Unreal Engine 4 Blueprints Tutorial
In this Unreal Engine 4 blueprints tutorial, you will learn how to use blueprints to create a player character, set up inputs and make an item disappear when the player touches it. By Ricardo Santos.
Sign up/Sign in
With a free Kodeco account you can download source code, track your progress, bookmark, personalise your learner profile and more!
Create accountAlready a member of Kodeco? Sign in
Contents
Unreal Engine 4 Blueprints Tutorial
25 mins
- Getting Started
- Creating the Player
- Attaching a Camera
- Representing the Player
- Spawning the Player
- Creating a Game Mode
- Placing the Player Start
- Setting Up Inputs
- Axis and Action Mappings
- Creating Movement Mappings
- Axis Value and Input Scale
- Moving the Player
- Using Variables
- Getting the Player Direction
- Adding the Offset
- Frame Rate Independence
- Actor Collisions
- Enabling Collision
- Creating an Item
- Setting the Collision Response
- Handling Collision
- Placing the Item
- Where to Go From Here?
Blueprints is the visual scripting system inside Unreal Engine 4 and is a fast way to start prototyping your game. Instead of having to write code line by line, you do everything visually: drag and drop nodes, set their properties in a UI, and drag wires to connect.
In addition to being a fast prototyping tool, Blueprints also makes it very easy for non-programmers to dive in and start scripting.
In this tutorial, you will use Blueprints to:
- Set up a top-down camera
- Create a player-controlled actor with basic movement
- Set up player inputs
- Create an item that disappears when the player touches it
This tutorial also makes basic use of vectors. If you are not familiar with vectors, I recommend this article on vectors at gamedev.net
This tutorial also makes basic use of vectors. If you are not familiar with vectors, I recommend this article on vectors at gamedev.net
- Part 1: Getting Started
- Part 2: Blueprints (you are here!)
- Part 3: Materials
- Part 4: UI
- Part 5: How To Create a Simple Game
- Part 6: Animation
- Part 7: Audio
- Part 8: Particle Systems
- Part 9: Artificial Intelligence
- Part 10: How to Create a Simple FPS
Getting Started
Download the starter project and unzip it. To open the project, go to the project folder and open BananaCollector.uproject.
You will see the scene below. This is where the player will move around and collect the items.

I have categorized the project files into folders for easier navigation, like you see here:

You can use the button highlighted in red above to show or hide the sources panel if you’d like.
Creating the Player
In the Content Browser, navigate to the Blueprints folder. Click the Add New button and select Blueprint Class.
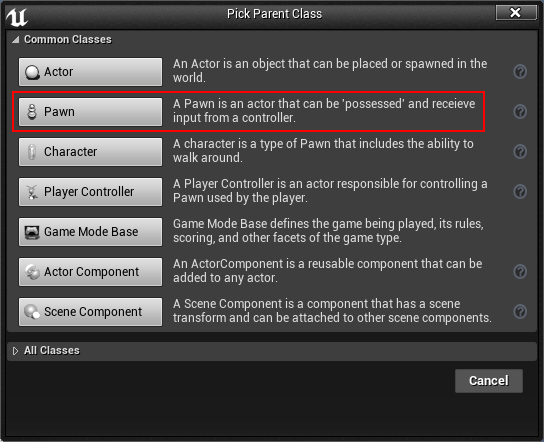
Since you want the actor to be able to receive inputs from the player, the Pawn class is fitting. Select Pawn from the pop-up window and name it BP_Player.

Attaching a Camera
A camera is the player’s method of looking into the world. You will create a camera that looks down towards the player.
In the Content Browser, double-click on BP_Player to open it in the Blueprint editor.
To create a camera, go to the Components panel. Click Add Component and select Camera.

For the camera to be in a top-down view, you need to place it above the player. With the camera component selected, go to the Viewport tab.
Activate the move manipulator by pressing the W key and then move it to (-1100, 0, 2000). Alternatively, you can type the coordinates into the Location fields. It is located under the Transform section in the Details panel.

If you have lost sight of the camera, press the F key to focus on it.
Next, activate the rotation manipulator by pressing the E key. Rotate the camera down to -60 degrees on the Y-axis.

Representing the Player
A red cube will represent the player so you will need to use a Static Mesh component to display it.
First, deselect the Camera component by left-clicking an empty space in the Components panel. If you don’t do this, the next added component will be a child of Camera.
Click Add Component and select Static Mesh.

To display the red cube, select the Static Mesh component and then go to the Details tab. Click on the drop-down located to the right of Static Mesh and select SM_Cube.

This is what you should see (you can hit F inside the Viewport to focus on this if you don’t see it):

Now, it’s time to spawn the player Pawn. Click Compile and go back to the main editor.
Spawning the Player
Before the player can control the Pawn, you need to specify two things:
- The Pawn class the player will control
- Where the Pawn will spawn
You accomplish the first by creating a new Game Mode class.
Creating a Game Mode
A Game Mode is a class that controls how a player enters the game. For example, in a multiplayer game, you would use Game Mode to determine where each player spawns. More importantly, the Game Mode determines which Pawn the player will use.
Go to the Content Browser and make sure you are in the Blueprints folder. Click the Add New button and select Blueprint Class.
From the pop-up window, select Game Mode Base and name it GM_Tutorial.

Now, you need to specify which Pawn class will be the default. Double-click on GM_Tutorial to open it.
Go to the Details panel and look under the Classes section. Click the drop-down for Default Pawn Class and select BP_Player.

Before you can use your new Game Mode, the level needs to know which Game Mode to use. You can specify this in World Settings. Click Compile and close the Blueprint editor.
Each level has their own settings. You can access the settings by selecting Window\World Settings. Alternatively, you can go to the Toolbar and select Settings\World Settings.

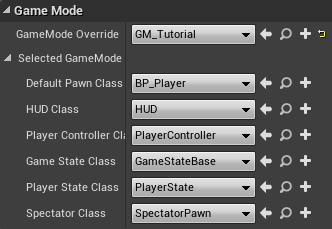
A new World Settings tab will open next to the Details tab. From here, click the drop-down for GameMode Override and select GM_Tutorial.

You will now see that the classes have changed to the ones selected in GM_Tutorial.

Finally, you need to specify where the player will spawn. You do this by placing a Player Start actor into the level.