Chipmunk Tutorial for iOS: How To Create A Simple iPhone Game
A Chipmunk tutorial that shows you how to create a fun and simple iPhone game called “Cat nap” with realistic physics! By Ray Wenderlich.
Sign up/Sign in
With a free Kodeco account you can download source code, track your progress, bookmark, personalise your learner profile and more!
Create accountAlready a member of Kodeco? Sign in
Sign up/Sign in
With a free Kodeco account you can download source code, track your progress, bookmark, personalise your learner profile and more!
Create accountAlready a member of Kodeco? Sign in
Contents
Chipmunk Tutorial for iOS: How To Create A Simple iPhone Game
40 mins
Starting from Scratch
So go to File\New\New File, choose iOS\Cocoa Touch\Objective-C class, and click Next. Enter CCLayer for Subclass of, click Next, name the new class ActionLayer.m, and click Finish.
Once that’s done, open up ActionLayer.h and replace it with the following:
#import "cocos2d.h"

@interface ActionLayer : CCLayer {

}

+ (id)scene;

@end
Here you’re creating just a standard CCLayer. We’ll eventually put the Chipmunk code in here, but for now it will just be blank.
Then switch to ActionLayer.m and replace it with the following:
#import "ActionLayer.h"

@implementation ActionLayer

+ (id)scene {
    CCScene *scene = [CCScene node];
    ActionLayer *layer = [ActionLayer node];
    [scene addChild:layer];
    return scene;
}

- (id)init {
    if ((self = [super init])) {
        CGSize winSize = [CCDirector sharedDirector].winSize;

        CCLabelBMFont *label = [CCLabelBMFont labelWithString:@"Hello, Chipmunk!" fntFile:@"Arial.fnt"];
        label.position = ccp(winSize.width/2, winSize.height/2);
        [self addChild:label];
    }
    return self;
}

@end
This code does the following:
- The scene method creates a CCScene, adds a single layer to it (ActionLayer), and returns it.
- The init method simply puts a label in the middle of the screen that says “Hello, Chipmunk!”
Note this uses CCLabelBMFont to display the text, because I’ve sworn off ever using CCLabelTTF again due to it’s insane slowness.
If you haven’t used CCLabelBMFont before, notice that the last parameter specifies a bitmap font to use to display the text – called Arial.fnt here.
If you’d like, you can create this your own bitmap font file using Glyph Designer (recommended) or Hiero, or you can download one I’ve already made in the resources for this tutorial.
Once you’ve either made a font file (or downloaded the one I made), add it to your project.
Once you’re done, open up AppDelegate.m and make the following changes:
// Add to top of file
#import "ActionLayer.h"

// Modify call to replaceScene at bottom of applicationDidFinishLaunching to the following
[[CCDirector sharedDirector] runWithScene: [ActionLayer scene]];
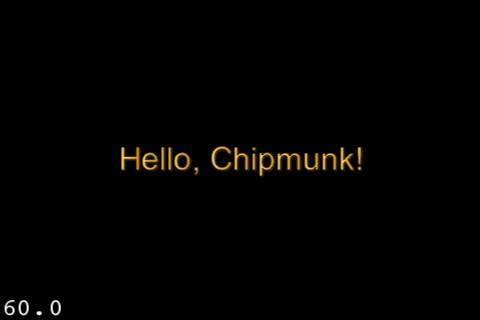
If all works well, you should see the the following:
At this point you have a “blank slate” that we can start adding the Chipmunk code to. Time for the fun stuff!
Creating a Basic Chipmunk Scene
There are seven steps to create a basic Chipmunk scene that you can use as a starting point for your projects.
Most of the time, I still follow these steps myself when making a new Chipmunk project, just to have a good “home base” to start from.
Rather than me blabbing on about it, let’s just practice doing each one, one at a time.
1. Initialize Chipmunk
The first step is to initialize the Chipmunk library. You should only do this once, so a good place is inside applicationDidFinishLaunching.
Let’s try this out. Open up AppDelegate.m and add the following changes:
// Add to top of the file
#import "chipmunk.h"

// In applicationDidFinishLaunching, right before call to runWithScene
cpInitChipmunk();
That’s it! This is probably the easiest thing you’ll do with Chipmunk, lol. You just have to remember that you should only call this once, otherwise you’ll get a memory leak.
2. Create Chipmunk space
The next step is to create a virtual Chipmunk space for it to run the physics simulation in.
There’s an object that represents the Chipmunk space called cpSpace – you just need to create it an initialize it.
Switch to ActionLayer.h and make the following modifications:
// At top of file
#import "chipmunk.h"

// Inside @interface
cpSpace *space;
Here you’re just importing the chipmunk header, and declaring an instance variable to keep track of the Chipmunk space, because you’ll be using it a lot!
Then switch to ActionLayer.m and make the following modifications:
// Add new method before init
- (void)createSpace {
    space = cpSpaceNew();
    space->gravity = ccp(0, -750);
    cpSpaceResizeStaticHash(space, 400, 200);
    cpSpaceResizeActiveHash(space, 200, 200);
}

// Comment out the lines that create the label in init, and add this:
[self createSpace];
As you can see, the important lines are in createSpace. The first line calls cpSpaceNew to create a new object for the Chipmunk virtual space, and stores it in the space instance variable.
The second line sets the Chipmunk gravity to be nothing along the x-axis, and a decent amount down on the y-axis. As for what values to put here, it’s really a matter of tweaking to whatever “feels right” for your game.
The final two lines create the Chipmunk static and active hashes. This is just an optimization Chipmunk uses to speed up collision detection.
It basically divides up the Chipmunk space into a grid. Then if two objects are in different grid cells, Chipmunk knows instantly they don’t collide, and doesn’t have to do any further math.
So with these calls you’re setting up the size of a grid cell (second parameter), and the number of grid cells (third parameter). The recommendation is to set the size of the grid cell bigger than your average object, and the number of grid cells at least 10x greater than the number of objects in your game.
For a simple games this won’t matter, but keep in mind this is something you may want to tweak if performance is critical for your game.
3. (Optional) Add “ground”
For many games, it can be helpful to add objects to your Chipmunk space to represent the ground of your level.
For example, in this minigame we’re going to create a line segment shape from the bottom left to the bottom right. This way, when we create an object it will collide with the ground, rather than falling right off the screen!
To add the ground, make the following modifications to ActionLayer.m:
// Add new method
- (void)createGround {
    // 1
    CGSize winSize = [CCDirector sharedDirector].winSize;
    CGPoint lowerLeft = ccp(0, 0);
    CGPoint lowerRight = ccp(winSize.width, 0);

    // 2
    cpBody *groundBody = cpBodyNewStatic();

    // 3
    float radius = 10.0;
    cpShape *groundShape = cpSegmentShapeNew(groundBody, lowerLeft, lowerRight, radius);

    // 4
    groundShape->e = 0.5; // elasticity
    groundShape->u = 1.0; // friction

    // 5
    cpSpaceAddShape(space, groundShape);
}

// Add inside init method, right after call to createSpace
[self createGround];
This is the first time you’ve seen how to add objects to the Chipmunk scene, so let’s go through this section by section.
- We’re going to make the ground as a line from the lower left of the screen to the lower right of the screen, so this gets the coordinates of these for future reference.
- Creates a new Chipmunk body – a static body, because it never moves. Usually you have to add the body to the scene, but you don’t have to for static bodies. In fact, if you do add it, it will cause dynamic bodies to fall through the ground! I’m not actually sure why this is, so if anyone knows please chime in.
- Creates a new segment shape and associates it to the body just created.
- Sets the elasticity to be somewhat bouncy, and the friction to be not very slippery.
- Adds the shape to the Chipmunk space.
4. (Optional) Add bodies/shapes
Next, we’re going to create a helper routine to add a dynamic (movable) Chipmunk body to the scene, and call it a few times to create a few boxes.
// Add new method
- (void)createBoxAtLocation:(CGPoint)location {

    float boxSize = 60.0;
    float mass = 1.0;
    cpBody *body = cpBodyNew(mass, cpMomentForBox(mass, boxSize, boxSize));
    body->p = location;
    cpSpaceAddBody(space, body);

    cpShape *shape = cpBoxShapeNew(body, boxSize, boxSize);
    shape->e = 1.0;
    shape->u = 1.0;
    cpSpaceAddShape(space, shape);

}

// Add in init, after call to createGround
[self createBoxAtLocation:ccp(100,100)];
[self createBoxAtLocation:ccp(200,200)];
This should look pretty similar to step 3, with two main differences.
The first difference is instead of calling cpBodyNewStatic, you’re just calling cpBodyNew to create a dynamic (movable) body.
Notice how when you call cpBodyNew you have to pass in mass and a “moment of inertia.” We’ve already talked about mass, and the “moment of inertia” has to do with how hard a body is to rotate. To figure out what to put for that parameter, you can just call a helper routine to calculate it, based on the type of shape(s) you’re adding to the body.
The second difference is it’s creating a box shape instead of a segment shape, so it calls cpBoxShapeNew (which takes a width and height) rather than cpSegmentShapeNew.
So we can call this routine twice to add two different bodies to the scene, just to have something to play around with for now.
5. Step sim in update loop
We need to give Chipmunk time to perform the simulation every frame. I’ll show you the simplest possible way to do this now – later on in the article I’ll discuss a better way.
// In init after calls to createBoxAtLocation
[self scheduleUpdate];

// Add new method
- (void)update:(ccTime)dt {
    cpSpaceStep(space, dt);
}
The first thing we do here is call scheduleUpdate in the initializer, which tells Cocos2D to call a method on the layer (update) every frame.
The update method then simply gives Chipmunk time to run the simulation, by calling cpSpaceStep.
6. (Optional) Enable debug draw
At this point the simulation would actually run, but you would’t see anything on the screen.
To visualize what’s going on in the Chipmunk virtual space, you can use some classes that draw visual representations of the Chipmunk bodies to the scene. It works by looping through each Chipmunk body, and then drawing a representation to the screen using OpenGL commands.
Let’s try this out. Inside the resources for this tutorial under “Helper Code”, you’ll find drawSpace.c and drawSpace.h. Drag these into your project, make sure “Copy items into destination group’s folder (if selected)” is checked, and click Finish.
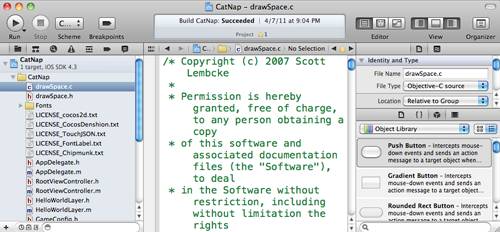
Important step: drawSpace.c won’t compile correctly unless you change a setting on it first. To do this in Xcode 4, select drawSpace.c, then click the third tab in the toolbar’s “View” section to bring up the Utilities window. In the dropdown for “File Type”, change the entry from “Default – C source” to “Objective-C source”, as you can see in the screenshot below.
Next, switch to ActionLayer.m and add this to the top of the file:
#import "drawSpace.h"
Then implement the draw method to call the helper routine in drawSpace.c/h as follows:
- (void)draw {

    drawSpaceOptions options = {
        0, // drawHash
        0, // drawBBs,
        1, // drawShapes
        4.0, // collisionPointSize
        4.0, // bodyPointSize,
        2.0 // lineThickness
    };

    drawSpace(space, &options);

}
As you can see here, the first step is to tell the function what it should draw. Here we tell it not to draw a visualization of the Chipmunk hash (which I don’t think works on the iPhone anyway), not to draw the bounding boxes, but to draw the shapes themselves (the most important part). It also sets some values for the point sizes and line thickness.
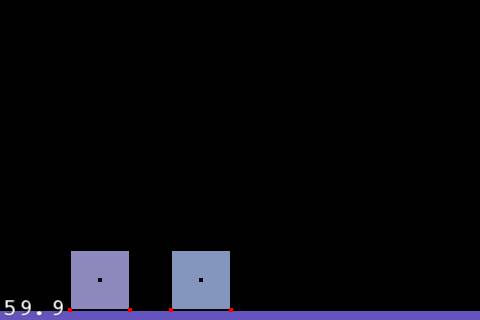
At this point, you can finally compile and run! If all goes well, you should see a few bodes fall onto the ground, bounce a bit, and then settle down:
But unfortunately after the boxes drop, they just sit there forever. It would be cool (and useful for debugging) if we could move the objects around by dragging them, so let’s add that next!
7. (Optional) Add mouse joints
Inside the resources for this tutorial under “Helper Code”, you’ll find cpMouse.c and cpMouse.h. Drag these into your project, make sure “Copy items into destination group’s folder (if selected)” is checked, and click Finish.
After adding the files, change the file type for cpMouse.c to “Objective-C source” the same way you did for drawSpace.c.
Then open up ActionLayer.h and make the following changes:
// At top of file
#import "cpMouse.h"

// Inside @interface
cpMouse *mouse;
This just imports the header file, and makes an instance variable to keep track of the mouse joint.
Next switch to ActionLayer.m and make the following changes:
// Inside init, after call to scheduleUpdate
mouse = cpMouseNew(space);
self.isTouchEnabled = YES;

// Add new methods
- (void)registerWithTouchDispatcher {
    [[CCTouchDispatcher sharedDispatcher] addTargetedDelegate:self priority:0 swallowsTouches:YES];
}

- (BOOL)ccTouchBegan:(UITouch *)touch withEvent:(UIEvent *)event {
    CGPoint touchLocation = [self convertTouchToNodeSpace:touch];
    cpMouseGrab(mouse, touchLocation, false);
    return YES;
}

- (void)ccTouchMoved:(UITouch *)touch withEvent:(UIEvent *)event {
    CGPoint touchLocation = [self convertTouchToNodeSpace:touch];
    cpMouseMove(mouse, touchLocation);
}

- (void)ccTouchEnded:(UITouch *)touch withEvent:(UIEvent *)event {
    cpMouseRelease(mouse);
}

- (void)ccTouchCancelled:(UITouch *)touch withEvent:(UIEvent *)event {
    cpMouseRelease(mouse);
}

- (void)dealloc {
    cpMouseFree(mouse);
    cpSpaceFree(space);
    [super dealloc];
}
This should be pretty self-explanatory – it enables touch handling, then calls some methods in the helper code to initialize the mouse joint, grab something on a touch down, move it on a touch move, and release it on a touch ended or cancelled.
Compile and run your code, and now you should be able to move objects around by dragging them!


