Android App Bundles: Play Feature Delivery
Learn how to configure your app for Play Feature Delivery which uses advanced capabilities of app bundles, allowing certain features of your app to be delivered conditionally or downloaded on demand. By Harun Wangereka.
Sign up/Sign in
With a free Kodeco account you can download source code, track your progress, bookmark, personalise your learner profile and more!
Create accountAlready a member of Kodeco? Sign in
Sign up/Sign in
With a free Kodeco account you can download source code, track your progress, bookmark, personalise your learner profile and more!
Create accountAlready a member of Kodeco? Sign in
Sign up/Sign in
With a free Kodeco account you can download source code, track your progress, bookmark, personalise your learner profile and more!
Create accountAlready a member of Kodeco? Sign in
Contents
Android App Bundles: Play Feature Delivery
30 mins
- Getting Started
- Understanding Play Feature Delivery
- Enabling Play Feature Delivery
- Creating a Dynamic Feature Modules
- Specifying Delivery Type
- Modularizing Your Android App
- Manifest Configurations
- Looking at Delivery Types
- On-Demand Delivery
- Install-time Delivery
- Conditional Delivery
- Instant Delivery
- Configuring Install-Time Modules
- Configuring On-Demand Delivery Modules
- Downloading an On-Demand Module
- Initiating Download of On-Demand Modules
- Deploying On-Demand Modules
- Testing On-Demand Modules Locally
- Configuring Instant Apps
- Deploying Instant Apps to a Physical Device
- Deploying Instant Apps to Google Play Store
- Creating a Play Instant Release
- Where To Go From Here?
In 2018, Android introduced the possibility of delivering apps not only in APK format but also Android App Bundle (AAB). As of August 2021, Android now requires developers to release all their apps as AABs only. Play Feature Delivery uses the advanced capabilities of app bundles.
Play Feature Delivery lets apps larger than 150 MB enable and download features without including them in the main package.
In this tutorial, you’ll build PlayFeatureDelivery, an app that shows pictures of cats and dogs. During the process you’ll learn about:
- Dynamic feature modules.
- On-Demand, install-time, conditional and instant delivery types.
- Configuring, deploying and downloading on-demand modules.
- Testing On-Demand modules locally.
- Configuring and deploying instant apps.
Getting Started
Download the starter project by clicking the Download Materials button at the top or bottom of the tutorial.
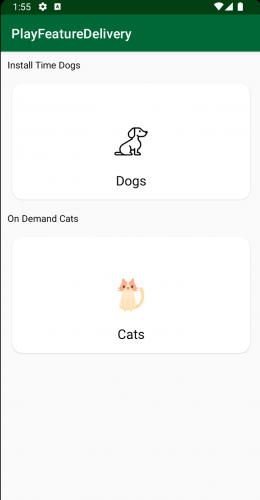
Open Android Studio Arctic Fox or later and import the starter project. Then, build and run the project. You’ll see the following screen:
The app shows two CardViews, one for dogs and one for cats. Currently, nothing happens when you tap the CardViews. Don’t worry: You’ll add functionality to handle that in this tutorial.
Before you get started, take a moment to learn more about Play Feature Delivery.
Understanding Play Feature Delivery
Play Feature Delivery lets you customize the delivery of features in your app, which is especially helpful for larger apps. It helps you customize the delivery of such features.
You can set some features as available at install-time and make others available as users needs them. You can also provide features according to devices.
For example, say you have an app with a feature that requires augmented reality functionality. Currently, not all devices have the hardware to support this. Instead of shipping this feature to all devices, you can target devices with augmented reality support.
This way, only devices with augmented reality support will download the augmented reality feature. By targeting only those users who can use that feature, you’ll reduce your app’s download size. Users will only download features they can use on their device and ones they’ll need.
Enabling Play Feature Delivery
By default, AABs support Play Feature Delivery. Before you begin, you need to learn more about Dynamic Feature Modules.
Dynamic Feature Modules let you separate features from your base app. They provide a variety of configuration options to customize when features are available on your app. You’ll create your first dynamic feature module next.
Creating a Dynamic Feature Modules
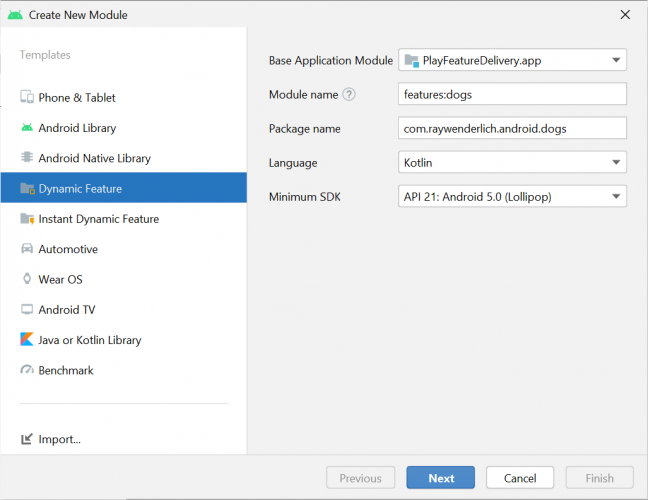
To create a Dynamic Feature Module, go to File ▸ New ▸ New Module. You’ll see this:
As you can see, there are many types of modules you can create for your project. Select the Dynamic Feature option and you’ll see the configuration options. You need to:
- First, specify your app base module. By default, it’s the app module, but if your name is different, you specify the name here.
- Then, set the module name. In this case, it’s features:dogs. You’ll add functionality to fetch dog images on this module.
- Appending features: Before the module name creates a package with that name which helps you group all your feature modules into one package.
- Then, add the package name for your module. Notice the package name is like the app module but the name is different.
- Set the language for your module as Kotlin. You have a choice of Java or Kotlin.
- Finally, specify the Minimum SDK version for your module. Always make sure the version is the same as that of your base module. If you don’t, you’ll have to deal with build failures.
Specifying Delivery Type
Click Next and you’ll see the final step for creating your dynamic feature module:
In this step, you have to specify your module title and install-time inclusion which is a drop down list. The list has three options:
- Do not include module at install-time (on-demand only).
- Include module at install-time.
- Only include module at install-time for devices with specified features.
Select the second option, which makes your module available when a user downloads the app. You’ll take a closer look at the other options later in this tutorial.
Only devices running Android 5.0 (API level 21) and higher support downloading and installing features on demand. To make your feature available to earlier versions of Android, enable Fusing when creating a feature module.
Click Finish and wait for Gradle sync to complete. Your project now looks like this:
You have the app and shared modules as well as the features package, which includes the dogs modules. Later, you’ll add one more module to this package.
The shared module contains all shared functionality, like making network calls, and code that all modules will need, making it easy to share code across. It also prevents you from writing repetitive code across all modules.
Modularizing Your Android App
Currently, your app has several modules making it a multi-modular architecture. For a project with a large number of features and a large team, modularizing your app has the following benefits:
- You can achieve a separation of concerns by having modules that only have data, domain or presentation logic.
- Teams can work on features in parallel without affecting another team’s work.
- Your codebase is easier to test.
- It’s also easier to reuse common code.
- Configuring delivery types is easier with this architecture in place.
This list highlights some of the advantages of modularizing your app. There’s no definitive way of creating the module’s structure because it’s dependent on the individual team. The team has to weigh the pros and cons of modularizing the app before starting.
Next, you’ll look at the manifest file Android Studio generates when you create the dog’s module.
Manifest Configurations
Navigate to features/dogs. Open AndroidManifest.xml and you’ll see:
<!--1-->
  <dist:module
    dist:instant="false"
    dist:title="@string/title_dogs">
<!--2-->
    <dist:delivery>
      <dist:install-time />
    </dist:delivery>
<!--3-->
    <dist:fusing dist:include="true" />
  </dist:module>
Here’s a code breakdown:
- Here, you specify your module and if your app is an instant app.
- Then, you set the delivery type for your module to
install-timewhile creating the module. - You add the fusing behavior for your app. Setting it to
truelets Android 4.4 and lower devices include this module. These devices don’t support dynamic feature modules.
Android Studio creates this configuration for you when you create the modules. If you need to change them, you can always edit your AndroidManifest.xml.
You’ve seen how to configure your AndroidManifest.xml, but what configurations options are available? You’ll dive into these options in the next section.


