Introduction to Unity Animation
In this tutorial, you’ll learn the ins and outs of Unity animation by tossing pies at belligerent clowns. By Barbara Reichart.
Sign up/Sign in
With a free Kodeco account you can download source code, track your progress, bookmark, personalise your learner profile and more!
Create accountAlready a member of Kodeco? Sign in
Sign up/Sign in
With a free Kodeco account you can download source code, track your progress, bookmark, personalise your learner profile and more!
Create accountAlready a member of Kodeco? Sign in
Contents
Introduction to Unity Animation
30 mins
- Getting Started
- A Moving Target – Your First Animation
- Editing an Animation Clip
- Animating Sound
- Your Turn
- Manipulating Animation Curves
- Switching Between Animations – State Machines 101
- Your First Transition
- Just do it! – The Any State
- Control State Switches Using Parameters and Conditions
- Types of Parameters and Combining Conditions
- Bull’s Eye – Combine Animations and C# Scripts
- Trigger an Animation From Code
- State Machine Behaviors: React to State Changes in Your Scripts
- Animation Events: Trigger Code From Your Animation
- Where to Go From Here?
Games with animations feel more polished and fun. Fortunately, Mecanim, Unity’s animation system, provides ample possibilities for animating GameObjects. In this tutorial, you will learn the basics of animation by throwing cake at a moving clown.
You’ll learn how to
- Create animations
- Use a state machine to switch between animations
- Connect animations to scripts
By the end of the tutorial, you will be able to spice up your own game — with or without clowns :]
Getting Started
Download the starter project and open it in Unity. It provides you with some initial graphic and audio assets, along with a Scene that already lets you throw cake around. Fun!
Licensed under Creative Commons: By Attribution 3.0
http://creativecommons.org/licenses/by/3.0/
In order to follow the tutorial more easily, select the Default layout from the drop-down menu in the top right corner. Unity should now look something like this:
Double-click on GameScene in the Project Browser, then hit the Play button at the top to run the starter project. You’ll see a colorful background. Click on it to throw a piece of cake! The cake is animated using physics, which is not part of this tutorial. You can learn more about Unity physics here.
Your basic project is now up and running. Ready – Set – Cake!
A Moving Target – Your First Animation
Now to add a clown. Align your Scene View to the Camera’s view by selecting the Main Camera in the Hierarchy and choosing GameObject\Align View to Selected from the menu.
Drag and drop Models\Clown from the Project Browser into the Hierarchy.
In the Inspector, make sure the Position is set to (0, 0, 0). Change the Rotation to (0, 180, 0):
Time to create your first animation. The clown should move to the left, then to the right and finally back to its starting position.
From the menu, select Window\Animation. This view lets you create and manipulate animations. Drag and drop it next to the Console View.
In the Hierarchy, make sure the Clown is still selected. In the Animation View you will see text reading, “To begin animating Clown, create an Animator and an Animation Clip.” Press the Create button below. In the file dialog enter MoveHorizontally as the file name and press Save.
As a result, Unity creates two files: MoveHorizontally.anim and Clown.controller. Additionally, it adds an Animator Component to the Clown (1), which points to the Clown.controller (2):
For now, you only need to focus on MoveHorizontally. This is the Animation Clip that allows you to animate several properties of your clown, such as:
- Position, rotation, and scale
- Material color and light intensity
- Volume of a sound
- Variables in your own scripts
You do this using the Animation View. It is fairly complex, so take a look at the most important areas:
- Property List to add or remove the properties to animate.
- Time Line to preview or modify a specific frame (sample) of the Animation Clip. The numbers correspond to seconds and samples, so 3:14 means 3 seonds and 14 samples.
- Dope Sheet for an overview of the keyframe timing for multiple properties.
Editing an Animation Clip
There are several ways to change property values in an Animation Clip. First, change the property directly to make the clown move to the left.
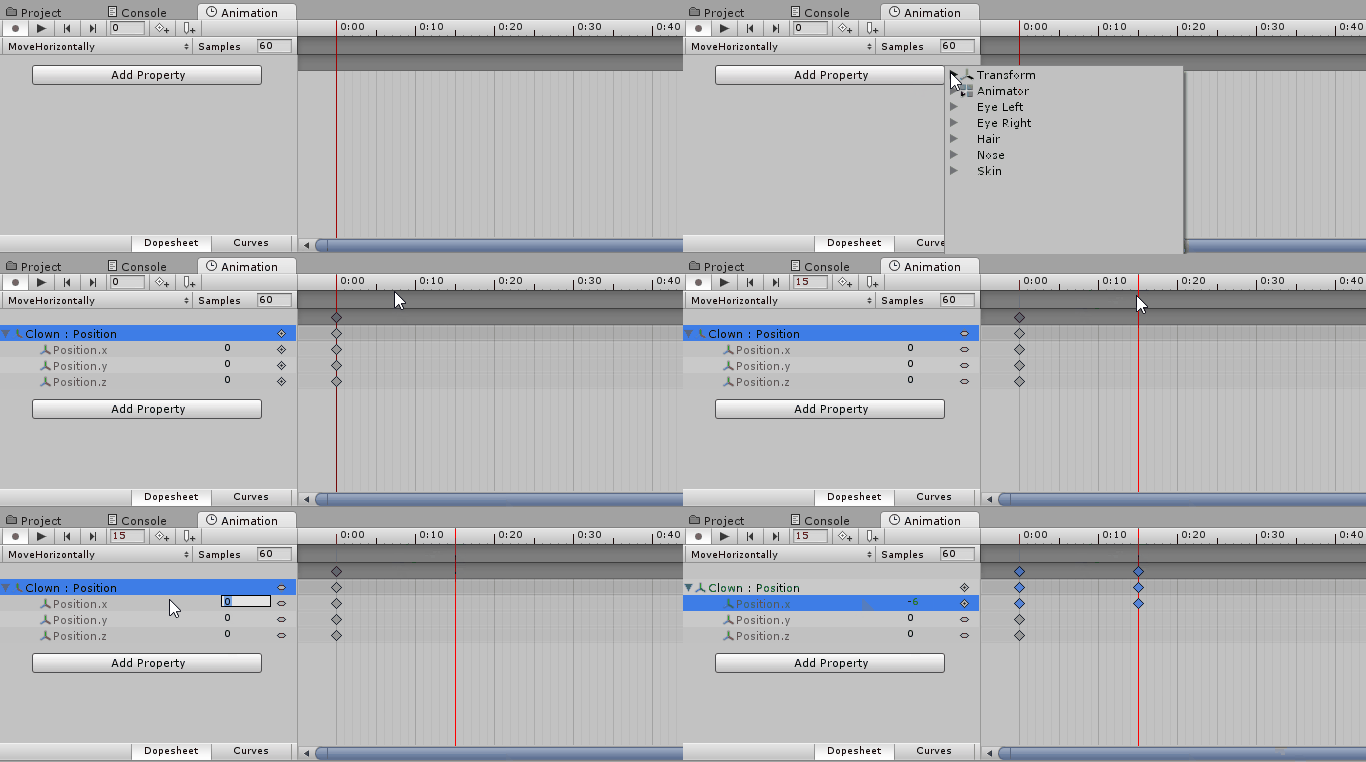
In the Animation View, click Add Property. From the drop-down menu select Transform\Position and click on the plus sign. In the Property List unfold Clown: Position by clicking on the tiny arrow to its left. Now the position has an x, y, and z coordinate — just what you’d expect for a 3D game.
Click on the animation’s Time Line and select a time around 0:15 to modify the clown’s position at this time during the animation. In the Property List click on the number after Position.x and enter -6. This adds a keyframe that changes the property’s value at this particular time.
Now to check out another way to edit Animation Clips, this time by making the clown move to the right. In the Time Line, select a time around 0:45. Go to the Inspector and set Position x to 6. You will see that Unity adds another keyframe to the timeline.
Play the animation by pressing the play button in the Animator View. Hm, it’s running a bit too fast for our poor cake-throwing skills. Fix this by setting Samples to 12. Run the animation again — the clown’s a much easier target now.
You did it! You created your first animation :] Time to create another.
Animating Sound
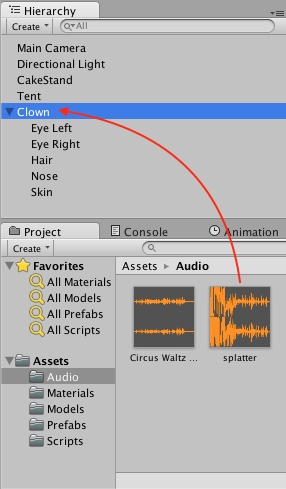
When the clown gets hit, you’ll want to play a sound. Make sure to first stop the animation recording mode, then drag and drop Audio/splatter from the Project Browser onto the Clown GameObject in the Hierarchy.
Select the Clown in the Hierarchy. In the Inspector, you’ll see that this added an Audio Source Component to the Clown. Disable the Audio Source by clicking on the check box in its top left corner. You only want to enable the sound when the clown is actually hit. Also, the sound is a bit loud, so set its Volume to 0.25. The result:
Time to play the sound from within the Animation Clip. In the Animation View, click on MoveHorizontally. From the drop-down select Create new Clip.
In the file dialog, name it Hit and click Save.
Click record in the Animation View. In the Time Line, move the playback head to 0:10, then in the Inspector enable the Audio Source by activating the checkbox in its top left corner. Repeat at 1:00, but now disable it. Take note: when you hit play in the Animation View, you will not hear the sound.
Observing changes to properties other than position and scale can be difficult. Use the Keyframe Navigation highlighted in the image below to check that the Audio Source toggles between enabled and disabled.


