Android GridView Tutorial
In this Android GridView tutorial, you will build an app using a GridView and learn how to customize it to create a beautiful user interface. By Brian Voong.
Sign up/Sign in
With a free Kodeco account you can download source code, track your progress, bookmark, personalise your learner profile and more!
Create accountAlready a member of Kodeco? Sign in
Sign up/Sign in
With a free Kodeco account you can download source code, track your progress, bookmark, personalise your learner profile and more!
Create accountAlready a member of Kodeco? Sign in
Contents
These days, people are always being told to relax, go off-grid and put their smartphones down. But where’s the fun in that? I’m here to encourage you not to get off the grid. Instead, get onto our grid—our Android GridView tutorial, that is!
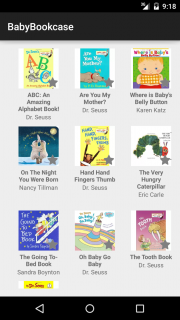
Today you’ll learn how to tame this widely-used Android component and construct your own Bookcase application containing various books for babies.
If you’re familiar with Android’s ListView component, you should feel right at home here. We also have a great tutorial on ListViews if you’d like to familiarize yourself with them first (although you don’t need to for this tutorial).
GridView follows the same formula to render each cell. Basically, you:
- Create a
BaseAdaptersubclass. - Set an instance of this class as your data provider to the
GridView. - Return each cell’s view from
getView()on your adapter.
Android’s GridView is a useful component for constructing easy-to-browse lists. And since grids are everywhere these days (notably in the Instagram app) it’s a necessary skill. After completing this tutorial, you’ll be ready to conquer the world with your own amazing grid views!
Getting Started
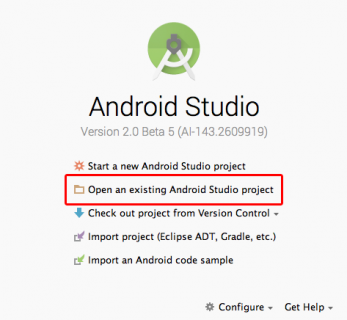
Download the starter project here. Included are the image assets for each book and a list of Book objects describing the contents of our Baby Bookcase. Open the project by starting Android Studio and selecting Open an existing Android Studio project:
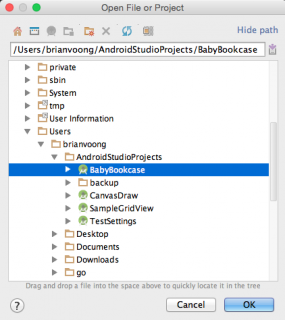
Navigate to the directory where you unzipped the sample project and hit OK:
Build and run the project on your preferred emulator or Android device—you should see the most amazing blank screen ever:
You are now ready to start integrating your GridView.
Navigate to app\res\layout\activity_main.xml and insert the following block of XML between the RelativeLayout tags (make sure to view the file as “Text” by clicking the tab near the bottom):
<GridView
    android:id="@+id/gridview"
    android:layout_width="match_parent"
    android:layout_height="match_parent"
    android:gravity="center"
    android:columnWidth="100dp"
    android:numColumns="auto_fit"
    android:verticalSpacing="24dp"
    android:horizontalSpacing="10dp"
    android:stretchMode="spacingWidthUniform"
    />
Your editor should now show a preview of your GridView:
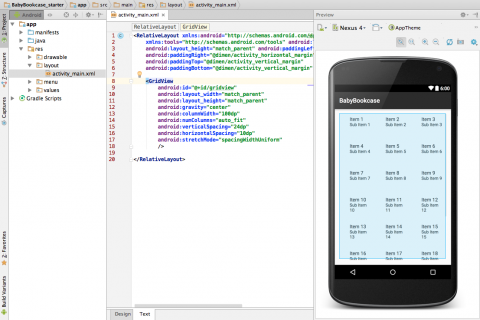
The snippet above specifies a GridView with some customized properties. We’ll discuss property customization in more detail later on.
Setting The Data Provider
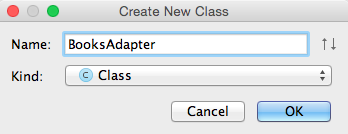
Empty grids are hungry for data to display. To feed this one, you’ll set up a class called BooksAdapter, an adapter which is a subclass of the BaseAdapter class, as your data provider for the GridView. In the project navigator pane, right-click on com.raywenderlich.babybookcase, and select New/Java Class. After that, type in BooksAdapter for Name, keep Class for Kind, and hit OK.
The adapter acts as the middleman between the GridView and the data source. It loads the information to be displayed in your grid view from a data source, such as an array or database query, then creates a view for each item. If you’re interested, the ListView tutorial has more information on adapters.
Replace the contents of this file with the following:
package com.raywenderlich.babybookcase;

import android.content.Context;
import android.view.View;
import android.view.ViewGroup;
import android.widget.BaseAdapter;
import android.widget.TextView;

public class BooksAdapter extends BaseAdapter {

  private final Context mContext;
  private final Book[] books;

  // 1
  public BooksAdapter(Context context, Book[] books) {
    this.mContext = context;
    this.books = books;
  }

  // 2
  @Override
  public int getCount() {
    return books.length;
  }

  // 3
  @Override
  public long getItemId(int position) {
    return 0;
  }

  // 4
  @Override
  public Object getItem(int position) {
    return null;
  }

  // 5
  @Override
  public View getView(int position, View convertView, ViewGroup parent) {
    TextView dummyTextView = new TextView(mContext);
    dummyTextView.setText(String.valueOf(position));
    return dummyTextView;
  }

}
Here’s the play-by-play of each step in the above code:
- You use this constructor to instantiate a
BooksAdapter. - You return the number of cells to render here.
- You don’t need to return an
idfor this tutorial, so just return0. Android still requires you to provide an implementation for this method. - See #3, but instead return
null. - You return a dummy
TextViewas the cell view for yourGridView.
Now that you have a basic adapter implementation, you can use this class as the data provider for the GridView in MainActivity. Within onCreate() in MainActivity.java, underneath
setContentView(R.layout.activity_main);
insert the following:
GridView gridView = (GridView)findViewById(R.id.gridview);
BooksAdapter booksAdapter = new BooksAdapter(this, books);
gridView.setAdapter(booksAdapter);
Build and run. You should see something like this:
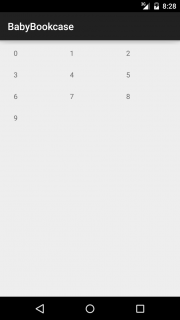
Great—we’re getting somewhere!
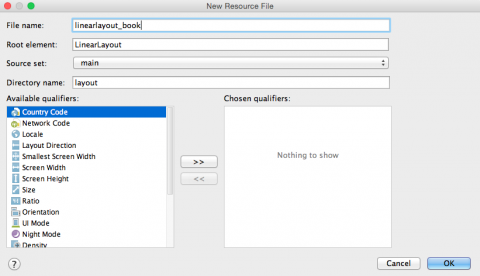
To provide the proper view for the cells that represent each Book object, create a new XML layout file by right-clicking on the layout directory and selecting New/Layout resource file:
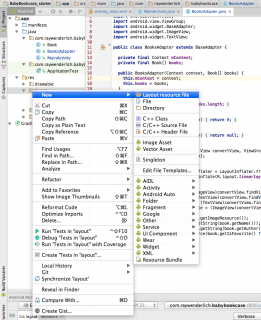
Use linearlayout_book as the file name and hit OK:
Replace the file contents with the following:
<LinearLayout xmlns:android="http://schemas.android.com/apk/res/android"
              xmlns:tools="http://schemas.android.com/tools"
              android:orientation="vertical" android:layout_width="match_parent"
              android:layout_height="match_parent"
              android:gravity="center"
    >

    <FrameLayout
        android:layout_width="wrap_content"
        android:layout_height="wrap_content">

        <ImageView
            android:id="@+id/imageview_cover_art"
            android:layout_width="wrap_content"
            android:layout_height="wrap_content"
            android:scaleType="centerCrop"/>

        <ImageView
            android:id="@+id/imageview_favorite"
            android:layout_width="24dp"
            android:layout_height="24dp"
            android:src="@drawable/star_disabled"
            android:layout_gravity="bottom|right"/>

    </FrameLayout>

    <TextView
        android:id="@+id/textview_book_name"
        android:layout_width="wrap_content"
        android:layout_height="wrap_content"
        android:textSize="12sp"
        tools:text="Are You My Mother"
        android:textStyle="bold"
        android:paddingTop="4dp"
        android:paddingLeft="8dp"
        android:paddingRight="8dp"
        android:gravity="center_horizontal"/>

    <TextView
        android:id="@+id/textview_book_author"
        android:layout_width="wrap_content"
        android:layout_height="wrap_content"
        android:textSize="12sp"
        tools:text="Dr. Seuss"
        android:gravity="center_horizontal"/>

</LinearLayout>
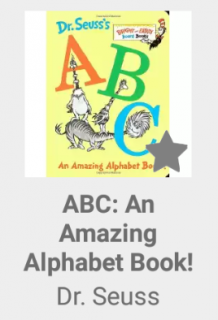
This new layout file will be used to represent your Book objects inside the grid. Each book will be drawn inside a cell that contains four items:
- An
ImageViewfor the cover art. - Another
ImageViewfor a “favorited” star icon. - A
TextViewfor the book name. - Another
TextViewfor the book’s author.
Here’s a sample of what a book cell will look like:
Now that your layout is established, you can return a more complex view for your cells. Open BooksAdapter.java again and finish the implementation of getView() by replacing it with the following:
@Override
public View getView(int position, View convertView, ViewGroup parent) {
  // 1
  final Book book = books[position];

  // 2
  if (convertView == null) {
    final LayoutInflater layoutInflater = LayoutInflater.from(mContext);
    convertView = layoutInflater.inflate(R.layout.linearlayout_book, null);
  }

  // 3
  final ImageView imageView = (ImageView)convertView.findViewById(R.id.imageview_cover_art);
  final TextView nameTextView = (TextView)convertView.findViewById(R.id.textview_book_name);
  final TextView authorTextView = (TextView)convertView.findViewById(R.id.textview_book_author);
  final ImageView imageViewFavorite = (ImageView)convertView.findViewById(R.id.imageview_favorite);

  // 4
  imageView.setImageResource(book.getImageResource());
  nameTextView.setText(mContext.getString(book.getName()));
  authorTextView.setText(mContext.getString(book.getAuthor()));

  return convertView;
}
Here’s an explanation of each step:
- You find the proper book for this cell by using the
positionindex. -
GridViewoptimizes memory usage by recycling the cells. This means that ifconvertViewis null, you instantiate a new cell view by using aLayoutInflaterand inflating your linearlayout_book layout. - You create references for each individual view you created in your XML layout file.
- You set the book’s cover art, name and author using the above references.
Build and run the application again. You should see the following:
