Using Framer to Prototype iOS Animations
Learn how to use Framer to quickly and easily prototype iOS Animations. By Lea Marolt Sonnenschein.
Sign up/Sign in
With a free Kodeco account you can download source code, track your progress, bookmark, personalise your learner profile and more!
Create accountAlready a member of Kodeco? Sign in
Sign up/Sign in
With a free Kodeco account you can download source code, track your progress, bookmark, personalise your learner profile and more!
Create accountAlready a member of Kodeco? Sign in
Contents
Using Framer to Prototype iOS Animations
35 mins
- Getting Started
- Creating a New Prototype
- Your First Framer Animation
- Using Framer to Recreate an Animation
- Deselected
- Selected
- Transitioning from Deselected to Selected
- Transitioning from Selected to Deselected
- Laying Things Out
- Deselected State
- Adding Icons and Titles
- Refactoring
- Transitioning to Selected State
- Finishing Touches
- Animation Settings
- Where to Go From Here?
Animation Settings
You can animate every layer in Framer; you can fine tune the animation by setting the following values:
-
properties:
width,height,scale,borderRadiusand others; the layer will animate from whatever state it is in to what you define here. - time: How long the animation lasts.
- delay: If there should be a delay before the animation, and how long the delay should be.
- repeat: How many times to repeat the animation.
- curve: How fast the animation should run.
- curve options: Fine-tuning options for the animation curve.
The most confusing two above are the curve and the curve options setting. You can use this tool to prototype animation curves with options: Framer.js Animation Playground.
Since you haven’t defined an animation curve for any of the animations, the prototype uses Framer’s default curve, ease:
This curve makes the prototype look stiff and unnatural. The curve you want is a spring curve that lets you have more control over what happens at each step of the transformation.
Time to translate the words used to describe these animations into numbers through the curveOptions settings.
This animation calls for a simple spring curve with the following parameters:
- tension: How “stiff” the curve should be. The bigger the number, the more speed and bounce the animation should have.
- friction: How much resistance to apply. The bigger the number, the more damped the animation will be.
- velocity: The initial velocity of the animation.
Often you won’t just know what these numbers are. You will have to play around until you’re satisfied.
There are two animations with different speeds going on here:
Animating the menus: Starts slow, speeds up a lot, then slows down dramatically:
Animating the icon and title: The icon size goes from 100% to 0%, and the animation is fairly sudden. It starts fast, but finishes with a lot of damping:
Compared to the previous animation, this one has a lot less tension and the transitions between the different speeds are quicker. Give it a similar friction number for that nice damping effect and a small initial velocity.
Add the following just before menuItems.push(menuItem):
menuItem.states.animationOptions =
	curve: "spring"
	curveOptions:
		tension: 200
		friction: 25
		velocity: 8
	time: 0.25
This sets a spring animation for the menus and sets tension to 200, friction to 25, and velocity to 8. It runs just a little faster than the icon and title animations.
Find each instance of sublayer.animate, and add the following under the time line in the properties section, matching the indentation:
curve: "spring"
curveOptions:
	tension: 120
	friction: 18
	velocity: 5
This will add a similar spring animation to the titles and icons, but they will be a little less springy and move a little slower than the menu sections.
You’ll add this code in four times in total: twice under collapse and twice under expand for both the icon and the title subLayers.
To compare your results, here’s an example of the collapse function with the required indentation:
collapse = (currentItem) ->
	for menuItem in menuItems
		for sublayer in menuItem.subLayers
			if sublayer.name is "icon"
				sublayer.animate
					properties:
						scale: 0
						opacity: 0
					time: 0.3
					curve: "spring"
					curveOptions:
						tension: 120
						friction: 18
						velocity: 5
			if sublayer.name is "title"
				sublayer.animate
					properties:
						y: collapsedMenuHeight/2
					time: 0.3
					curve: "spring"
					curveOptions:
						tension: 120
						friction: 18
						velocity: 5
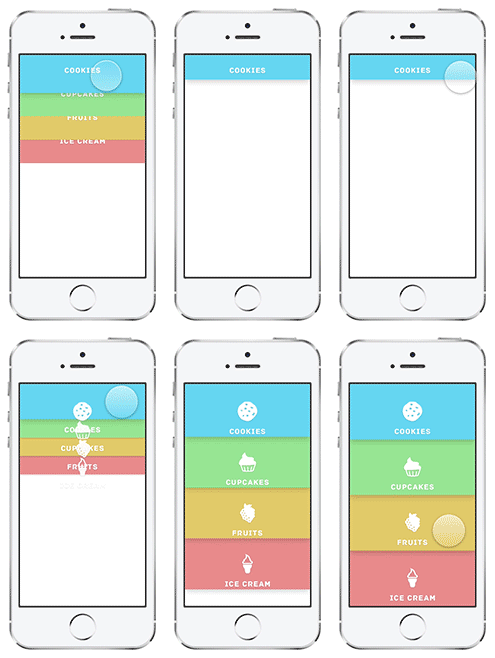
Here’s how things should look after you’re done:
Where to Go From Here?
And that’s a wrap! Congrats on your first Framer prototype :]
You can download the finished project here. It goes a bit further than this tutorial in that it shows you how to display the cards inside each menu item as well. The complete project, along with this same prototype created in Xcode + Swift are included.
- To learn more about Framer, check out their documentation and learning resources, and their medium articles and tutorials.
- Framer layers can respond to many other events such as panning, swiping and pinching. To learn more about these events, check out the Framer event documentation at: https://framerjs.com/getstarted/guide/#events/.
- To learn more about what you can do with states, check out http://framerjs.com/learn/basics/states/.
- To learn more about curves are and how they’re used, take a look at Framer’s Easing Curves under the Animate section.
- To learn more about animation curves, and other advanced animation techniques in Framer, have a read through their Animation Documentation.
- You can also check out UI Movement for some interactive UI inspiration.
- Finally, you can learn more about animation with Swift and Xcode with our book iOS Animations by Tutorials.
If you have any questions or comments on this tutorial, please feel free to join the discussion in the forums below!


