Using Framer to Prototype iOS Animations
Learn how to use Framer to quickly and easily prototype iOS Animations. By Lea Marolt Sonnenschein.
Adding Icons and Titles
Now let’s add some icons and titles to your menus, starting with the cookie menu.
Add the following code to the end of your file:
cookieIcon = sketch.Cookie
cookieIcon.superLayer = cookieMenu

cookieText = sketch.CookieText
cookieText.superLayer = cookieMenu
This adds two new variables: cookieIcon and cookieText and sets them equal to the corresponding sketch layers, Cookie and CookieText. You then set the superLayer of both to container.
Your next task is to position these layers now. cookieIcon should go in the center of its superLayer, and cookieText should center horizontally, but position itself 4/5ths of the way down its superLayer. The icon should go in the center of the layer’s superLayer.
Add the following code to center the icon:
cookieIcon.center()
Add the following code to set the position of the text;
cookieText.centerX()
cookieText.y = cookieText.superLayer.height * 0.8
Now just repeat this for the rest of the menus, using the following code:
cookieIcon = sketch.Cookie
cookieIcon.superLayer = cookieMenu
cookieIcon.center()

cookieText = sketch.CookieText
cookieText.superLayer = cookieMenu
cookieText.centerX()
cookieText.y = cookieText.superLayer.height * 0.8

cupcakeIcon = sketch.Cupcake
cupcakeIcon.superLayer = cupcakeMenu
cupcakeIcon.center()

cupcakeText = sketch.CupcakeText
cupcakeText.superLayer = cupcakeMenu
cupcakeText.centerX()
cupcakeText.y = cupcakeText.superLayer.height * 0.8

fruitIcon = sketch.Raspberry
fruitIcon.superLayer = fruitMenu
fruitIcon.center()

fruitText = sketch.FruitText
fruitText.superLayer = fruitMenu
fruitText.centerX()
fruitText.y = fruitText.superLayer.height * 0.8

iceCreamIcon = sketch.IceCream
iceCreamIcon.superLayer = iceCreamMenu
iceCreamIcon.center()

iceCreamText = sketch.IceCreamText
iceCreamText.superLayer = iceCreamMenu
iceCreamText.centerX()
iceCreamText.y = iceCreamText.superLayer.height * 0.8
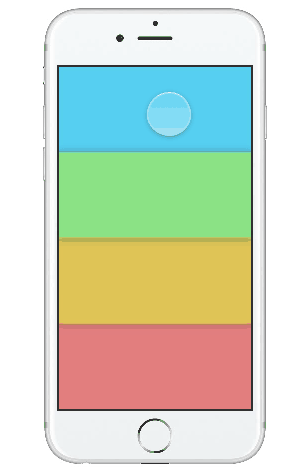
This should give you something that looks very much like the deselected state:

Whew! You made it. Give yourself a little pat on the pack for getting this far. :]
Refactoring
But, in retrospect, that’s a whole lot of code to make one screen…

Just think of how unwieldy your code might be when you’ll have to juggle all the state changes and other details.
Preposterous! This looks like a good time to refactor your code.
Instead of creating each menu layer and its icon and title separately, you’ll create some helper functions to make the code look neater and easier to read.
Replace everything you’ve done so far after the menuHeight and menuWidth definitions with the following:
# 1
menuItems = []
colors = [blue, green, yellow, red]
icons = [sketch.Cookie, sketch.Cupcake, sketch. Raspberry, sketch.IceCream]
titles = [sketch.CookieText, sketch.CupcakeText, sketch.FruitText, sketch.IceCreamText]

# 2
addIcon = (index, sup) ->
	icon = icons[index]
	icon.superLayer = sup
	icon.center()
	icon.name = "icon"

# 3
addTitle = (index, sup) ->
	title = titles[index]
	title.superLayer = sup
	title.centerX()
	title.y = sup.height - sup.height*0.2
	title.name = "title"

# 4
for menuColor, i in colors
	menuItem = new Layer
		height: menuHeight
		width: menuWidth
		x: 0
		y: container.height/4 * i
		shadowY: 2
		shadowBlur: 40
		shadowSpread: 3
		shadowColor: "rgba(25,25,25,0.3)"
		superLayer: container
		backgroundColor: menuColor
		scale: 1.00
	menuItems.push(menuItem)
	addIcon(i, menuItem)
	addTitle(i, menuItem)

repositionMenus = () ->
	menuItems[3].bringToFront()
	menuItems[2].bringToFront()
	menuItems[1].bringToFront()
	menuItems[0].bringToFront()

repositionMenus()
Let’s review this section by section:
- This sets up some arrays to keep track of the menus, colors, icons and titles.
- This is a helper function to insert the icon sublayer for each menu item.
- This is a helper function to add the title sublayer for each menu item.
- This loops through each menu item, creating a new layer and calling the helper functions to add the icon and title. Note that it stores each layer in a
menuItemsarray so you can easily access them later.
And this, ladies and gentleman, is clean code. Onwards to the next challenge!
Transitioning to Selected State
The first step is to add a new state named collapse to the main menuItems loop. Think about this for a second though. What do you need to do to menuItem when it enters the collapse state?

You’ll need to transition from an expanded state to a collapsed state.

Review the changes from before:
- The y-position of the layer becomes 0.
- The height goes from 1/4th of the screen to about 1/9ths of the screen.
- The icon disappears gradually.
- The y-position of the text changes so the text moves up.
- You only see the shadow of the selected
menuItem
Focus on the easy things first: the height and y-positions for the menuItem. Comment out the two following lines in the for loop, but don’t remove them — you’ll need them later.
# 	addIcon(i, menuItem)
# 	addTitle(i, menuItem)
Command + / on the line.Add the following collapsedMenuHeight constant with the other constants after the container layer:
collapsedMenuHeight = container.height/9
Add the collapse state right before menuItems.push(menuItem), just after the commented out parts:
	menuItem.states.add
		collapse:
			height: collapsedMenuHeight
			y : 0
Now to make the menuItems listen and respond to tap events.
Define the following tap events on each menuItem, just after the menuItem for loop and before repositionMenus:
#onTap listeners
menuItems[0].onTap ->
	for menuItem in menuItems
		menuItem.states.next()
	this.bringToFront()

menuItems[1].onTap ->
	for menuItem in menuItems
		menuItem.states.next()
	this.bringToFront()

menuItems[2].onTap ->
	for menuItem in menuItems
		menuItem.states.next()
	this.bringToFront()

menuItems[3].onTap ->
	for menuItem in menuItems
		menuItem.states.next()
	this.bringToFront()
Every time you tap on a menuItem, you loop through all the menuItems and transition each of them to its next state. this.bringToFront() brings the tapped menuItem to the top. By declaring each tap event separately, it’s easier to change them later.
this is useful when you’re trying to refer to an object you’re manipulating, instead of using its name explicitly. It’s clearer and, in most cases, shorter and it increases the legibility of your code.Give it a try to see how your touch interaction works so far:
Finishing Touches
So far so good, except you need to add the icon and titles back, and fix a few issues.
To do this, you’ll need to track when a menuItem is selected.
Add the following variable after the menuItems for loop and before the onTap listeners:
selected = false
You initially set selected to false since nothing is selected when you start.
Now you’re ready to start writing the function for switching between selected and deselected states. Add the following code before the repositionMenus function, after the onTap listeners:
# 1
menuStateChange = (currentItem) ->
	# 2
	for menuItem in menuItems
		menuItem.states.next()
	# 3
	if !selected
		currentItem.bringToFront()
	# 4
	else
		repositionMenus()
	# 5
	selected = !selected
This function does the following:
- Accepts a parameter
currentItem, which is the tappedmenuItem. - Iterates through all
menuItemsand makes each transition to its next state. - If no
menuItemwas selected, thenselectedisfalse, so you placecurrentItemat the front. - If a
menuItemwas selected, thenselectedistrue, so you return the menus to their default states withrepositionMenus(). - Finally, you flip the state of the
selectedBoolean.
Now you can leverage this function in your onTap implementation. Change the onTap implementation for each as shown below for each menuItem instance, 0 through 3:
menuItems[0].onTap ->
	menuStateChange(this)
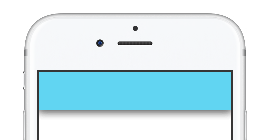
Awesome. Now if you look closely, you may notice that when the menu items are compressed, the shadow looks particularly heavy. This is because all four layers have shadows that are stacking on top of each other.
To fix this, in menuStateChange, change the for loop as follows:
for menuItem in menuItems
	if menuItem isnt currentItem
		menuItem.shadowY = 0
		menuItem.shadowSpread = 0
		menuItem.shadowBlur = 0
	menuItem.states.next()
This hides the shadow for any layer that isn’t the topmost layer, when the layers are collapsed.
Even though the animation looks pretty cool by now, there’s still two key things missing: the icon and the text.
Uncomment the below code found in the menuItems for loop (make sure that these are the last lines in the for loop):
addIcon(i, menuItem)
addTitle(i, menuItem)
Remember when you added names to the icon and title sublayers in addIcon and addTitle? Here’s where those come in handy. Those names will help you distinguish between different sublayers in a menuItem.
Add the following function to collapse the menu, just after menuStateChange():
collapse = (currentItem) ->
	# 1
	for menuItem in menuItems
		# 2
		for sublayer in menuItem.subLayers
			# 3
			if sublayer.name is "icon"
				sublayer.animate
					properties:
						scale: 0
						opacity: 0
						time: 0.3
			# 4
			if sublayer.name is "title"
				sublayer.animate
					properties:
						y: collapsedMenuHeight/2
					time: 0.3
Here’s what’s going on in the code above:
- Iterate through each of the
menuItems. - For each
menuItem, iterate through itssubLayers. - If you hit the
iconsublayer, animate the scale to 0 and the opacity to 0 over the space of 0.3 seconds. - When you hit the
titlesublayer, animate the y-position to the middle of the current menu.
Now, add the following function immediately below the one you just added:
expand = () ->
	# 1
	for menuItem in menuItems
		# 2
		for sublayer in menuItem.subLayers
			# 3
			if sublayer.name is "icon"
				sublayer.animate
					properties:
						scale: 1
						opacity: 1
					time: 0.3
			# 4
			if sublayer.name is "title"
				sublayer.animate
					properties:
						y: menuHeight * 0.8
					time: 0.3
Taking it step-by-step:
- Iterate through each of the
menuItems. - For each
menuItem, iterate through itssubLayers. - If you hit the
iconsublayer, animate the scale to 100% and the opacity to 1 over the space of 0.3 seconds. - When you hit the
titlesublayer, animate the y-position tomenuHeight * 0.8.
Add the calls to collapse() and expand() to menuStateChange() as shown below:
menuStateChange = (currentItem) ->
	# remove shadow for layers not in front
	for menuItem in menuItems
		if menuItem isnt currentItem
			menuItem.shadowY = 0
			menuItem.shadowSpread = 0
			menuItem.shadowBlur = 0
		menuItem.states.next()
	if !selected
		currentItem.bringToFront()
		collapse(currentItem)
	else
		expand()
		repositionMenus()
	selected = !selected
Check out the prototype panel and now you’ll see the icon and title animate properly as well:

You’re almost at the finish line! You don’t have much farther to go! :]