Cocoa Bindings on macOS
Cocoa bindings make glue code a thing of the past. Discover how you can simplify your controller code in this Cocoa Bindings on macOS Tutorial! By Andy Pereira.
Sign up/Sign in
With a free Kodeco account you can download source code, track your progress, bookmark, personalise your learner profile and more!
Create accountAlready a member of Kodeco? Sign in
Sign up/Sign in
With a free Kodeco account you can download source code, track your progress, bookmark, personalise your learner profile and more!
Create accountAlready a member of Kodeco? Sign in
Contents
Cocoa Bindings on macOS
25 mins
- Getting Started
- Searching via iTunes
- Setting Up an NSArrayController
- Adding the Search Box and Button
- Your First Bindings
- Binding Text Fields to Their Properties
- Adding in Rank
- Binding a Table View’s Selection
- Formatting Bound Data
- Formatting as Bytes
- Binding Images
- Just-in-Time Downloads
- Binding the Image View
- Populating the Collection View
- Binding Other Properties
- Seting Up a Progress Spinner
- Adding a Little More Detail
- Where to Go From Here?
Adding a Little More Detail
Cocoa Bindings can do more than what you’ve learned so far: you can bind colors and fonts to labels, enable and disable controls, and even set different values for labels depending on their state.
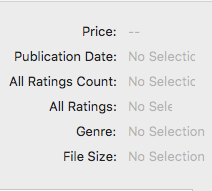
Build and run your app, and you’ll notice that you see No Selection on all your labels before. This isn’t very nice for a user to see when they start your app.
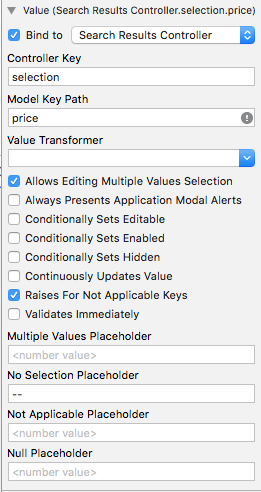
Find the label titled Price Label (Bind), and expand Value. Under No Selection Placeholder, put -- as shown below:

Build and run your app, and you’ll see that the Price label now has a nice placeholder value:

Set all labels that say No Selection to have a placeholder of your choice.
Note: If you want the label to be blank, you can set the No Selection Placeholder to a space.
Note: If you want the label to be blank, you can set the No Selection Placeholder to a space.
Where to Go From Here?
That’s the basics of Cocoa Bindings on macOS. You’ve seen how easy it can be to connect data and UI.
In this tutorial, you learned the following:
- How to use Interface Builder to quickly and easily bind objects to data.
- How to keep models and views in sync with the user’s current selection.
- How to use methods and bindings together to control behaviors and organize data.
- How to quickly build out UI features like progress spinners.
You can download the final project here. Hopefully, you can save a lot of time (and code!) by adopting this technology.
Each binding has a lot of little settings and options, many of which you didn’t explore in this tutorial. Check out this resource on Cocoa bindings provided by Apple. It covers a lot of the details about what the options in the bindings windows do.
I hope you enjoyed this Cocoa Bindings on macOS tutorial and picked up some new techniques to use to accelerate your development process. You’ve just opened up a whole new universe!
Questions and comments are always welcomed in the discussion below.