How To Make A Game Like Color Switch with SpriteKit and Swift
Learn how to make a game like Color Switch using SpriteKit and Swift. By Brian Broom.
Sign up/Sign in
With a free Kodeco account you can download source code, track your progress, bookmark, personalise your learner profile and more!
Create accountAlready a member of Kodeco? Sign in
Sign up/Sign in
With a free Kodeco account you can download source code, track your progress, bookmark, personalise your learner profile and more!
Create accountAlready a member of Kodeco? Sign in
Contents
How To Make A Game Like Color Switch with SpriteKit and Swift
30 mins
A common obstacle when starting a game project is the lack of art to use for game sprites. One way to make things easier is to pick an art style that uses very simple or stylized graphics.
For example, the popular game Color Switch (with over 125 million downloads worldwide) creates fun and attractive visuals using only simple shapes such as circles, lines, and squares that are brightly colored.
In this tutorial, you will make a game where the goal is to move a colored dot up the screen and past multi-colored obstacles — similar to Color Switch. The dot can safely pass through shapes that match its own color, but will fall back to the beginning if it contacts any shape with a different color.
You will learn how to use:
-
SKShapeNodes with custom paths, -
SKActions and radians for rotating nodes indefinitely, - Category and collision bit masks for keeping track of interactions,
- The
SKCameraCodefor conveniently following the player as the game progress, - And more…
Note: You’ll use SpriteKit to build this game. If you are new to SpriteKit, you might want to start with an introduction to sprites and the physics system.
Note: You’ll use SpriteKit to build this game. If you are new to SpriteKit, you might want to start with an introduction to sprites and the physics system.
Getting Started
Download the starter project for this tutorial. There are only minor changes from the default Xcode template to ensure everything works on both iPhone and iPad.
Build and run the project, and you should see a black screen. Unlike many games, this one is played in portrait mode, since the player movement is up and down.
The Obstacles
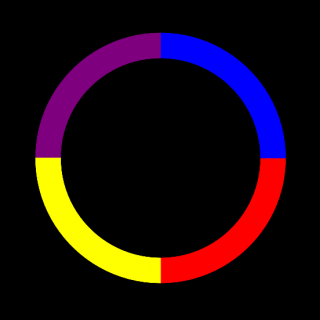
The stars of the show are the multi-colored obstacles that you have to bypass to score points in this game. There are many shapes you can use as obstacles, but creating a circle is a good place to start. The end result will look like this.
Beep. Bop. Boop. Beep.
Since the obstacles are made up of geometric shapes, you’re going to build them up using the SpriteKit class SKShapeNode. To create a custom SKShapeNode, you can define its path. The simplest way to define a path is to use the UIBezierPath class.
UIBezierPath provides several initializers for simple shapes:
-
init(rect: CGRect): Creates and returns a rectangle of a given size. -
init(ovalIn: CGRect): Creates and returns an oval (or circle) that fits in a given rectangle. -
init(roundedRect: CGRect, cornerRadius: CGFloat): Creates and returns a rectangle with rounded corners. The larger thecornerRadius, the more rounded the corners are.
It might seem like init(ovalIn:) would be what you want to make your circle obstacle, but this method gives you a complete circle, and you need it separated into four sections. That way each section can have its own color. Thankfully, UIBezierPath provides additional methods for generic path drawing.
Your First SKShapeNode
A good starting point is to make a node for the yellow section at the bottom-right of the circle. You’ll do this by drawing the outline of the shape.
Drawing the path
In GameScene.swift, add the following methods below didMove(to:):
func setupPlayerAndObstacles() {
  addObstacle()
}

func addObstacle() {
  addCircleObstacle()
}

func addCircleObstacle() {
  // 1
  let path = UIBezierPath()
  // 2
  path.move(to: CGPoint(x: 0, y: -200))
  // 3
  path.addLine(to: CGPoint(x: 0, y: -160))
  // 4
  path.addArc(withCenter: CGPoint.zero,
              radius: 160,
              startAngle: CGFloat(3.0 * M_PI_2),
              endAngle: CGFloat(0),
              clockwise: true)
  // 5
  path.addLine(to: CGPoint(x: 200, y: 0))
  path.addArc(withCenter: CGPoint.zero,
              radius: 200,
              startAngle: CGFloat(0.0),
              endAngle: CGFloat(3.0 * M_PI_2),
              clockwise: false)
}
and add this to didMove(to:):
setupPlayerAndObstacles()
With this code you create one circle obstacle when the game starts. Inside addCircleObstacle(), you:
- Create and return a blank path.
- Call
move(to: CGPoint), which moves to the given point, but does not draw a path. This method is generally used to move to the starting point of your shape, which you do here. - Add a line from the previous point to the given one. This completes the first line of your path, which is the vertical line that starts on the bottom-left corner of the shape.
- This method is a bit of a mouthful, but here you add a curved line from the current point. I generally find that some trial and error is necessary to get the combination of
startAngle,endAngle, andclockwiseto work the way you want it to. - You then add the horizontal line to the outer edge of the circle and complete the path with another arc.
When defining a path, make sure to pay attention to which direction you are moving. If you leave a gap, or if a side has the wrong direction, you will get a strange shape.
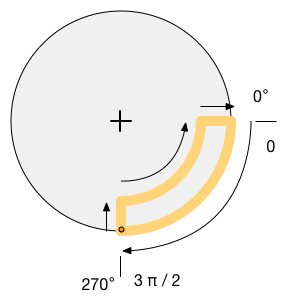
The start and end angle values are in a unit called radians. A complete circle is 2π radians, and the values for other major angles are shown on the diagram. There are constants defined for several common angle values:
-
M_PIis π radians, or 180° -
M_PI_2is π/2 radians, or 90° -
M_PI_4is π/4 radians, or 45°
Note: The values for clockwise seem to be backward from what they should be. This is due the coordinate system for UIBezierPath being different from that used in SpriteKit. UIBezierPath, along with all of UIKit, uses the +y direction as down. SpriteKit, and other OpenGL systems, have the +y direction as up.
Note: The values for clockwise seem to be backward from what they should be. This is due the coordinate system for UIBezierPath being different from that used in SpriteKit. UIBezierPath, along with all of UIKit, uses the +y direction as down. SpriteKit, and other OpenGL systems, have the +y direction as up.
Now that you have a path, you can create and display an SKShapeNode. Add this to the end of your addCircleObstacle() method:
let section = SKShapeNode(path: path.cgPath)
section.position = CGPoint(x: size.width/2, y: size.height/2)
section.fillColor = .yellow
section.strokeColor = .yellow
addChild(section)
The initializer for SKShapeNode uses a CGPath, but UIBezierPath will do that conversion for you with the cgPath property. You could have generated a CGPath directly, but UIBezierPath is often easier to work with. Then you set the position and color properties of the node, and add it to the scene to display it.
You set the strokeColor in addition to the fillColor, because the stroke outline defaults to a thin white line, and you do not want any outline on the shape.
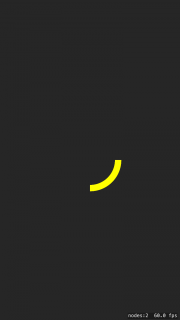
Build and run the project to make sure everything worked.
First part of the circle
Note: If you get a strange looking shape, double check your path numbers, especially the order of steps and the signs of numbers. If any of those are moved around, the shape will not be what you are expecting.
Note: If you get a strange looking shape, double check your path numbers, especially the order of steps and the signs of numbers. If any of those are moved around, the shape will not be what you are expecting.
Take a look at the position of this shape on the screen. Notice how it is in the lower right quadrant of the screen? You might have expected this shape to appear more centered.
The reason is that the path you drew in the first part of this method is drawn relative to a central point, so the shape itself is offset from that central point. Setting the position of the SKShapeNode changes the position of this central point, which lets you move the shape around.


