Multiple UISplitViewController Tutorial
This UISplitViewController tutorial shows you how to build an adaptive layout note-taking app using multiple UISplitViewControllers. By Warren Burton.
Splitting the Split
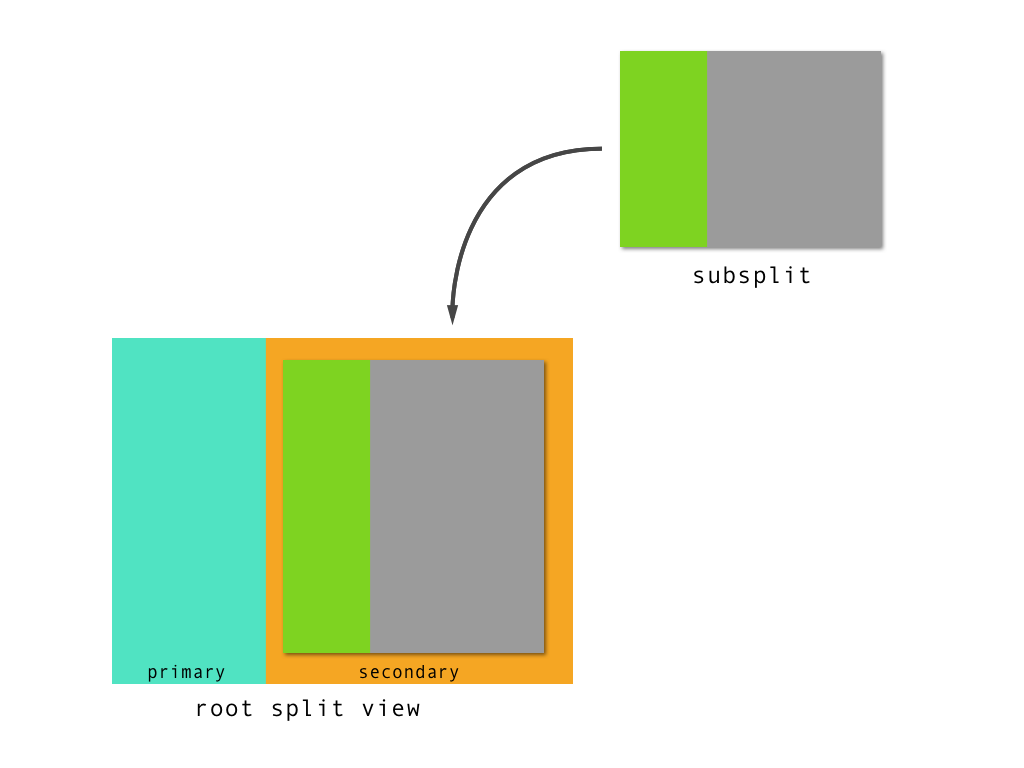
You’re now ready to install a UISplitViewController inside a UISplitViewController.
Creating a Split and Adding to View
You want to place a UISplitViewController inside rootSplitView like this:
In RootViewController.swift, insert this method below viewDidLoad():
func installDoubleSplitWhenHorizontallyRegular() -> UISplitViewController? {
  guard isHorizontallyRegular else {
    return nil
  }

  if let subSplit = rootSplitView.viewControllers.last
    as? UISplitViewController {
    return subSplit
  }

  let split = freshSplitViewTemplate()
  split.delegate = self
  rootSplitView.preferredPrimaryColumnWidthFraction = rootSplitSmallFraction
  rootSplitView.showDetailViewController(split, sender: self)
  return split
}
This method checks to see if there is a split view installed in the secondary view, and it returns the if it exists. Otherwise, a new split view is created and returned.
Choosing the Correct Split to Use
When you add the list of files contained in a folder, you’ll target a different split view depending on the current trait collection. This will happen in several places, so you’ll place all that logic inside a helper method.
Add this method below the method installDoubleSplitWhenHorizontallyRegular():
func targetSplitForCurrentTraitCollection() ->
 UISplitViewController {
  if isHorizontallyRegular {
    guard let subSplit = installDoubleSplitWhenHorizontallyRegular() else {
      fatalError("you must have a UISplitViewController here")
    }
    return subSplit
  } else {
    return rootSplitView
  }
}
This method always returns the correct split view depending on the trait collection.
Adding the Table View of Files
The list of folders will always appear in the primary navigation controller of rootSplitView, but the list of files can either appear:
- Stacked in the primary navigation.
- As the root view controller of the sub-split’s primary navigation.

In RootViewController.swift, find the extension that contains the method showFolderLevelPlaceholder().
Add this code inside the extension:
func installFileList(fileList: FileListViewController) {
  if
    isHorizontallyRegular,
    let subSplit = installDoubleSplitWhenHorizontallyRegular() {
      //1
      let navigation = primaryNavigation(subSplit)
      navigation.viewControllers = [fileList]
      //2
      subSplit.preferredDisplayMode = .allVisible
      subSplit.preferredPrimaryColumnWidthFraction = rootSplitLargeFraction
      rootSplitView.preferredPrimaryColumnWidthFraction = rootSplitSmallFraction
      //3
      showFileLevelPlaceholder(in: subSplit)
  } else {
    let navigation = primaryNavigation(rootSplitView)
    navigation.pushViewController(fileList, animated: true)
  }
}
When the app has a regular horizontal width:
- You install the
FileListViewControlleras the root view of the sub-split’sUINavigationController. - You configure the split’s
preferredPrimaryColumnWidthFractionproperty to divide the screen 25/25/50. - You install a placeholder in the detail view.
Otherwise, not in a regular horizontal width, you push the FileListViewController onto the UINavigationController in the rootSplitView.
Responding to State Changes
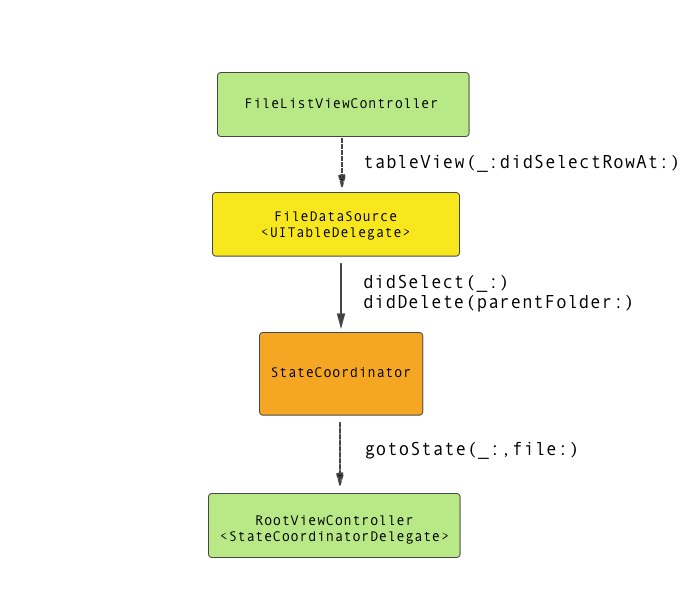
Earlier, you configured RootViewController as the delegate of the StateCoordinator. The StateCoordinator calls gotoState(_:file:) on its delegate when the selection state changes.
In this next section, you’ll add the glue code to allow the UI to react to those changes.
Configuring Root View to Respond to State Changes
Within RootViewController.swift, find the method gotoState(_:file:) in the StateCoordinatorDelegate extension.
Add these four helpers below that method:
//1
func gotoNoSelection(_ folder: File?) {
  let navigation = primaryNavigation(rootSplitView)
  if navigationStack(navigation, isAt: .foldersOnly) && folder == nil {
    showFolderLevelPlaceholder(in: rootSplitView)
  } else {
    showFileLevelPlaceholder(in: targetSplitForCurrentTraitCollection())
  }
}

//2
func gotoFolderSelected(_ folder: File) {
  if folder.isFolder {
    let fileList = FileListViewController.freshFileList()
    let title = folder.name ?? "Untitled"
    configureFileList(fileList, title: title, rootFolder: folder)
    installFileList(fileList: fileList)
  }
}

//3
func gotoFileSelected(_ file: File) {
  if !file.isFolder {
    let detail = EditorViewController.freshDetailController(file: file)
    let navigation = freshNavigationController(rootViewController: detail)
    targetSplitForCurrentTraitCollection()
      .showDetailViewController(navigation, sender: self)
  }
}

//4
func freshNavigationController(rootViewController: UIViewController)
  -> UINavigationController {
  let nav = UINavigationController(rootViewController: rootViewController)
  nav.navigationBar.prefersLargeTitles = true
  return nav
}
-
gotoNoSelection(_:)checks the state of the root navigation and makes a decision regarding which placeholder to install. This method is called when the user has deleted a file or a folder. When the user deletes aFile, theStateCoordinatorpasses theparentFileto theStateCoordinatorDelegate. A folder has no parent, so thefileargument will benil. -
gotoFolderSelected(_:)creates a newFileListViewController, configures that file list with a reference to the selected parent folder, and then it installs the file list in the correct place. -
gotoFileSelected(_:)creates a newEditorViewControllerwith a reference to the selected file, places that editor inside aUINavigationController, and then it installs that navigation into the secondary view of the relevant split. -
freshNavigationController(rootViewController:)creates a newUINavigationControllerinstances with the correct configuration.
Finally, you’ll fill in the body of gotoState(_:file:) with this code:
if nextState == .folderSelected, let folder = file {
  gotoFolderSelected(folder)
} else if nextState == .fileSelected, let file = file {
  gotoFileSelected(file)
} else if nextState == .noSelection {
  gotoNoSelection(file)
}
With this code, you pick the correct destination based on the nextState argument.
You have finished with the RootViewController for now!
Updating File Data Source to Trigger State Changes
The RootViewController can now react to the changes broadcast by the StateCoordinator but nothing is triggering those changes yet.
In this section, you’ll add the code to let FileDataSource connect to StateCoordinator.
Open the Model Layer folder in the Project navigator and select FileDataSource.swift.
Find the extension extension FileDataSource: UITableViewDelegate.
Add this code inside the body of the method tableView(_:didSelectRowAt:):
stateCoordinator?.didSelectFile(object(at: indexPath))
When you touch a cell in FileListViewController, the delegate method tableView(_:didSelectRowAt:) in FileDataSource is called.
In turn, FileDataSource tells the StateCoordinator that a File was selected, at which point the StateCoordinator changes state and tells the RootViewController about that change.
You also want to address the deletion of files as that action can change the selection state. In this section, you’ll add the code to address this.
Find the extension extension FileDataSource: UITableViewDataSource.
Find the method deleteAction(_:) and replace the line try operations.delete(file: file, force: true) inside the do block with this code:
//1
let parent = file.parent
//2
try operations.delete(file: file, force: true)
//3
stateCoordinator?.didDeleteFile(parentFolder: parent)
In this change, you:
- Get a reference to the
parentof theFilebefore deleting from the database. - Delete the file.
- Tell the
StateCoordinatorthat a deletion happened.
Build and run to see all your hard work pay off.

When you select a folder, a second FileListViewController appears wherein you can create, rename and delete file objects.
Testing in Compact Environments
Thanks to UISplitViewController, your app will also adapt to running on iPhone.
Pick the iPhone 8 simulator target.

Build and run. Your UISplitViewController now behaves like a UINavigationController. You’ll start with an empty folder list, because this is a new device. Add a folder:

Select it and go to the files list, where you can add files:

Select a file to go to the editor:

That’s great! When running in a compact environment, you see one view at a time, because there isn’t room for more. That’s the power of UISplitViewController!