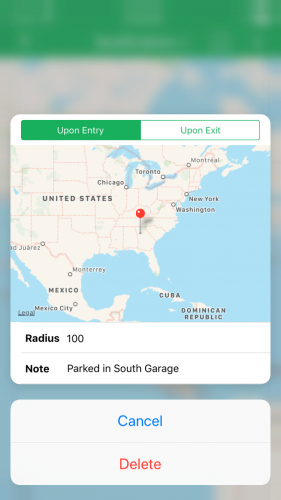
Grouping Preview Actions
If you’d like to group your preview actions differently, you can use UIPreviewActionGroup. This allows you to give more context on how your actions related to each other by hiding more actions behind a single action.
To try this out, open AddGeotificationViewController.swift, and replace previewActionItems with the following:
override var previewActionItems: [UIPreviewActionItem] {
  let editAction = UIPreviewAction(title: "Edit", style: .default) {
    [weak self] (action, controller) in
    self?.handle(action: action, and: controller)
  }

  let deleteAction = UIPreviewAction(title: "Delete", style: .destructive) {
    [weak self] (action, controller) in
    self?.handle(action: action, and: controller)
  }
  let cancelAction = UIPreviewAction(title: "Cancel", style: .default) {
    [weak self] (action, controller) in
    self?.handle(action: action, and: controller)
  }
  let group = UIPreviewActionGroup(title: "Delete...",
                                   style: .destructive,
                                   actions: [cancelAction, deleteAction])
  return [editAction, group]
}
By adding deleteAction and cancelAction to the actions of group, you’ll be given an additional set of options when selecting Delete.
Build and run the app. When you select Delete?, you’ll now see that a second preview actions appears, which is the original Delete. This will give you a chance to change your mind should you not actually want to delete your Geotification.

With that, you’ve finished adding 3D Touch to your app. See if you can find new actions to add to the Peek or places to implement 3D Touch for yourself.
Where to Go From Here?
You can download the finished project using the Download Materials button at the top or bottom of this tutorial.
To learn more, check out these resources:
We hope you enjoyed this tutorial! If you have any questions or comments, please join the forum discussion below!
