Gradle Tutorial for Android: Getting Started – Part 2
In this Gradle Build Script tutorial, you’ll learn build types, product flavors, build variants, and how to add additional information such as the date to the APK file name. By Ricardo Costeira.
Sign up/Sign in
With a free Kodeco account you can download source code, track your progress, bookmark, personalise your learner profile and more!
Create accountAlready a member of Kodeco? Sign in
Sign up/Sign in
With a free Kodeco account you can download source code, track your progress, bookmark, personalise your learner profile and more!
Create accountAlready a member of Kodeco? Sign in
Sign up/Sign in
With a free Kodeco account you can download source code, track your progress, bookmark, personalise your learner profile and more!
Create accountAlready a member of Kodeco? Sign in
Contents
Gradle Tutorial for Android: Getting Started – Part 2
25 mins
Defining Build Variants
From the output above, what you’ve actually generated are different build variants, which are a combination of build types – debug and release and build flavors – free and paid. That is to say, you have four possible build variants – paidDebug, paidRelease, freeDebug and freeRelease.
Great! You’ve got two different build flavors. But, different names won’t be a money maker. You need to make a few more changes and configure your app’s behavior based on the flavor type.
Declare a constant for the paid flavor right below the declaration of ProfileActivity class:
companion object {
  const val PAID_FLAVOR = "paid"
}
Add the following function to ProfileActivity:
private fun isAppPaid() = BuildConfig.FLAVOR == PAID_FLAVOR
Now you can check if a user is using a paid version of the app. Depending on the result of this check, you’ll enable or disable some functionality visible to your user so they can clearly see what version they’re using in-app.
Add these strings to the strings.xml file:
<string name="free_app_message">Hi! You\'re using the free version of the application</string>
<string name="paid_app_message">Hi! Congratulations on buying the premium version of the application</string>
Add the following functions below isAppPaid() of ProfileActivity:
private fun showMessage() {
  val message = if (isAppPaid()) R.string.paid_app_message else R.string.free_app_message

  Toast.makeText(this, message, Toast.LENGTH_LONG).show()
}

private fun togglePhotosVisibility() {
  binding.extraPhotos.visibility = if (isAppPaid()) View.VISIBLE else View.GONE
  binding.restriction.visibility = if (isAppPaid()) View.GONE else View.VISIBLE
}
Call these functions at the end of the onCreate(savedInstanceState: Bundle?) function:
showMessage()
togglePhotosVisibility()
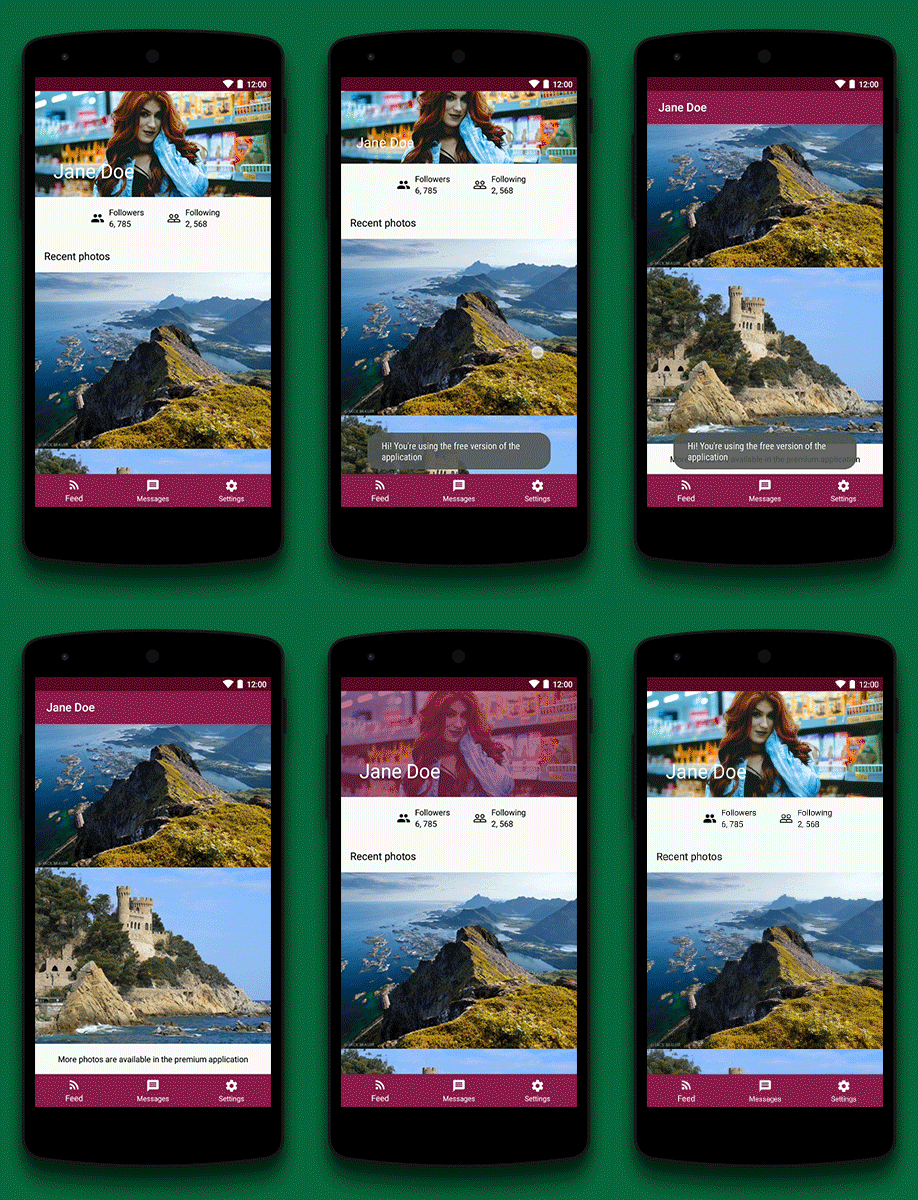
Now, your user will see a different greeting message. And, depending on their version of the app, they’ll be able to view the whole photo feed or just some of the photos. Select the freeRelease build variant in the window below:
Build and run the project (you may first need to choose the app build configuration in the drop-down next to the Run button):
You’ll see the functionality of the app is restricted and the message with a corresponding text is shown. Select the paidRelease option, and run the app again:
If a user buys your app, they’ll be able to access its full functionality.
Creating Tasks
Sometimes you need your build system to do something more complicated or customize the build process in some way. For example, you may want Gradle to output an APK file containing the build date in its name. One possible solution for this is to create a custom Gradle task.
Understanding Tasks
A task is a piece of work you want to execute during a build. Tasks can be really powerful depending on what you want to do. They can do simple things from cleaning your build files to more complex endeavors like creating test reports or manipulating build artifacts.
Tasks have a configuration section and an action section. The configuration logic executes during the build’s configuration phase. The action logic is where you define what you want the task to do, and it gets executed when the task itself is executed, which can be at any time after the initial configuration.
To define an action, you need to use either of the doFirst { } or doLast { } clojures. Anything that you define out of these clojures executes at the configuration phase. For instance, if you define a task like this:
tasks.register('hello') {
  doFirst {
    println('I\'ll show up in second')
  }

  doLast {
    println('I\'ll show up last')
  }

  println('I\'ll show up first')
}
And then run it with ./gradlew hello, you’ll see the following output:
I'll show up first

> Task :app:hello
I'll show up in second
I'll show up last

BUILD SUCCESSFUL in 519ms
Here, the third print shows up first because it executes during the configuration phase.
Gradle allows you to define two types of tasks:
- Simple tasks: These are the tasks like the one above. You configure the task, and add the corresponding logic inside the action clojure. Simple tasks are good for one-off operations you might want to run during build.
-
Enhanced tasks: These tasks encapsulate behavior, and provide properties so that you can customize that behavior to some extent. For instance, the
cleantask in the app-level build.gradle declares itself as being of typeDelete, which in itself is an enhanced class. To define an enhanced class, you typically write some Groovy/Java/Kotlin class that encapsulates the behavior.
Gradle tasks on Android can make use of something named the Variants API. In the last few years, Gradle tasks have seen some changes with time, mainly due to the new version of the Variants API.
In order to output an APK file containing the build date in its name using the old Variants API, you can do something like this using Groovy in your module-level build.gradle:
// 1
task.register('addCurrentDate') {
  // 2
  android.applicationVariants.all { variant ->
    // 3
    variant.outputs.all { output ->
      // 4
      def date = new Date().format("dd-MM-yyyy")
      // 5
      def fileName = variant.name + "_" + date + ".apk"
      // 6
      output.outputFileName = fileName
    }
  }
}
Here’s what’s going on:
- You define an
addCurrentDate()task. - You iterate through all the output build variants, using the old Variants API.
- You iterate over all the APK files.
- You create an instance of
Dateand format it. - You create a new filename appending the current date to the initial name.
- You set the new filename to current APK file.
After this, you then tell Gradle to configure the task after every project in the build is evaluated (and all other tasks are ready) by adding:
gradle.taskGraph.whenReady {
  addCurrentDate
}
If you try this in the project, you’ll most likely get a compilation error at the output.outputFileName line stating that “The value for this property cannot be changed any further”. This is because the old Variants API is slowly getting discontinued in favor of the new one. In other words, this would work with an older Android Gradle Plugin(AGP) version. That said, there’s a chance you’ll still see this API being used in projects using older versions of AGP, so it’s still good to be aware of it.


