Unreal Engine 4 Animation Tutorial
In this Unreal Engine 4 animation tutorial, you will learn how to import and use animations. By Tommy Tran.
Sign up/Sign in
With a free Kodeco account you can download source code, track your progress, bookmark, personalise your learner profile and more!
Create accountAlready a member of Kodeco? Sign in
Contents
Unreal Engine 4 Animation Tutorial
25 mins
- Getting Started
- What is a Skeleton?
- Importing a Skeletal Mesh
- Using a Skeletal Mesh
- Importing Animations
- Creating an Animation Blueprint
- The Animation Blueprint Editor
- What is a State Machine?
- Creating a State Machine
- Linking an Animation to a State
- Using an Animation Blueprint
- Creating the Jumping and Falling States
- Transition Rules
- Checking if the Player is Jumping or Falling
- Defining the Transition Rules
- What is a Blend Space?
- Creating a Blend Space
- Adding Animations to a Blend Space
- Using Blend Spaces
- Getting the Player’s Speed
- Using the Death Animation
- Checking if the Player is Dead
- Using the Blend Poses by Bool Node
- Where to Go From Here?
What is a State Machine?
A State Machine is a set of states and rules. For the purposes of this tutorial, you can think of a state as an animation.
State Machines can only be in one state at a time. To transition to a different state, certain conditions—defined by rules—must be met.
Below is an example of a simple State Machine. It shows the states of a jump and the rules for transitioning to each state.

States can also have a two-way relationship. In the example below, the Jump and Fall states can transition to each other.

Without this two-way relationship, a character wouldn’t be able to perform a double jump. This is because the character would only be able to enter the Jump state from the Idle state.
That’s enough about State Machines. Let’s go ahead and create a new State Machine.
Creating a State Machine
Make sure you are in the Anim Graph and then right-click an empty area. From the menu, select Add New State Machine.

This will add a State Machine node to your graph. Rename the State Machine to Locomotion. Afterwards, connect the Locomotion State Machine to the Final Animation Pose node.

Now, the Locomotion State Machine will determine the muffin’s final animation.
Next, double-click on the Locomotion State Machine to open it. Inside, you will see an Entry node.

The state connected to this node is the default state. For this tutorial, the default state will be the idle animation. Create this state by right-clicking an empty area on the graph. From the menu, select Add State and rename it to Idle.

Now, you need to connect the Entry node to the Idle state. Drag-click the Entry pin to the gray area of the Idle state. Release left-click to connect them.

When you create a state using the context menu, it won’t have an animation linked to it. Let’s fix that.
Linking an Animation to a State
Double-click on the Idle state to open it.
To link an animation, go to the Asset Browser and then drag-click the SK_Muffin_Idle animation. Release left-click on an empty area in the graph to add it.

Next, connect the Play SK_Muffin_Idle node to the Final Animation Pose node.

To use the Animation Blueprint, you need to update BP_Muffin.
Using an Animation Blueprint
Click Compile and then switch to BP_Muffin.
Go to the Components panel and then select the Mesh (Inherited) component. Go to the Details panel and then locate the Animation section.
Set the Animation Mode to Use Animation Blueprint. Next, set Anim Class to ABP_Muffin.

Now, the Skeletal Mesh will use ABP_Muffin as its Animation Blueprint.
Click Compile and then close BP_Muffin. Go to the main editor and press Play to test the Animation Blueprint. Since Idle is the default state, the muffin will automatically use the idle animation.

In the next section, you will create states for jumping and falling.
Creating the Jumping and Falling States
Go back to ABP_Muffin and then switch back to the graph for the Locomotion State Machine. You can do this by clicking the Locomotion bread crumb located at the top of the graph.

Instead of creating a state and then linking an animation, you can create one with an animation already linked. Let’s do that for the jumping state.
Go to the Asset Browser and then drag-click the SK_Muffin_Jump animation. Release left-click on an empty area in the graph. This will create a state with the animation already linked.

Rename the state to Jump.
Repeat the process using the SK_Muffin_Fall animation and rename the state to Fall.
You will now have three states: Idle, Jump and Fall.

Next, you will link the states to each other. You can do this by drag-clicking the gray area of the state you want to transition from. Release left-click on the gray area of the target state to create a transition.
Create the following transitions:
- Idle to Jump
- Jump to Fall
- Fall to Jump
- Fall to Idle

Now that you have transitions, you need to define when a transition can occur. You do this by using Transition Rules.
Transition Rules
This icon represents a Transition Rule:

Every Transition Rule contains a Result node with a single boolean input.

If this input is true, a transition can occur.
Next, you will create variables that inform you if the player is jumping or falling. You will then use these variables in the Transition Rules.
Checking if the Player is Jumping or Falling
Create two boolean variables named IsJumping and IsFalling.
First, you will set the value of IsJumping. Switch to the Event Graph and locate the Event Blueprint Update Animation node. This node functions like the Event Tick node.

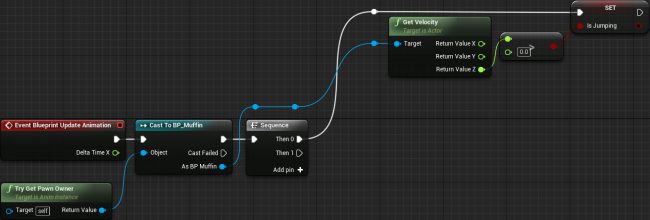
To check if the player is jumping, create the following setup:
This will check if the player’s velocity on the Z-axis is greater than 0. If it is, the player is jumping and IsJumping will be set to true.
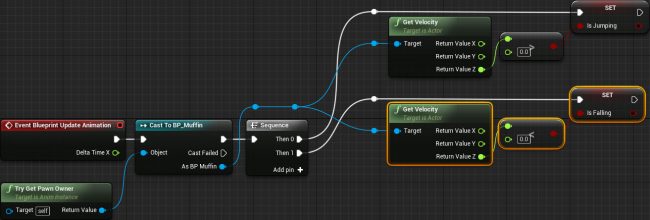
To check if the player is falling, you just need to perform the opposite check. Add the highlighted nodes:
Now, IsFalling will be set to true if the player’s Z-Velocity is less than 0.
It’s time to use these variables to define the Transition Rules.
Defining the Transition Rules
First, you will define the Idle to Jump Transition Rule. Switch back to the Locomotion State Machine. Double-click on the Idle to Jump Transition Rule to open it.

Create an IsJumping node and connect it to the Result node.

Now, the Idle state can transition to the Jump state when IsJumping is true.
Repeat the process for the Jump to Fall and Fall to Jump Transition Rules. Use the following variables:
- Jump to Fall: IsFalling
- Fall to Jump: IsJumping

Now, the Jump and Fall states can transition to each other.
There is still one Transition Rule left to define. Go ahead and open the Fall to Idle Transition Rule.

To transition to the Idle state, the player cannot be jumping or falling. To perform this check, you can use the NOR node. This node will only return true if both of its inputs are false.
Create a NOR node and connect an IsJumping and IsFalling node to it. Afterwards, connect the NOR node to the Result node.

Now, the Fall state can transition to the Idle state when IsJumping and IsFalling are false.
Click Compile and then go back to the main editor. Press Play to test the transitions.

Right now, the muffin just slides when moving along the ground. This is because you haven’t used the walk animation yet!
Instead of creating a new state for walking, you can blend it with the idle animation using a Blend Space.

