iOS Tutorial: How To Create A Simple iPhone App: Part 1/3
An iOS tutorial for complete beginners that shows you how to make your first iPhone app, from scratch! By Ray Wenderlich.
Sign up/Sign in
With a free Kodeco account you can download source code, track your progress, bookmark, personalise your learner profile and more!
Create accountAlready a member of Kodeco? Sign in
Sign up/Sign in
With a free Kodeco account you can download source code, track your progress, bookmark, personalise your learner profile and more!
Create accountAlready a member of Kodeco? Sign in
Contents
iOS Tutorial: How To Create A Simple iPhone App: Part 1/3
20 mins
Update 6/02/14: Fully updated for iOS 7 by Jorge Jordán.
The iPhone is an amazing platform to develop on for indie software developers. It’s never been easier to come up with your own unique app idea, code something up, and have it be available to millions of potential customers!
Lately I’ve been getting a lot of questions from people new to iOS development asking how to get started. So I thought it would be helpful to write an iOS tutorial series tailored for beginners.
But rather than focusing in detail on just one topic, you’re going to dive in and create an entire functional app from scratch. By the end, you’ll have tried out many areas of iPhone development, and ready to dig in further.
So what’s the app you’re going to make? Well, there’s a story behind that…
The other night, I saw a picture of a Potato Bug for the first time and started freaking out because it was so big and ugly! Then I got obsessed with looking up all kinds of scary bug pictures online. So to spread the fun, you’re going to make an app for that – rating scary bugs!
While making this app, you’ll learn some of the most commonly used topics in iPhone development:
- What You Need to Get Started with iPhone Development
- How to store your app data in a Model
- How to use Table Views – including adding and deleting rows
- How to create a detail view for a row
- How to support both Portrait & Landscape orientations
- How to use Navigation Controllers
- How to use an Image Picker
- How to use common controls such as a text field, button, and image view
- How to add icons and default images
- Bonus: How to handle long-running operations
It sounds like a lot, but don’t get scared – you’re not afraid of no bugs!
In this first part of this three-part iOS tutorial series, you’ll learn how to load your model with a list of bugs and display them in a table view. (Jump to Part Two or Part Three)
This iOS tutorial is for beginner iOS developers, however it assumes you are familiar with Objective-C and programming in general. If you are new to Objective-C, I recommend reading Apple’s Objective-C Programming Language Guide first.
What You Need
First things first – to develop for the iPhone, you’ll need a Mac. Pretty much any Mac will do, as long as it’s powerful enough to run the latest version of the Mac OS, Mavericks. But if you’re looking to go the cheap route, you can pick up a Mac Mini for relatively cheap, and it works just fine for a development machine.
Next, you’ll need to get a copy of XCode, Apple’s IDE for iOS development. So if you haven’t already, register for a free account at the iPhone Dev Center and download a copy of Xcode from the Mac App Store.
If you’d like, you can sign up for the paid iPhone Developer Program that allows you to distribute your apps on the App Store, but if you just want to try out iOS development the free account works fine.
If you get serious about iOS development, you’ll probably want physical device(s) (iPhone 4/iPhone 5/iPod Touch/iPad) as well. It’s true that you can do a lot of testing with just the Simulator, but there are some APIs that don’t work on the Simulator, and you’ll need a physical device for performance testing.
That’s it – so if you haven’t already, grab a copy of XCode, fire it up, and continue on!
Hello, Table View!
You’re going to start out by using one of the most common controls on the iPhone – the Table View. You’ve probably seen the Table View in a lot of apps already, here are a few examples:
So anyway, your first screen in the app will have one of these, to display a list of scary bugs!
Start by going to File\New Project… in XCode, select the iOS\Application\Master-Detail Application, and click Next.
On the next page, enter ScaryBugs for the Product Name, enter a unique string for your company identifier (com.yourcompanyname or com.yourname is best), select iPhone on the Devices drop down and enter RWT as Class Prefix. Click Next when you’re done.
Choose a place to save your project and click Create. And before you do anything else, check out what you’ve got so far! In the main menu choose Product\Destination\iOS Simulator\iPhone Retina (3.5-inch), then click the Run button. If all goes well, you should see the following in your simulator:
You can tap the + button to create a new entry, and then tap the new row to see a detail view for it:
So as you can see, you already have a working project to start from since you chose the Master-Detail Application template.
You’re not going to dig into the template since that’s beyond the scope of this iOS tutorial, but just notice that you have an empty table view and detail view set up and ready to go – you just have to fill it in with data!
So to do that, create a class to keep track of your scary bugs.
A Scary Data Model: Organization
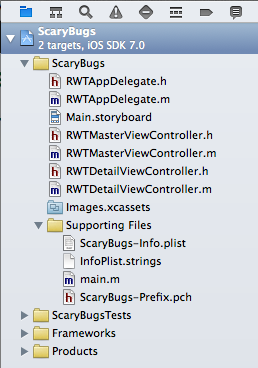
Notice how there’s a hierarchy of folders in the Project Navigator section of XCode:
The template comes set up with a root group, and a Supporting Files group. These groups are just for organizational purposes, so feel free to change them however you want. In your case, you’re going to have a fair number of files in this project, so it’s better to organize things a bit.
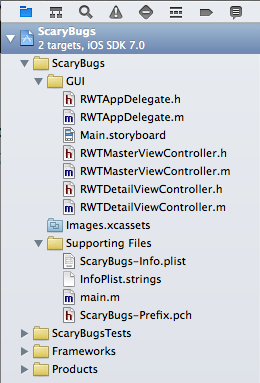
First, create a new group to store the User Interface files in. To do this, control-click the Scary Bugs group and select New Group. Then control click the new group it created and select rename, and name it GUI. Drag the existing files from the root into the GUI group (but not Supporting Files). It should now look like this:
Now create a second new group, and name it Model, because you’re about to add couple classes for your data model there. Your tree should now look like the following:
Before you begin, it’s important for you to know how things are going to be organized on this tutorial:
- RWTScaryBugData: Contains bug name and rating.
- RWTScaryBugDoc: Contains full size image, thumbnail image, RWTScaryBugData.
The reason you’re setting things up like that is it will make things easier in the follow-up for this iOS tutorial, where you’re going to start saving your data to the disk, implementing file sharing, and the like.


