Beginning ARC in iOS 5 Tutorial Part 1
Update 10/24/12: If you’d like a new version of this tutorial fully updated for iOS 6 and Xcode 4.5, check out iOS 5 by Tutorials Second Edition! Note from Ray: This is the twelfth iOS 5 tutorial in the iOS 5 Feast! This tutorial is a free preview chapter from our new book iOS 5 […] By Ray Wenderlich.
Sign up/Sign in
With a free Kodeco account you can download source code, track your progress, bookmark, personalise your learner profile and more!
Create accountAlready a member of Kodeco? Sign in
Sign up/Sign in
With a free Kodeco account you can download source code, track your progress, bookmark, personalise your learner profile and more!
Create accountAlready a member of Kodeco? Sign in
Contents
Beginning ARC in iOS 5 Tutorial Part 1
50 mins
Update 10/24/12: If you’d like a new version of this tutorial fully updated for iOS 6 and Xcode 4.5, check out iOS 5 by Tutorials Second Edition!
Note from Ray: This is the twelfth iOS 5 tutorial in the iOS 5 Feast! This tutorial is a free preview chapter from our new book iOS 5 By Tutorials. Matthijs Hollemans wrote this chapter – the same guy who wrote the iOS Apprentice Series. Enjoy!
This is a post by iOS Tutorial Team member Matthijs Hollemans, an experienced iOS developer and designer.
The most disruptive change in iOS 5 is the addition of Automatic Reference Counting, or ARC for short. ARC is a feature of the new LLVM 3.0 compiler and it completely does away with the manual memory management that all iOS developers love to hate.
Using ARC in your own projects is extremely simple. You keep programming as usual, except that you no longer call retain, release and autorelease. That’s basically all there is to it.
With Automatic Reference Counting enabled, the compiler will automatically insert retain, release and autorelease in the correct places in your program. You no longer have to worry about any of this, because the compiler does it for you. I call that freaking awesome. In fact, using ARC is so simple that you can stop reading this tutorial now. ;-)
But if you’re still skeptical about ARC — maybe you don’t trust that it will always do the right thing, or you think that it somehow will be slower than doing memory management by yourself — then read on. The rest of this tutorial will dispel those myths and show you how to deal with some of the less intuitive consequences of enabling ARC in your projects.
In addition, we’ll give you hands-on experience with converting an app that doesn’t use ARC at all to using ARC. You can use these same techniques to convert your existing iOS projects to use ARC, saving yourself tons of memory headaches!
How It Works
You’re probably already familiar with manual memory management, which basically works like this:
- If you need to keep an object around you need to retain it, unless it already was retained for you.
- If you want to stop using an object you need to release it, unless it was already released for you (with autorelease).
As a beginner you may have had a hard time wrapping your head around the concept but after a while it became second nature and now you’ll always properly balance your retains with your releases. Except when you forget.
The principles of manual memory management aren’t hard but it’s very easy to make a mistake. And these small mistakes can have dire consequences. Either your app will crash at some point because you’ve released an object too often and your variables are pointing at data that is no longer valid, or you’ll run out of memory because you don’t release objects enough and they stick around forever.
The static analyzer from Xcode is a great help in finding these kinds of problems but ARC goes a step further. It avoids memory management problems completely by automatically inserting the proper retains and releases for you!
It is important to realize that ARC is a feature of the Objective-C compiler and therefore all the ARC stuff happens when you build your app. ARC is not a runtime feature (except for one small part, the weak pointer system), nor is it *garbage collection* that you may know from other languages.
All that ARC does is insert retains and releases into your code when it compiles it, exactly where you would have — or at least should have — put them yourself. That makes ARC just as fast as manually managed code, and sometimes even a bit faster because it can perform certain optimizations under the hood.
Pointers Keep Objects Alive
The new rules you have to learn for ARC are quite simple. With manual memory management you needed to retain an object to keep it alive. That is no longer necessary, all you have to do is make a pointer to the object. As long as there is a variable pointing to an object, that object stays in memory. When the pointer gets a new value or ceases to exist, the associated object is released. This is true for all variables: instance variables, synthesized properties, and even local variables.
It makes sense to think of this in terms of ownership. When you do the following,
NSString *firstName = self.textField.text;
the firstName variable becomes a pointer to the NSString object that holds the contents of text field. That firstName variable is now the owner of that string object.
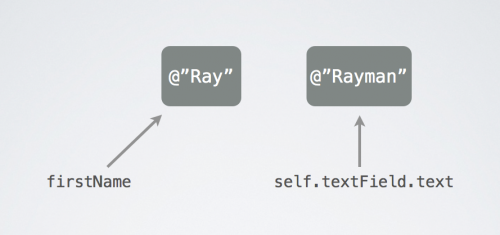
An object can have more than one owner. Until the user changes the contents of the UITextField, its text property is also an owner of the string object. There are two pointers keeping that same string object alive:
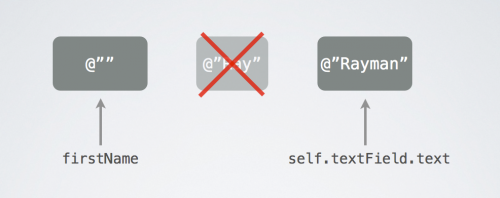
Moments later the user will type something new into the text field and its text property now points at a new string object. But the original string object still has an owner (the firstName variable) and therefore stays in memory.
Only when firstName gets a new value too, or goes out of scope — because it’s a local variable and the method ends, or because it’s an instance variable and the object it belongs to is deallocated — does the ownership expire. The string object no longer has any owners, its retain count drops to 0 and the object is deallocated.
We call pointers such as firstName and textField.text “strong” because they keep objects alive. By default all instance variables and local variables are strong pointers.
There is also a “weak” pointer. Variables that are weak can still point to objects but they do not become owners:
__weak NSString *weakName = self.textField.text;
The weakName variable points at the same string object that the textField.text property points to, but is not an owner. If the text field contents change, then the string object no longer has any owners and is deallocated:
When this happens, the value of weakName automatically becomes nil. It is said to be a “zeroing” weak pointer.
Note that this is extremely convenient because it prevents weak pointers from pointing to deallocated memory. This sort of thing used to cause a lot of bugs — you may have heard of the term “dangling pointers” or “zombies” — but thanks to these zeroing weak pointers that is no longer an issue!
You probably won’t use weak pointers very much. They are mostly useful when two objects have a parent-child relationship. The parent will have a strong pointer to the child — and therefore “owns” the child — but in order to prevent ownership cycles, the child only has a weak pointer back to the parent.
An example of this is the delegate pattern. Your view controller may own a UITableView through a strong pointer. The table view’s data source and delegate pointers point back at the view controller, but are weak. We’ll talk more about this later.
Note that the following isn’t very useful:
__weak NSString *str = [[NSString alloc] initWithFormat:...];
NSLog(@"%@", str);  // will output "(null)"
There is no owner for the string object (because str is weak) and the object will be deallocated immediately after it is created. Xcode will give a warning when you do this because it’s probably not what you intended to happen (“Warning: assigning retained object to weak variable; object will be released after assignment”).
You can use the __strong keyword to signify that a variable is a strong pointer:
__strong NSString *firstName = self.textField.text;
But because variables are strong by default this is a bit superfluous.
Properties can also be strong and weak. The notation for properties is:
@property (nonatomic, strong) NSString *firstName;
@property (nonatomic, weak) id <MyDelegate> delegate;
ARC is great and will really remove a lot of clutter from your code. You no longer have to think about when to retain and when to release, just about how your objects relate to each other. The question that you’ll be asking yourself is: who owns what?
For example, it was impossible to write code like this before:
id obj = [array objectAtIndex:0];
[array removeObjectAtIndex:0];
NSLog(@"%@", obj);
Under manual memory management, removing the object from the array would invalidate the contents of the obj variable. The object got deallocated as soon as it no longer was part of the array. Printing the object with NSLog() would likely crash your app. On ARC the above code works as intended. Because we put the object into the obj variable, which is a strong pointer, the array is no longer the only owner of the object. Even if we remove the object from the array, the object is still alive because obj keeps pointing at it.
Automatic Reference Counting also has a few limitations. For starters, ARC only works on Objective-C objects. If your app uses Core Foundation or malloc() and free(), then you’re still responsible for doing the memory management there. We’ll see examples of this later in the tutorial. In addition, certain language rules have been made stricter in order to make sure ARC can always do its job properly. These are only small sacrifices, you gain a lot more than you give up!
Just because ARC takes care of doing retain and release for you in the proper places, doesn’t mean you can completely forget about memory management altogether. Because strong pointers keep objects alive, there are still situations where you will need to set these pointers to nil by hand, or your app might run out of available memory. If you keep holding on to all the objects you’ve ever created, then ARC will never be able to release them. Therefore, whenever you create a new object, you still need to think about who owns it and how long the object should stay in existence.
There is no doubt about it, ARC is the future of Objective-C. Apple encourages developers to turn their backs on manual memory management and to start writing their new apps using ARC. It makes for simpler source code and more robust apps. With ARC, memory-related crashes are a thing of the past.
But because we’re entering a transitioning period from manual to automatic memory management you’ll often come across code that isn’t compatible with ARC yet, whether it’s your own code or third-party libraries. Fortunately you can combine ARC with non-ARC code in the same project and I’ll show you several ways how.
ARC even combines well with C++. With a few restrictions you can also use ARC on iOS 4, which should only help to speed up the adoption.
A smart developer tries to automate as much of his job as possible, and that’s exactly what ARC offers: automation of menial programming work that you had to do by hand previously. To me, switching is a no-brainer.


