Beginning ARC in iOS 5 Tutorial Part 1
Update 10/24/12: If you’d like a new version of this tutorial fully updated for iOS 6 and Xcode 4.5, check out iOS 5 by Tutorials Second Edition! Note from Ray: This is the twelfth iOS 5 tutorial in the iOS 5 Feast! This tutorial is a free preview chapter from our new book iOS 5 […] By Ray Wenderlich.
Sign up/Sign in
With a free Kodeco account you can download source code, track your progress, bookmark, personalise your learner profile and more!
Create accountAlready a member of Kodeco? Sign in
Sign up/Sign in
With a free Kodeco account you can download source code, track your progress, bookmark, personalise your learner profile and more!
Create accountAlready a member of Kodeco? Sign in
Contents
Beginning ARC in iOS 5 Tutorial Part 1
50 mins
Automatic Conversion
We are going to convert the Artists app to ARC. Basically this means we’ll just get rid of all the calls to retain, release, and autorelease, but we’ll also run into a few situations that require special attention.
There are three things you can do to make your app ARC-compatible:
- Xcode has an automatic conversion tool that can migrate your source files.
- You can convert the files by hand.
- You can disable ARC for source files that you do not want to convert. This is useful for third-party libraries that you don’t feel like messing with.
We will use all of these options on the Artists app, just to show you how it all works. In this section, we are going to convert the source files with Xcode’s automated conversion tool, except for MainViewController and AFHTTPRequestOperation.
Before we do that, you should make a copy of the project as the tool will overwrite the original files. Xcode does offer to make a snapshot of the source files but just as a precaution I would make a backup anyway.
ARC is a feature of the new LLVM 3.0 compiler. Your existing projects most likely use the older GCC 4.2 or LLVM-GCC compilers, so it’s a good idea to switch the project to the new compiler first and see if it compiles cleanly in non-ARC mode. Go to the Project Settings screen, select the Artists target and under Build Settings type “compiler” into the search box. This will filter the list to bring up just the compiler options:
Click on the Compiler for C/C++/Objective-C option to change it to Apple LLVM compiler 3.0:
Under the Warnings header, also set the Other Linker Flags option to -Wall. The compiler will now check for all possible situations that can cause problems. By default many of these warnings are turned off but I find it useful to always have all warnings on and to treat them as fatal errors. In other words, if the compiler gives a warning I will first fix it before continuing. Whether that is something you may want to do on your own projects is up to you, but during the conversion to ARC I recommend that you take a good look at any issues the compiler may complain about.
For the exact same reason, also enable the Run Static Analyzer option under the Build Options header:
Xcode will now run the analyzer every time we build the app. That makes the builds a bit slower but for an app of this size that’s barely noticeable.
Let’s build the app to see if it gives any problems with the new compiler. First do a clean using the Product -> Clean menu option (or Shift-Cmd-K). Then press Cmd-B to build the app. Xcode should give no errors or warnings, so that’s cool. If you’re converting your own app to ARC and you get any warning messages at this point, then now is the time to fix them.
Just for the fun of it, let’s switch the compiler to ARC mode and make it build the app again. We’re going to get a ton of error messages but it’s instructive to see what exactly these are.
Still in the Build Settings screen, switch to “All” to see all the available settings (instead of Basic, which only shows the most-often used settings). Search for “automatic” and set the Objective-C Automatic Reference Counting option to Yes. This is a project-wide flag that tells Xcode that you wish to compile all of the source files in your project using the ARC compiler.
Build the app again. Whoops, you should get a ton of errors:
Clearly we have some migrating to do! Most of these errors are pretty obvious, they say you can no longer use retain, release and autorelease. We could fix all of these errors by hand but it’s much easier to employ the automatic conversion tool. The tool will compile the app in ARC mode and rewrites the source code for every error it encounters, until it compiles cleanly.
From Xcode’s menu, choose Edit\Refactor\Convert to Objective-C ARC.
A new window appears that lets you select which parts of the app you want to convert:
For the purposes of this tutorial, we don’t want to do the whole app, so select only the following files:
- main.m
- AppDelegate.m
- SVProgressHUD.m
- SoundEffect.m
The dialog shows a little warning icon indicating that the project already uses ARC. That’s because we’ve enabled the Objective-C Automatic Reference Counting option in the Build Settings earlier and now the conversion tool thinks this is already an ARC project. You can ignore the warning, it won’t interfere with the conversion.
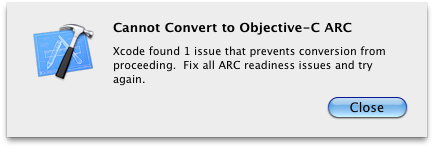
Press the Precheck button to begin. The tool first checks whether your code is in a good enough state to be converted to ARC. We did manage to build our app successfully with the new LLVM 3.0 compiler, but apparently that wasn’t good enough. Xcode gives the following error message:
It complains about “ARC readiness issues” and that we should enable the “Continue building after errors” option. We’ll do the latter first. Open the Xcode Preferences window (from the menubar, under Xcode) and go to the General tab. Enable the option Continue building after errors:
Let’s try again. Choose Edit\Refactor\Convert to Objective-C ARC and select all the source files except for MainViewController.m and AFHTTPRequestOperation.m. Press Precheck to begin.
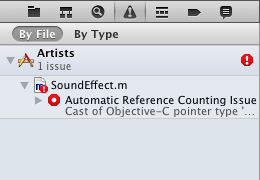
No luck, again we get an error message. The difference with before is that this time the compiler was able to identify all the issues we need to fix before we can do the conversion. Fortunately, there is only one:
(You may have more errors in this list than are displayed here. Sometimes the conversion tool also complains about things that are not really “ARC readiness” issues.)
The full description of our issue is:
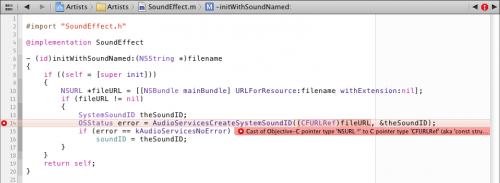
Cast of Objective-C pointer type 'NSURL *' to C pointer type 'CFURLRef' (aka 'const struct __CFURL *') requires a bridged cast
What it looks like in the source editor:
I will go into more detail about this later, but the source code here attempts to cast an NSURL object to a CFURLRef object. The AudioServicesCreateSystemSoundID() function takes a CFURLRef that describes where the sound file is located, but we’re giving it an NSURL object instead. CFURLRef and NSURL are “toll-free bridged”, which makes it possible to use an NSURL object in place of a CFURLRef and vice versa.
Often the C-based APIs from iOS will use Core Foundation objects (that’s what the CF stands for) while the Objective-C based APIs use “true” objects that extend the NSObject class. Sometimes you need to convert between the two and that is what the toll-free bridging technique allows for.
However, when you use ARC the compiler needs to know what it should do with those toll-free bridged objects. If you use an NSURL in place of a CFURLRef, then who is responsible for releasing that memory at the end of the day? To solve this conundrum, a set of new keywords was introduced: __bridge, __bridge_transfer and __bridge_retained. We will go into more depth on how to use these later in the tutorial.
For now, we need to change the source code to the following:
OSStatus error = AudioServicesCreateSystemSoundID((__bridge CFURLRef)
  fileURL, &theSoundID);
The pre-check may have given you errors other than just this one. You can safely ignore those, the above change in SoundEffect.m is the only one we need to make. The conversion tool seems a little uncertain in what it considers an “ARC readiness issue” from time to time.
Let’s run the conversion tool once more – Edit\Refactor\Convert to Objective-C ARC. This time the pre-check runs without problems and we’re presented with the following screen:
Click Next to continue. After a few seconds, Xcode will show a preview of all the files that it will change and which changes it will make. The left-hand pane shows the changed files while the right-hand pane shows the originals.

It’s always a good idea to step through these files to make sure Xcode doesn’t mess up anything. Let’s go through the changes that the conversion tool is proposing to make.


