How to Make an Interactive eBook Without Any Code
This is a post by Tutorial Team Member Greg Pugh, author of the Colin Turtle children’s eBook app series. You can also find him on Google+. When people hear that I have written two children’s book apps, a common response I get is “I have an idea for a children’s book, could you help me […] By .
Sign up/Sign in
With a free Kodeco account you can download source code, track your progress, bookmark, personalise your learner profile and more!
Create accountAlready a member of Kodeco? Sign in
Sign up/Sign in
With a free Kodeco account you can download source code, track your progress, bookmark, personalise your learner profile and more!
Create accountAlready a member of Kodeco? Sign in
Contents
How to Make an Interactive eBook Without Any Code
35 mins
- Getting Started
- Introducing Kwik 2
- Preparing the Project
- The Hills are Alive, with the Sound of… Audio Files :]
- Setting up ‘Shop
- Creating the eBook
- Physics in Action
- Read to Me!
- Adding Page Navigation
- The Third Time’s a Charm
- Lights, Camera, Action!
- He Talks as Much as my Wife!
- Finishing Touches
- Where To Go From Here?
Setting up ‘Shop
Start up Photoshop. You’ll be greeted with a Kwik 2 welcome screen, which will be similar to the one below depending on which version is available at the time you work on this tutorial.
Note: Don’t see this screen? Just go to Window\Extensions\K2 and it should appear.
Note: Don’t see this screen? Just go to Window\Extensions\K2 and it should appear.
Follow the splash screen recommendations and change the Flash settings by clicking the Setup button. You’ll be taken to the Flash Player Help page.Click Edit Locations… > Add location > Browse for folder.
From there, locate your Photoshop folder in your Applications (this tutorial was prepared using Photoshop CS6) and then navigate to Plug-ins > Panels > K2. With the K2 folder highlighted, click Open and make sure “Always allow” is checked.
That’s it for the Flash settings! That was done in a…flash, wasn’t it? :]
Now switch back to Photoshop, and click OK on the dialog if you haven’t already. It will then display the Kwik Settings window with the “General” tab selected. Click browse for your CoronaSDK simulator.
If you’re using a Macintosh, it most likely will be in Applications > CoronaSDK > Corona Simulator. You’ll also need to browse for your default project folder, which in our case will be in Documents > Kwik > eBook. Finally, you might want to set up the checkboxes the way I have here.
In the Export tab, make sure Export images and Export sample icons are checked.
Click OK and you’re done. Enough prep work, you’re probably itching to get this eBook started!
Creating the eBook
Click the New Project button in the Kwik 2 panel. If you don’t see the Kwik panel in Photoshop, go to Window > Extensions > K2.
Name your project “eBook” on an iPad device, leave the orientation in landscape mode, and click Create.
If a popup appears, click OK to dismiss it.
Then open your images folder, which should be found in Documents > Kwik > eBook, and drag page1.png into your Photoshop project. Place the image and adjust it so it fits perfectly onto the canvas (it may fit already, since the image supplied is the correct iPad resolution).
Note: If Photoshop and the Kwik 2 window become unresponsive, it could be that you are stuck in an edit mode in Photoshop. In particular, if you see the size gadgets on your new page and you can’t click anything, hit Return — the size gadgets should go away and you will be able to once again work with your image!
Note: If Photoshop and the Kwik 2 window become unresponsive, it could be that you are stuck in an edit mode in Photoshop. In particular, if you see the size gadgets on your new page and you can’t click anything, hit Return — the size gadgets should go away and you will be able to once again work with your image!
Find the layers panel on the sidebar of Photoshop (you can open it with Windows\Layers if it isn’t there), double-click the layer and rename it “bg”.
Believe it or not, you’ve just created the first page of your eBook! Hit Cmd+S to save your work.
At this point, if you’re like most developers you’re eager to see your work in action :] Click the publish button in the Kwik 2 panel, which will automatically start up CoronaSDK.
Hey, wait a second! CoronaSDK is running, but where’s our book?
In CoronaSDK, click File > Open and browse for Documents > Kwik > eBook > eBook > build > main.lua.
main.lua is the only file CoronaSDK will run in the simulator. If you’re familiar with HTML, think of it as the index.html file that automatically gets read as the default page in web browsers.
Now that your eBook is open, you’ll see the first page of your book running in the simulator. You can change the devices in Corona by navigating to Window > View As, but since you’re making an iPad book, just worry about the iPad view for now.
Sidebar: If you think you recognize LUA from somewhere else — you may be right! If you’ve ever used a World of Warcraft UI enhancement, then you’ve used LUA. There is also the iPad code editor/builder Codea from Australian developer Two Lives Left. If you want to read and understand your main.lua file, see The Programming Language Lua for more resources.
Sidebar: If you think you recognize LUA from somewhere else — you may be right! If you’ve ever used a World of Warcraft UI enhancement, then you’ve used LUA. There is also the iPad code editor/builder Codea from Australian developer Two Lives Left. If you want to read and understand your main.lua file, see The Programming Language Lua for more resources.
You can leave the simulator running in the background, as each time you publish your book to test it, the simulator will automatically update. Head back to Photoshop; you now are going to change some book settings in Kwik.
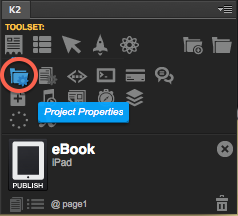
Under the Project and Pages tab in the Kwik Toolset, click Project Properties.
Check Export thumbnails, Create navigation panel, and uncheck Enable page swipe. In the configure panel for the navigation panel, set the alpha to 80%, and click Create and then Save.
Okay — time for a little review of the above steps. You just told Kwik to create a navigation panel that will consist of thumbnail images of each page on the top of our book. You then disabled the default page swiping effect to turn pages because your eBook will let users turn the page by tapping on arrow buttons.
When designing an interactive eBook, it’s usually a good idea to use some sort of buttons to navigate through the pages. It can be extremely frustrating for the user if they try to interact with another element of your book, and end up accidentally turning the page!
However, before you create page navigation buttons, first you’ll need to create a new page that you can navigate to! :]
Under the Project and Pages tab, click on the “Add new page” button. Name this page “page2”, uncheck all of the checkboxes, and click OK.
Open your images folder from Documents > Kwik > eBook and drag “bg.png” onto your page2.psd file in Photoshop. Place and move so it fills the screen completely. It should be noted that you can create all the graphics of your book directly in Photoshop without having to import artwork. However, the .png files have been provided with this tutorial in order to save time. Rename the new layer “bg” and save your work.
Are you ready to click Publish and see it in action? Not just yet, eager beaver! At this point, you could click Publish, but there would be no way to see page 2 since you disabled page swiping! Whoops!
When you created a second page earlier, Photoshop created a new page2.psd for you. You want to add a button on page 1 that will go to page 2, so to do this you need to switch back to page1.psd. Click page1.psd on the top toolbar to re-open it.
Next add “readSelf.png” from the Images folder into your page1.psd. You can do this either by dragging it in, or by opening it in Photoshop and copy/pasting it in. Move the image to the bottom left of the page, and resize it a bit.
To move the image, you can use the Photoshop “move” tool (shortcut key ‘V’), and to resize the image you can use Edit\Free Transform (shortcut key ‘Cmd-T’). After you have it in the right spot, rename the layer “readSelf.”
With the “readSelf” layer selected, go to Interactions > Add Button in the Kwik panel.
In the dialog that appears, change the name to “selfBtn”. Then expand the “Common” drop down menu, choose Read to Me, uncheck Enable Read to Me, and click Create. This enables the Read Myself button to go to page2.
Click Publish and check your CoronaSDK simulator — your book should now be updated in the simulator! When you click Read Myself, your book will now go to page 2, which is just a blank blue background for now.
Great success!
Pause here for a moment and consider what you’ve done so far — you’ve just created a two-page eBook app without writing ANY code at all! In fact, all you’ve really done is just import pictures into Photoshop. True, it took a bit of setup to get here, but you’ll have these tools installed and ready for your next eBook project!
However, that blank blue screen is kind of unnerving, isn’t it? Time to add some user interaction to your eBook!


