OpenGL ES Particle System Tutorial: Part 2/3
In this second part of our OpenGL ES particle system tutorial series, learn how to implement a generic particle system that deals with some “explosive” concepts! By Ricardo Rendon Cepeda.
Adding Vertex and Fragment Shaders
Now that your self-contained emitter is sketched out, you’re ready to create some shaders for your system.
Go to File\New\File…, choose the iOS\Other\Empty template, then click Next. Name the new file Emitter.vsh, uncheck the box next to your GLParticles2 target, and click Create.
Repeat the process above for another new file, but this time name it Emitter.fsh. These files will be used to write your vertex and fragment shaders.
Copy the following code into Emitter.vsh:
// Vertex Shader

static const char* EmitterVS = STRINGIFY
(

// Attributes
attribute float     a_pID;
attribute float     a_pRadiusOffset;
attribute float     a_pVelocityOffset;
attribute float     a_pDecayOffset;
attribute float     a_pSizeOffset;
attribute vec3      a_pColorOffset;

// Uniforms
uniform mat4        u_ProjectionMatrix;
uniform vec2        u_Gravity;
uniform float       u_Time;
uniform float       u_eRadius;
uniform float       u_eVelocity;
uniform float       u_eDecay;
uniform float       u_eSize;

// Varying
varying vec3        v_pColorOffset;

void main(void)
{
}

);
The above code should look familiar from Part 1 of this tutorial. Because there are so many variables in this shader, all attributes are prefaced with a_, all uniforms are prefaced with u_, and all varyings are prefaced with v_ in order to help tell them apart.
Add the following code to Emitter.vsh, inside main:
// 1
// Convert polar angle to cartesian coordinates and calculate radius
float x = cos(a_pID);
float y = sin(a_pID);
float r = u_eRadius * a_pRadiusOffset;

// 2
// Lifetime
float growth = r / (u_eVelocity + a_pVelocityOffset);
float decay = u_eDecay + a_pDecayOffset;

// 3
// If blast is growing
if(u_Time < growth)
{
    float time = u_Time / growth;
    x = x * r * time;
    y = y * r * time;
}

// 4
// Else if blast is decaying
else
{
    float time = (u_Time - growth) / decay;
    x = (x * r) + (u_Gravity.x * time);
    y = (y * r) + (u_Gravity.y * time);
}

// 5
// Required OpenGLES 2.0 outputs
gl_Position = u_ProjectionMatrix * vec4(x, y, 0.0, 1.0);
gl_PointSize = max(0.0, (u_eSize + a_pSizeOffset));

// Fragment Shader outputs
v_pColorOffset = a_pColorOffset;
There's plenty of new code here with a lot of equations, so take a moment to review the code comment by comment:
- Each particle has a unique ID in radians which you must convert to cartesian coordinates. By calculating the radius, you have enough information to animate a particle’s trajectory all the way to its final position.
- The lifetime of a particle is defined in terms of:
-
Growth: The time taken for a particle to reach its final position when traveling at a certain speed, which is found by way of
total radius / total velocity. - Decay: The total decay time of the emitter and particle.
-
Growth: The time taken for a particle to reach its final position when traveling at a certain speed, which is found by way of
- If the blast is growing, the particle is traveling from its source towards its final position. In this case, time becomes relative to the particle's growth lifespan.
- If the blast is decaying, the particle is traveling in the direction of gravity from its final position. In this case, time becomes relative to the particle's decay lifespan.
- Both required outputs (the point location and size) and optional outputs (the particle color offset) are passed along the graphics pipeline.
Add the following code to Emitter.fsh:
// Fragment Shader

static const char* EmitterFS = STRINGIFY
(

// Varying
varying highp vec3      v_pColorOffset;

// Uniforms
uniform highp float     u_Time;
uniform highp vec3      u_eColor;

void main(void)
{
    // Color
    highp vec4 color = vec4(1.0);
    color.rgb = u_eColor + v_pColorOffset;
    color.rgb = clamp(color.rgb, vec3(0.0), vec3(1.0));

    // Required OpenGL ES 2.0 outputs
    gl_FragColor = color;
}

);
The fragment shader simply calculates the final color of each particle, based on the overall emitter color and particle offset. The result then uses the clamp function to stay within the bounds of 0.0 for black and 1.0 for white.
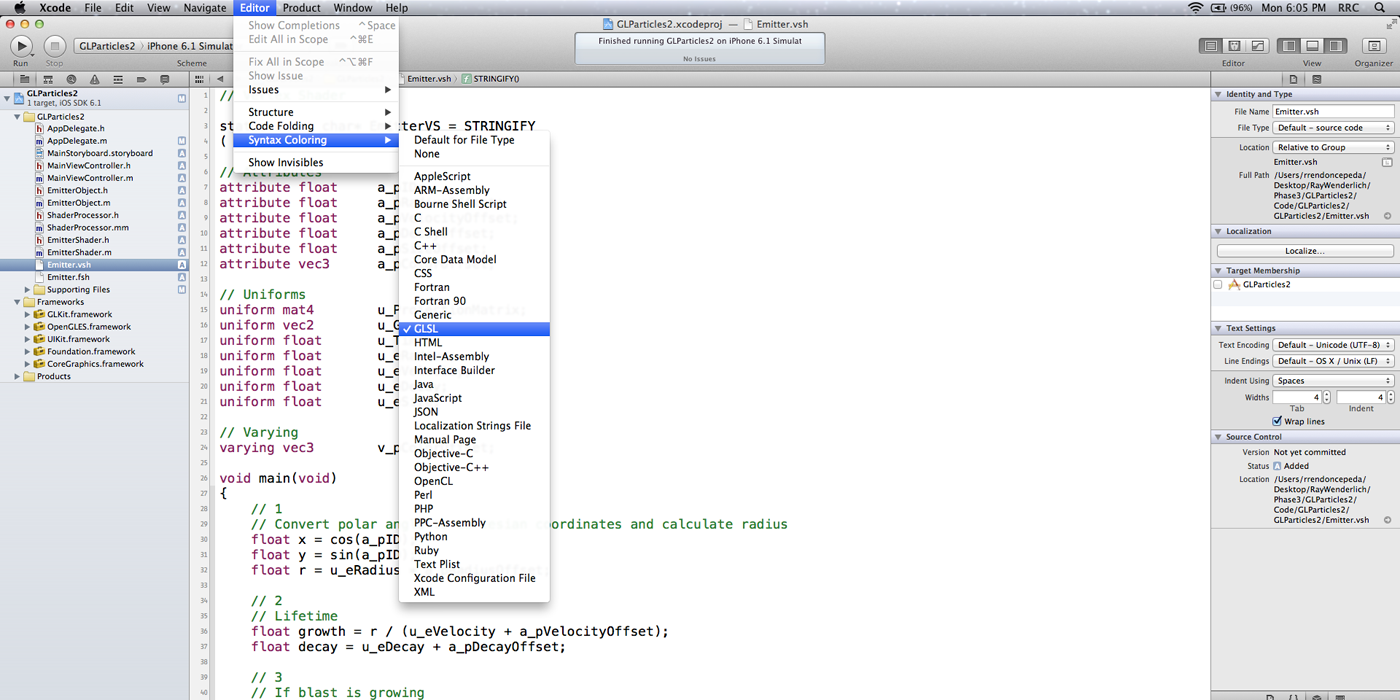
If your code is completely black and you aren’t getting automatic GLSL syntax highlighting, then you need to tell Xcode what type of file you are working with.
Part 1 showed you how to turn on syntax highlighting for GLSL files, but there's another quick way to accomplish the same thing. Look to the top bar of Xcode, go to Editor\Syntax Coloring, and select GLSL from the list as shown in the screenshot below:
Building an Objective-C Bridge
Your shaders are ready to run on the GPU, but just as in Part 1, you must create a “bridge” to feed them the necessary data from the CPU. Time to switch back to Objective-C!
First, you’ll need to download the resources for this tutorial. Unzip GLParticles2-resources.zip, which creates a folder named Resources. Right-click on the GLParticles folder in XCode's Project Navigator and select Add Files to "GLParticles2"..., as shown below:

Select the Resources folder you unzipped and click Add. Make sure Copy items into destination's group folder is checked, Create groups for any added folders is selected, and GLParticles2 is checked in the "Add to targets" section, as shown below:

ShaderProcessor.h and ShaderProcessor.mm are relatively simple shader processors that will be used by your emitter. They are included in the resources file, and were explained back in Part 1 of this tutorial. For that reason they won't be covered in detail in this part of the tutorial.
Time to build your emitter shaders.
Go to File\New\File... and create a new file with the iOS\Cocoa Touch\Objective-C class subclass template. Enter EmitterShader for the Class and NSObject for the subclass. Make sure the checkbox for the GLParticles2 target is checked, click Next, and click Create.
Replace the contents of EmitterShader.h with the following:
#import <GLKit/GLKit.h>

@interface EmitterShader : NSObject

// Program Handle
@property (readwrite) GLuint    program;

// Attribute Handles
@property (readwrite) GLint     a_pID;
@property (readwrite) GLint     a_pRadiusOffset;
@property (readwrite) GLint     a_pVelocityOffset;
@property (readwrite) GLint     a_pDecayOffset;
@property (readwrite) GLint     a_pSizeOffset;
@property (readwrite) GLint     a_pColorOffset;

// Uniform Handles
@property (readwrite) GLuint    u_ProjectionMatrix;
@property (readwrite) GLint     u_Gravity;
@property (readwrite) GLint     u_Time;
@property (readwrite) GLint     u_eRadius;
@property (readwrite) GLint     u_eVelocity;
@property (readwrite) GLint     u_eDecay;
@property (readwrite) GLint     u_eSize;
@property (readwrite) GLint     u_eColor;

// Methods
- (void)loadShader;

@end
Now, replace the contents of EmitterShader.m with the following:
#import "EmitterShader.h"
#import "ShaderProcessor.h"

// Shaders
#define STRINGIFY(A) #A
#include "Emitter.vsh"
#include "Emitter.fsh"

@implementation EmitterShader

- (void)loadShader
{
    // Program
    ShaderProcessor* shaderProcessor = [[ShaderProcessor alloc] init];
    self.program = [shaderProcessor BuildProgram:EmitterVS with:EmitterFS];

    // Attributes
    self.a_pID = glGetAttribLocation(self.program, "a_pID");
    self.a_pRadiusOffset = glGetAttribLocation(self.program, "a_pRadiusOffset");
    self.a_pVelocityOffset = glGetAttribLocation(self.program, "a_pVelocityOffset");
    self.a_pDecayOffset = glGetAttribLocation(self.program, "a_pDecayOffset");
    self.a_pSizeOffset = glGetAttribLocation(self.program, "a_pSizeOffset");
    self.a_pColorOffset = glGetAttribLocation(self.program, "a_pColorOffset");

    // Uniforms
    self.u_ProjectionMatrix = glGetUniformLocation(self.program, "u_ProjectionMatrix");
    self.u_Gravity = glGetUniformLocation(self.program, "u_Gravity");
    self.u_Time = glGetUniformLocation(self.program, "u_Time");
    self.u_eRadius = glGetUniformLocation(self.program, "u_eRadius");
    self.u_eVelocity = glGetUniformLocation(self.program, "u_eVelocity");
    self.u_eDecay = glGetUniformLocation(self.program, "u_eDecay");
    self.u_eSize = glGetUniformLocation(self.program, "u_eSize");
    self.u_eColor = glGetUniformLocation(self.program, "u_eColor");
}

@end
These two files comprise the requisite shader handles which tell your Objective-C variables where to find their GLSL counterparts. These shader handles are very similar to the EmitterShader you wrote in Part 1, but with quite a few more variables.
Note: You need to be aware of the number of variables you use in your shaders. It turns out that different graphics hardware has different limitations on the number of variables that can be used. In iOS, your shader will fail to compile at runtime if these limits are exceeded. Refer to the Best Practices for Shaders section of Apple's documentation for more information.
Note: You need to be aware of the number of variables you use in your shaders. It turns out that different graphics hardware has different limitations on the number of variables that can be used. In iOS, your shader will fail to compile at runtime if these limits are exceeded. Refer to the Best Practices for Shaders section of Apple's documentation for more information.
Now that your emitter is complete, you can send some meaningful data to your shaders.