OpenGL ES Particle System Tutorial: Part 3/3
In this third part of our OpenGL ES particle system tutorial series, learn how to add your particle system into a simple 2D game! By Ricardo Rendon Cepeda.
Sign up/Sign in
With a free Kodeco account you can download source code, track your progress, bookmark, personalise your learner profile and more!
Create accountAlready a member of Kodeco? Sign in
Sign up/Sign in
With a free Kodeco account you can download source code, track your progress, bookmark, personalise your learner profile and more!
Create accountAlready a member of Kodeco? Sign in
Contents
OpenGL ES Particle System Tutorial: Part 3/3
40 mins
- Particle System and 2D Game Series Review
- Getting Started
- Deciphering the Game Hierarchy
- Creating the Emitter
- Rendering Your Emitter Object
- Creating the GPU-CPU Bridge
- Generating Data for Your Particle System
- Sending Shader Data to the GPU
- Initializing Your Emitter
- Creating Your Particle Effect
- Deleting Your Emitter Objects
- Gratuitous Sound Effects
- Where To Go From Here?
Deleting Your Emitter Objects
You may have noticed that your game’s frame rate drops drastically after the 3rd or 4th hit. What's going on?
Even though the particles disappear once their lifespan is over, they’re still being rendered in-memory — and taking up a large chunk of your graphics processing power. You need a way to tell your game to remove your emitter objects upon their “death”.
Open up SGGEmitter.h and add the following property just below the line that begins with @interface:
@property (nonatomic,readonly,getter=isDead) BOOL dead;
Open SGGEmitter.m and add the following else clause to the existing if statement in update::
else
    _dead = YES;
With that, you have set up a “death” flag for your emitter object that gets triggered at the end of its lifecycle. Now, you need to add the code to perform the actual removal within your game logic.
Open up SGGActionScene.m and turn your attention to the update: method. Locate the following for loop:
for (SGGSprite * projectile in projectilesToDelete)
{
    [self.projectiles removeObject:projectile];
    [self.children removeObject:projectile];
}
...and add the following lines just below it:
if([self.emitters count] != 0)
{
    NSMutableArray * emittersToDelete = [NSMutableArray array];

    for(SGGEmitter* emitter in self.emitters)
    {
        if(emitter.isDead)
            [emittersToDelete addObject:emitter];
    }

    for(SGGEmitter* emitter in emittersToDelete)
    {
        [self.emitters removeObject:emitter];
        [self.children removeObject:emitter];
        NSLog(@"REMOVE EMITTER");
    }
}
This operation should look familiar from Part 2, but it also mirrors the way that projectiles are removed from the game. The code simply checks if an emitter is dead and if so, removes it from the game.
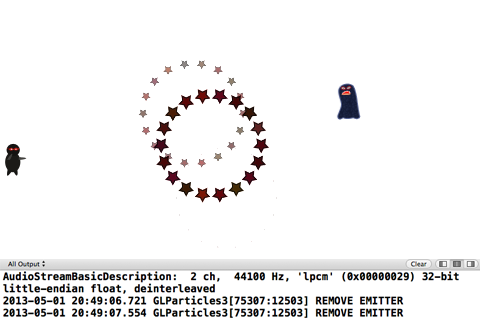
Build and run — your game should be running a lot more smoothly. In addition, you should see a REMOVE EMITTER message on your console output whenever an emitter dies, as shown below:
Gratuitous Sound Effects
That’s it for your particle effects - you did a great job to get this far!
However, this is also a gaming tutorial and you can't have dazzling visuals without some accompanying sound effects! There won't be much background on the behind-the-scenes details of the rendering of the sound effects in this section. It's recommended that you read up on the CocosDenshion sound engine from the simple 2D game series if you need a refresher.
Open up SGGActionScene.m and add the following line to initWithEffect: just after the line that reads [[SimpleAudioEngine sharedEngine] preloadEffect:@"pew-pew.wav"];:
[[SimpleAudioEngine sharedEngine] preloadEffect:@"blast.caf"];
This command preloads your sound effect so the sound doesn’t lag on its first playback.
Now, locate addEmitter: in and add the following line to the very bottom:
[[SimpleAudioEngine sharedEngine] playEffect:@"blast.caf"];
That’s it! Seriously — that's all you have to do! Two simple lines and you're done, thanks to CocosDenshion.
Build and run — it's much more satisfying to hit those monsters now with the added bonus of sound effects to accompany the kill!
Congratulations, you have completed the entire particle system tutorial series! Time to show off your three new apps and take a well deserved break.
Where To Go From Here?
You can find the completed project with all of the code and resources from this tutorial on GitHub. Keep an eye on the repository for any updates!
Part 3 was particularly rewarding because it involved understanding and extending existing code along with managing the OpenGL ES 2.0 pipeline appropriately.
By completing this 3-part series, you should now have a very good understanding of particle system hierarchies, shader programs, low-level graphics, CPU-GPU communication, game engine logic and extensions, and a host of other useful technologies! These are all advanced programming topics — you should feel very pleased with yourself.
You now definitely have what it takes to build more sophisticated particle systems and visual effects. Perhaps you’ll build a virtual snow globe? Or go all out and create an entire galaxy filled with stars? The choices are limitless!
If you have any questions, comments, or suggestions, or just want to show off your creations, feel free to join in the conversation below!
