Creating a Static Library in iOS Tutorial
Learn how to create a static library in iOS in this tutorial, and how to use it from within different projects and architectures. By Ernesto García.
Sign up/Sign in
With a free Kodeco account you can download source code, track your progress, bookmark, personalise your learner profile and more!
Create accountAlready a member of Kodeco? Sign in
Sign up/Sign in
With a free Kodeco account you can download source code, track your progress, bookmark, personalise your learner profile and more!
Create accountAlready a member of Kodeco? Sign in
Contents
Creating a Static Library in iOS Tutorial
30 mins
Create a static library in iOS!

Create a static library in iOS!
If you’ve been developing for iOS for some time, you probably have a decent set of your own classes and utility functions that you reuse in most of your projects.
The easiest way to reuse code is simply to copy/paste the source files. However, this can quickly become a maintenance nightmare. Since each app gets its own copy of the shared code, it’s difficult to keep all the copies in synch for bugfixes and updates.
This is where static libraries come to the rescue! A static library is a package of classes, functions, definitions and resources, which you can pack together and easily share between your projects.
In this tutorial you will get hands-on experience creating your own universal static library, using two different methods.
To get the most of this tutorial, you should be familiar with Objective-C and iOS programming.
Knowledge of Core Image is not needed, but it would help if you’re curious about how the sample application and the filtering code in the library works.
Get ready to reduce, reuse, and recycle your code in the name of efficiency!
Why Use Static Libraries?
You might want to create a static library for different reasons. For example:
- You want to bundle a number of classes that you and/or your colleagues in your team use regularly and share those easily around.
- You want to be able to keep some common code centralized so you can easily add bugfixes or updates.
- You’d like to share a library with a number of people, but not allow them to see your code.
- You’d like to make a version snapshot of a library that develops over time.
In this tutorial, imagine that you went through our Core Image Tutorial, and thought some of the code in there that shows you how to apply some photo effects looked handy.
You’ll take that code and add it into a static library, and then use use that static library in a modified version of the app. The result will be the same application, but with all of the benefits listed above.
Let’s dive in!
Getting Started
Launch Xcode, and choose File\New\Project. When the Choose a template dialog appears, select iOS\Framework & Library\Cocoa Touch Static Library, as shown below:
Click Next. In the project options dialog, type ImageFilters as the product name. Then, enter a unique company identifier and make sure Use Automatic Reference Counting is checked, and Include Unit Tests is unchecked, as so:
Click Next. Finally, choose a location where you’d like to save your new project, and click Create.
Xcode has just created a ready to use static library project, and even added a class ImageFilters for you. (Wasn’t that nice of Xcode?) That’s where your filter implementation code will live.
Note: You can add as many classes to a static library as you want, or even delete the original class. In this tutorial, everything will be added to the starter ImageFilters class.
Note: You can add as many classes to a static library as you want, or even delete the original class. In this tutorial, everything will be added to the starter ImageFilters class.
Since your Xcode project is still pretty much empty let’s add some code in!
Image Filters
This library is designed for iOS and uses UIKit, so the first thing you need to do is import UIKit in the header file. Open ImageFilters.h and add the following import to the top of the file:
#import <UIKit/UIKit.h>
Next, paste the following declarations below the line @interface ImageFilters : NSObject
@property (nonatomic,readonly) UIImage *originalImage;

- (id)initWithImage:(UIImage *)image;
- (UIImage *)grayScaleImage;
- (UIImage *)oldImageWithIntensity:(CGFloat)level;
These header file declarations define the public interface of the class. When other developers (including yourself!) use this library, they’ll know the name of the class and the methods that are exported in the static library just by reading this header.
Now, it’s time to add the implementation. Open ImageFilters.m and paste the following code just below the line: #import "ImageFilters.h":
@interface ImageFilters()

@property (nonatomic,strong) CIContext  *context;
@property (nonatomic,strong) CIImage    *beginImage;

@end
The code above declares some properties used internally by the class. These properties are not public, so any app that uses this library won’t have access to them.
Finally, you need to implement the class methods. Paste the following code just below the line @implementation ImageFilters:
- (id)initWithImage:(UIImage *)image
{
    self = [super init];
    if (self) {
        _originalImage  = image;
        _context        = [CIContext contextWithOptions:nil];
        _beginImage     = [[CIImage alloc] initWithImage:_originalImage];
    }
    return self;
}

- (UIImage*)imageWithCIImage:(CIImage *)ciImage
{
    CGImageRef cgiImage = [self.context createCGImage:ciImage fromRect:ciImage.extent];
    UIImage *image = [UIImage imageWithCGImage:cgiImage];
    CGImageRelease(cgiImage);

    return image;
}

- (UIImage *)grayScaleImage
{
    if( !self.originalImage)
        return nil;

    CIImage *grayScaleFilter = [CIFilter filterWithName:@"CIColorControls" keysAndValues:kCIInputImageKey, self.beginImage, @"inputBrightness", [NSNumber numberWithFloat:0.0], @"inputContrast", [NSNumber numberWithFloat:1.1], @"inputSaturation", [NSNumber numberWithFloat:0.0], nil].outputImage;

    CIImage *output = [CIFilter filterWithName:@"CIExposureAdjust" keysAndValues:kCIInputImageKey, grayScaleFilter, @"inputEV", [NSNumber numberWithFloat:0.7], nil].outputImage;

    UIImage *filteredImage = [self imageWithCIImage:output];
    return filteredImage;
}

- (UIImage *)oldImageWithIntensity:(CGFloat)intensity
{
    if( !self.originalImage )
        return nil;

    CIFilter *sepia = [CIFilter filterWithName:@"CISepiaTone"];
    [sepia setValue:self.beginImage forKey:kCIInputImageKey];
    [sepia setValue:@(intensity) forKey:@"inputIntensity"];

    CIFilter *random = [CIFilter filterWithName:@"CIRandomGenerator"];

    CIFilter *lighten = [CIFilter filterWithName:@"CIColorControls"];
    [lighten setValue:random.outputImage forKey:kCIInputImageKey];
    [lighten setValue:@(1 - intensity) forKey:@"inputBrightness"];
    [lighten setValue:@0.0 forKey:@"inputSaturation"];

    CIImage *croppedImage = [lighten.outputImage imageByCroppingToRect:[self.beginImage extent]];

    CIFilter *composite = [CIFilter filterWithName:@"CIHardLightBlendMode"];
    [composite setValue:sepia.outputImage forKey:kCIInputImageKey];
    [composite setValue:croppedImage forKey:kCIInputBackgroundImageKey];

    CIFilter *vignette = [CIFilter filterWithName:@"CIVignette"];
    [vignette setValue:composite.outputImage forKey:kCIInputImageKey];
    [vignette setValue:@(intensity * 2) forKey:@"inputIntensity"];
    [vignette setValue:@(intensity * 30) forKey:@"inputRadius"];

    UIImage *filteredImage = [self imageWithCIImage:vignette.outputImage];

    return filteredImage;
}
This code implements the initialization and the methods that perform the Core Image filtering. Since explaining the function of the Core Image code above it outside of the scope of this tutorial, you can learn more about Core Images and filters in the Core Image Tutorial.
At this point, you have a static library with a public class ImageFilters that exposes the following three methods:
- initWithImage: Initializes the filtering class
- grayScaleImage: Creates a grayscale version of the image
- oldImageWithIntensity: Creates an old-looking image
Now build and run your library. You will notice the usual Xcode “Run” button just performs a build; you can’t actually run your library to see the results as there’s no app behind it!
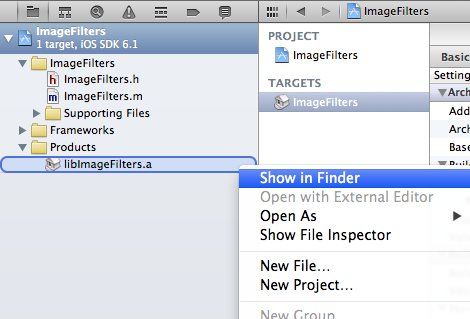
Rather than a .app or a .ipa file, a static library has the .a extension. You can find the generated static library in the Products folder in the project navigator. Right-click or control-click libImageFilters.a and select Show in Finder in the contextual menu.
Xcode will open the folder in Finder, where you’ll see something like this:
There are two parts to the end product of a shared library:
Header files: In the include folder, you will find all the public headers of the library. In this case, there’s only one public class so this folder only has the single ImageFilters.h file. You’ll need to use this header file later in your app’s project so that Xcode knows about the exported classes at compile time.
Binary Library: The static library file that Xcode generates is ImageFilters.a. When you want to use this library in an application, you’ll need to link it using this file.
These two pieces are similar to the things you need when including a new framework into your app; you simply import the framework header and the framework code gets linked into the app.
The shared library is ready to be used — with one small caveat. By default, the library file will be built only for the current architecture. If you build for the simulator, the library will contain object code for the i386 architecture; and if you build for the device you’ll get code for the ARM architecture. You would need to build two versions of the library and pick which one to link as you change targets from simulator to device.
What to do?
Fortunately, there’s a better way to support multiple platforms without the need to create multiple configurations or build products in your application’s project. You can create a universal binary that contains the object code for both architectures.


