Text Kit Tutorial
Learn how to easily layout your text in iOS 7 in this Text Kit tutorial! By Colin Eberhardt.
Adding further styles
The basic principle of applying styles to delimited text is rather straightforward: use a regex to find and replace the delimited string using applyStylesToRange to set the desired style of the text.
Add the following instance variable to SyntaxHighlightTextStorage.m:
- (void) createHighlightPatterns {
    UIFontDescriptor *scriptFontDescriptor =
      [UIFontDescriptor fontDescriptorWithFontAttributes:
          @{UIFontDescriptorFamilyAttribute: @"Zapfino"}];

    // 1. base our script font on the preferred body font size
    UIFontDescriptor* bodyFontDescriptor = [UIFontDescriptor
      preferredFontDescriptorWithTextStyle:UIFontTextStyleBody];
    NSNumber* bodyFontSize = bodyFontDescriptor.
                  fontAttributes[UIFontDescriptorSizeAttribute];
    UIFont* scriptFont = [UIFont
              fontWithDescriptor:scriptFontDescriptor size:[bodyFontSize floatValue]];

    // 2. create the attributes
    NSDictionary* boldAttributes = [self
     createAttributesForFontStyle:UIFontTextStyleBody
                        withTrait:UIFontDescriptorTraitBold];
    NSDictionary* italicAttributes = [self
     createAttributesForFontStyle:UIFontTextStyleBody
                        withTrait:UIFontDescriptorTraitItalic];
    NSDictionary* strikeThroughAttributes = @{ NSStrikethroughStyleAttributeName : @1};
    NSDictionary* scriptAttributes = @{ NSFontAttributeName : scriptFont};
    NSDictionary* redTextAttributes =
                          @{ NSForegroundColorAttributeName : [UIColor redColor]};

    // construct a dictionary of replacements based on regexes
    _replacements = @{
              @"(\\*\\w+(\\s\\w+)*\\*)\\s" : boldAttributes,
              @"(_\\w+(\\s\\w+)*_)\\s" : italicAttributes,
              @"([0-9]+\\.)\\s" : boldAttributes,
              @"(-\\w+(\\s\\w+)*-)\\s" : strikeThroughAttributes,
              @"(~\\w+(\\s\\w+)*~)\\s" : scriptAttributes,
              @"\\s([A-Z]{2,})\\s" : redTextAttributes};
}
Here’s what’s going on in this method:
It first creates a “script” style using Zapfino as the font. Font descriptors help determine the current preferred body font size, which ensures the script font also honors the users’ preferred text size setting.
- Next, it constructs the attributes to apply to each matched style pattern. You’ll cover
createAttributesForFontStyle:withTrait:in a moment; just park it for now. - Finally, it creates a dictionary that maps regular expressions to the attributes declared above.
It first creates a “script” style using Zapfino as the font. Font descriptors help determine the current preferred body font size, which ensures the script font also honors the users’ preferred text size setting.
If you’re not terribly familiar with regular expressions, the dictionary above might look a bit strange. But if you deconstruct the regular expressions that it contains, piece by piece, you can decode them without much effort.
Take the first regular expression you implemented above that matches words surrounded by asterisks:
(\\*\\w+(\\s\\w+)*\\*)\\s
The double slashes are a result of having to escape special characters in regular expressions in Objective-C with an extra backslash. If you cast out the escaping backslashes, and consider just the core regular expression, it looks like this:
(\*\w+(\s\w+)*\*)\s
Now, deconstruct the regular expression step by step:
- (\* - match an asterisk
- \w+ - followed by one or more “word” characters
- (\s\w+)* - followed by zero or more groups of spaces followed by “word” characters
- \*) - followed by an asterisk
- \s - terminated by a space.
Note: If you’d like to learn more about regular expressions above and beyond this chapter, check out this NSRegularExpression tutorial and cheat sheet.
As an exercise, decode the other regular expressions yourself, using the explanation above and the cheat sheet as a guide. How many can you do on your own?
Now you need to actually call createHighlightPatterns from somewhere.
Update init in SyntaxHighlightTextStorage.m as follows:
- (id)init
{
    if (self = [super init]) {
        _backingStore = [NSMutableAttributedString new];
        [self createHighlightPatterns];
    }
    return self;
}
Add the following method to SyntaxHighlightTextStorage.m:
- (NSDictionary*)createAttributesForFontStyle:(NSString*)style
                                    withTrait:(uint32_t)trait {
    UIFontDescriptor *fontDescriptor = [UIFontDescriptor
                               preferredFontDescriptorWithTextStyle:UIFontTextStyleBody];

    UIFontDescriptor *descriptorWithTrait = [fontDescriptor
                                    fontDescriptorWithSymbolicTraits:trait];

    UIFont* font =  [UIFont fontWithDescriptor:descriptorWithTrait size: 0.0];
    return @{ NSFontAttributeName : font };
}
The above method applies the supplied font style to the body font. It provides a zero size to fontWithDescriptor:size: which forces UIFont to return a size that matches the user’s current font size preferences.
Next, replace the existing applyStylesToRange method with the one below:
- (void)applyStylesToRange:(NSRange)searchRange
{
    NSDictionary* normalAttrs = @{NSFontAttributeName:
                      [UIFont preferredFontForTextStyle:UIFontTextStyleBody]};

    // iterate over each replacement
    for (NSString* key in _replacements) {
        NSRegularExpression *regex = [NSRegularExpression
                                            regularExpressionWithPattern:key
                                                                 options:0
                                                                   error:nil];

        NSDictionary* attributes = _replacements[key];

        [regex enumerateMatchesInString:[_backingStore string]
                          options:0
                            range:searchRange
                       usingBlock:^(NSTextCheckingResult *match,
                                    NSMatchingFlags flags,
                                    BOOL *stop){
            // apply the style
            NSRange matchRange = [match rangeAtIndex:1];
            [self addAttributes:attributes range:matchRange];

            // reset the style to the original
            if (NSMaxRange(matchRange)+1 < self.length) {
                [self addAttributes:normalAttrs
                              range:NSMakeRange(NSMaxRange(matchRange)+1, 1)];
            }
        }];
    }
}
This code does pretty much exactly what it did before, but this time it iterates over the dictionary of regex matches and attributes, and applies the specified style to the matched patterns.
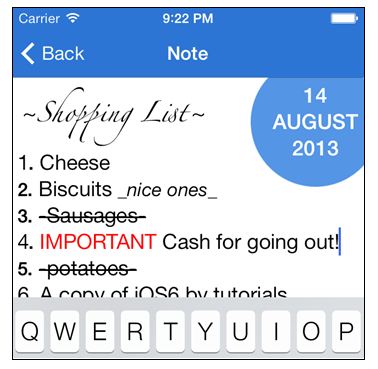
Build and run your app, and exercise all of the new styles available to you, as illustrated below:
Your app is nearly complete; there’s just a few loose ends to clean up.
If you’ve changed the orientation of your screen while working on your app, you’ve already noticed that the app no longer responds to content size changed notifications since your custom implementation doesn’t yet support this action.
As for the second issue, if you add a lot of text to a note you’ll notice that the bottom of the text view is partially obscured by the keyboard; it’s a little hard to type things when you can’t see what you’re typing!
Time to fix up those two issues.
Reviving dynamic type
To correct the issue with dynamic type, your code should update the fonts used by the attributed string containing the text of the note when the content size change notification occurs.
Open up SyntaxHighlightTextStorage.h and add the following method declaration to the interface:
@interface SyntaxHighlightTextStorage : NSTextStorage
- (void)update;
@end
Next, add the following implementation to SyntaxHighlightTextStorage.m:
-(void)update {
    // update the highlight patterns
    [self createHighlightPatterns];

    // change the 'global' font
    NSDictionary* bodyFont = @{NSFontAttributeName :
                             [UIFont preferredFontForTextStyle:UIFontTextStyleBody]};
    [self addAttributes:bodyFont
                  range:NSMakeRange(0, self.length)];

    // re-apply the regex matches
    [self applyStylesToRange:NSMakeRange(0, self.length)];
}
The method above updates all the fonts associated with the various regular expressions, applies the body text style to the entire string, and then re-applies the highlighting styles.
Finally, open NoteEditorViewController.m and update preferredContentSizeChanged: to invoke update:
- (void)preferredContentSizeChanged:(NSNotification *)notification {
    [_textStorage update];
    [self updateTimeIndicatorFrame];
}
Build and run your app and change your text size preferences; the text should adjust accordingly as in the example below:
Resizing text views
All that’s left to do is solve the problem of the keyboard obscuring the bottom half of the text view when editing long notes. This is one issue that iOS 7 hasn’t solved for us yet!
To fix this, you’ll reduce the size of the text view frame when the keyboard is visible.
Add the following line to viewDidLoad in NoteEditorViewController.m, right after the line that instantiates the text view:
_textView.scrollEnabled = YES;
This enables text view scrolling in your note editor view.
Now add the following code to the bottom of viewDidLoad:
[[NSNotificationCenter defaultCenter]
                         addObserver:self
                            selector:@selector(keyboardDidShow:)
                                name:UIKeyboardDidShowNotification
                              object:nil];

[[NSNotificationCenter defaultCenter]
                        addObserver:self
                           selector:@selector(keyboardDidHide:)
                               name:UIKeyboardDidHideNotification
                             object:nil];
This notifies you when the keyboard is shown or hidden; this is your signal to resize your text view frame accordingly.
Next add the following instance variable:
CGSize _keyboardSize;
This variable stores the keyboard size, which you’ll use when calculating the dimensions of your resized text view.
Add the following methods to the bottom of the file:
- (void)keyboardDidShow:(NSNotification *)nsNotification {
    NSDictionary *userInfo = [nsNotification userInfo];
    _keyboardSize = [[userInfo
        objectForKey:UIKeyboardFrameBeginUserInfoKey]
                                         CGRectValue].size;
    [self updateTextViewSize];
}

- (void)keyboardDidHide:(NSNotification *)nsNotification {
    _keyboardSize = CGSizeMake(0.0, 0.0);
    [self updateTextViewSize];
}
The above two methods set _keyboardSize appropriately when the keyboard is shown or hidden.
Finally, add the following method to the bottom of the file:
- (void)updateTextViewSize {
    UIInterfaceOrientation orientation =
                      [UIApplication sharedApplication].statusBarOrientation;
    CGFloat keyboardHeight =
                   UIInterfaceOrientationIsLandscape(orientation) ?
                                  _keyboardSize.width : _keyboardSize.height;

    _textView.frame = CGRectMake(0, 0,
                                 self.view.frame.size.width,
                                 self.view.frame.size.height - keyboardHeight);
}
The above code reduces the height of the text view to accommodate the keyboard.
You need to account for the current screen orientation when calculating the new text view size; that’s because the width and height properties of UIView instances are swapped when the screen orientation changes, but the keyboard’s width and height properties are not!
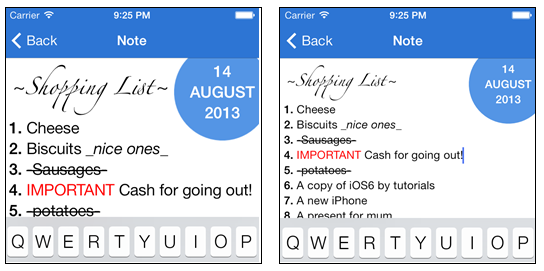
Build and run your app, edit a note and check that displaying the keyboard no longer obscures the text, as shown below:

Note: at the time of writing there is a subtle bug with iOS 7 – when the text view is resized, the cursor position may still be off screen. The cursor moves to its correct location if the user taps the ‘return’ key. We’ll keep an eye on this, and if the bug persists we’ll try to find an alternative solution.