iOS 7 Blur Effects with GPUImage
iOS 7 embodies deference, clarity and depth. Using GPUImage, this tutorial looks at one of the most appealing aspects of depth; the iOS 7 blur effect. By Mike Jaoudi.
Testing Your Capture with Breakpoints
To test out your code, add a breakpoint on the line directly below the call to convertViewToImage. The program will halt execution when it hits the breakpoint and you can view the captured image to make sure your code is functioning properly.
To add a breakpoint, click in the margin to the left of the line and Xcode with mark the spot with a blue arrow, as shown below:

The only thing left to do before you test things out is to call your new method.
Scroll up to show and add a call to updateBlur, directly below addToParentViewController:
-(void)show {
    [self addToParentViewController];

    [self updateBlur]; // Add this line

    CGRect deviceSize = [UIScreen mainScreen].bounds;

    [UIView animateWithDuration:0.25f animations:^(void){
        _blurView.frame = CGRectMake(0, 0, deviceSize.size.height, MENUSIZE);
        _backgroundView.frame = CGRectMake(0, 0, _backgroundView.frame.size.width, MENUSIZE);
    }];
}
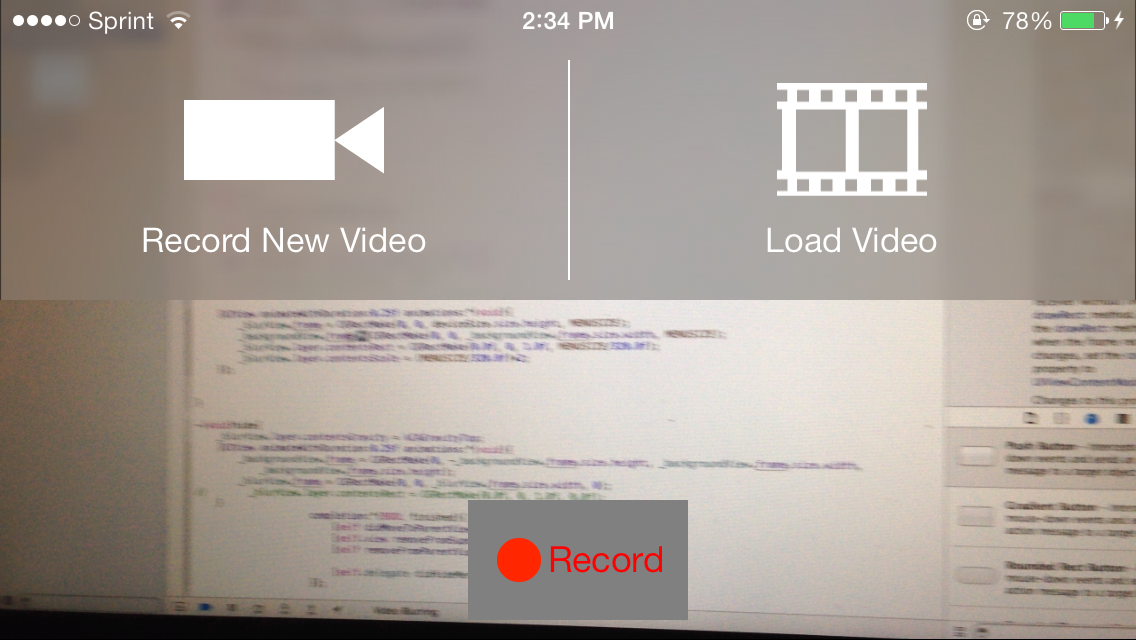
Build and run the app; tap the menu button and you’ll see that Xcode stops at your breakpoint, as shown below:

To preview the image, select image in the lower left hand pane of the debugger, then click the Quick Look icon as indicated below:

There’s your captured image, as expected.
Displaying the Captured Image
Now it’s a simple matter to display the captured image in the background of your menu.
You’d usually use an instance of UIImageView to display an image, but since you’ll be using GPUImage to blur the images, you’ll need to use an instance of GPUImageView instead.
The GPUImage framework has already been added to the project; you just need to import the header.
Add the following import to the top of DropDownMenuController.m, just below the others:
#import <GPUImage/GPUImage.h>
There’s currently an instance of UIView— _blurView — that gives the menu its gray background.
There’s a UIView instance variable named _blurView, which is used to provide the gray background of the menu. Change the declaration so _blurView is an instance of GPUImageView instead, as shown below:
@implementation DropDownMenuController {
    GPUImageView *_blurView;
    UIView *_backgroundView;
}
You’ll notice that Xcode is giving you a warning: you’re initialising an instance UIView, not GPUImageView, as it expects.
Fix that now. Update the variable assignment in viewDidLoad to the following:
_blurView = [[GPUImageView alloc] initWithFrame:CGRectMake(0, 0, deviceSize.size.height, 0)];
Add the following two lines directly below it, removing the line that sets the background color:
_blurView.clipsToBounds = YES;
_blurView.layer.contentsGravity = kCAGravityTop;
clipToBounds ensures the contents of the view stay inside the view, while contentsGravity fixes the image to the top of the image view.
Since _blurView is already being used as the background, you don’t have to write any extra code to make it visible.
You also need to declare the filter that you will use for blurring.
Add the following declaration to the @implementation block of DropDownMenuController.m:
GPUImageiOSBlurFilter *_blurFilter;
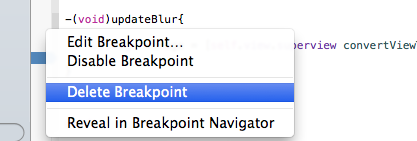
Find the breakpoint you added earlier, right click it and select Delete Breakpoint, as follows:
Now would be a great time to initialize your blur filter. Add the following code to DropDownMenuController.m:
-(void)updateBlur
{
    if(_blurFilter == nil){
        _blurFilter = [[GPUImageiOSBlurFilter alloc] init];
         _blurFilter.blurRadiusInPixels = 1.0f;

    }

    UIImage *image = [self.view.superview convertViewToImage];
}
Note that the blur radius is set to only a single pixel; you’re temporarily setting this to a low value so that you can ensure the image is properly positioned. Once you’re happy you’ll increase it later.
Now you need to display the image in the GPUImageView. However, you can’t simply add an instance of UIImage to a GPUImageView as you would with a UIImageView — you first need to create a GPUImagePicture.
Add the following line to the bottom of updateBlur:
GPUImagePicture *picture = [[GPUImagePicture alloc] initWithImage:image];
At this point, you now have your image, blur filter and image view.
Add the following code to the bottom of updateBlur:
[picture addTarget:_blurFilter];
[_blurFilter addTarget:_blurView];

[picture processImage];
These statements act as the glue which bonds everything together. You add the filter as a target of the picture, and then the image view as a target of the filter.
The really neat part of all this is that the image processing is taking place on the GPU; this means that the user interface won’t stall while the blur is calculated and displayed. The final result will simply show up in the image view when the processing is complete. Typically this doesn’t take much time at all, but it never hurts to let the GPU do the heavy lifting when appropriate.
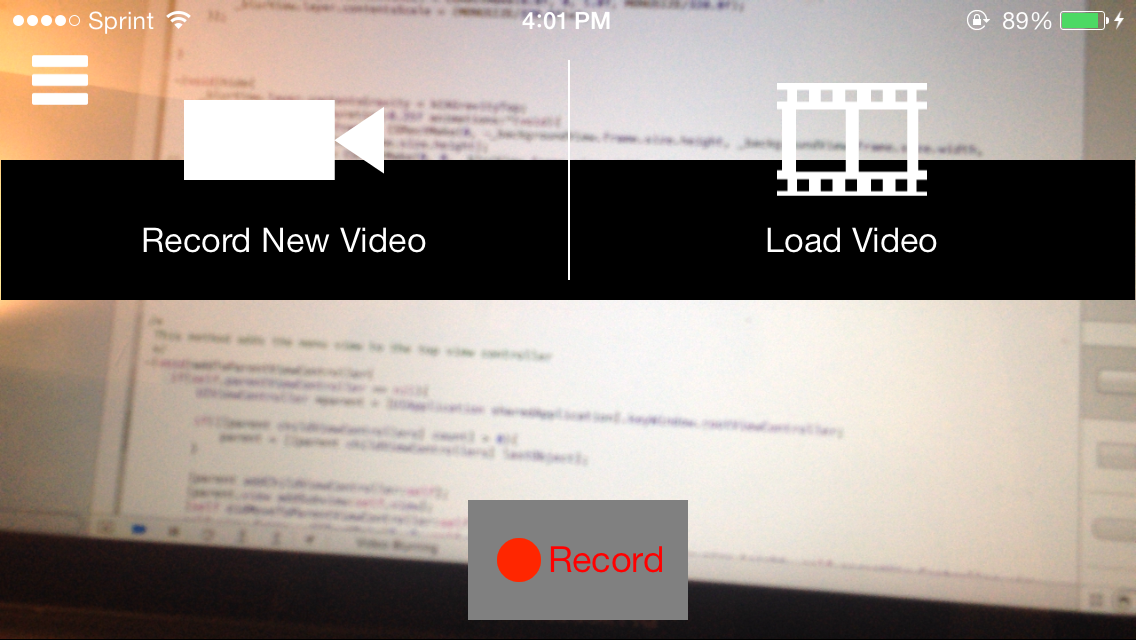
Build and run your app; click on the menu and you’ll see something similar to the following:

That looks a little odd, doesn’t it? What you’re seeing now is the resized image shrunk to fit inside the menu view. To correct this, you’ll need to specify what part of the image you want to show inside the GPUImageView — namely, the top half of your captured and processed view.
Setting contentsRect
Modify show in DropDownMenuController.m as follows:
-(void)show
{
    [self addToParentViewController];

    [self updateBlur];

    CGRect deviceSize = [UIScreen mainScreen].bounds;

    [UIView animateWithDuration:0.25f animations:^(void){
        _blurView.frame = CGRectMake(0.0f, 0.0f, deviceSize.size.height, MENUSIZE);
        _backgroundView.frame = CGRectMake(0.0f, 0.0f, _backgroundView.frame.size.width, MENUSIZE);
        _blurView.layer.contentsRect = CGRectMake(0.0f, 0.0f, 1.0f, MENUSIZE / 320.0f); // Add this line!
    }];
}
By specifying the contentsRect you define the rectangle, in the unit coordinate space, that indicates the portion of the layer’s contents that should be used.
Build and run your app, tap the menu button, and…

Uh, that still doesn’t look right! You’re using the correct part of the image, but it’s still scaling inappropriately! The piece you’re missing is the correct content scaling.
Add the following line to show, at the bottom of the animation block:
_blurView.layer.contentsScale = (MENUSIZE / 320.0f) * 2;
The contentsScale property defines the mapping between the logical coordinate space of the layer (measured in points) and the physical coordinate space (measured in pixels). Higher scale factors indicate that each point in the layer is represented by more than one pixel at render time.
Build and run your app, hit the Menu button and check if the scaling works properly:
Yeah — that looks much better! Now close the app, re-open it, and…uh-oh, what’s happened?
Well that’s a bit problematic, to say the least. If you reset the contentScale back to 2.0 before you animate the view, it fixes the half bar problem.
Add the following line to show in DropDownMenuController.m, just above the animation block:
_blurView.layer.contentsScale = 2.0f;
Build and run your app; tap Menu, close the menu, and then tap Menu again. What does your menu look like now?

The half-size black box is no longer a problem — but now you have a full-size black box to contend with!