How To Implement A* Pathfinding with Swift
Learn how to implement the A* pathfinding algorithm into a Sprite Kit game to calculate paths between two points. By Gabriel Hauber.
Creating the ShortestPathStep Class
In order to calculate the shortest path using the A* algorithm, you need to know for each of the path’s steps:
- Location
- F, G and H scores
- parent step (so you can trace back along its length from end to beginning)
You’ll capture all this information in a private class called ShortestPathStep.
Add the following code to the top of AStarPathfinder.swift:
/** A single step on the computed path; used by the A* pathfinding algorithm */
private class ShortestPathStep: Hashable {
  let position: TileCoord
  var parent: ShortestPathStep?

  var gScore = 0
  var hScore = 0
  var fScore: Int {
    return gScore + hScore
  }

  var hashValue: Int {
    return position.col.hashValue + position.row.hashValue
  }

  init(position: TileCoord) {
    self.position = position
  }

  func setParent(parent: ShortestPathStep, withMoveCost moveCost: Int) {
    // The G score is equal to the parent G score + the cost to move from the parent to it
    self.parent = parent
    self.gScore = parent.gScore + moveCost
  }
}

private func ==(lhs: ShortestPathStep, rhs: ShortestPathStep) -> Bool {
  return lhs.position == rhs.position
}

extension ShortestPathStep: Printable {
  var description: String {
    return "pos=\(position) g=\(gScore) h=\(hScore) f=\(fScore)"
  }
}
As you can see, this is a very simple class that keeps track of the following:
- The step’s tile coordinate
- The G score (the movement cost from the start to the step’s position)
- The H score (the estimated number of tiles between the current position and destination)
- The step before this step in the path (the parent)
- The F score, that is, the score for this tile (calculated by adding G + H).
The class also conforms to the Equatable protocol: two steps are equal if they refer to the same location, regardless of their G or H scores.
Finally, it is also Printable for the purposes of human-friendly debug messages.
Implementing the A* Algorithm
Now the bootstrapping is over and it’s time to write the code to calculate the optimal path! First, add the following helper methods to the AStarPathfinder class:
private func insertStep(step: ShortestPathStep, inout inOpenSteps openSteps: [ShortestPathStep]) {
  openSteps.append(step)
  openSteps.sort { $0.fScore <= $1.fScore }
}

func hScoreFromCoord(fromCoord: TileCoord, toCoord: TileCoord) -> Int {
  return abs(toCoord.col - fromCoord.col) + abs(toCoord.row - fromCoord.row)
}
The first method insertStep(_:inOpenSteps:) inserts a ShortestPathStep into the open list at the appropriate position ordered by F score. Note that it modifies the array in-place and is passed in as an inout parameter.
The second method computes the H score for a square according to the Manhattan (or “city block”) method, which calculates the total number of steps moved horizontally and vertically to reach the final desired step from the current step, ignoring any obstacles that may be in the way.
With these helper methods in place, you now have everything you need to implement the pathfinding algorithm itself.
Delete the current placeholder code in shortestPathFromTileCoord(_:toTileCoord:) and replace it with the following:
// 1
if self.dataSource == nil {
  return nil
}
let dataSource = self.dataSource!

// 2
var closedSteps = Set<ShortestPathStep>()
var openSteps = [ShortestPathStep(position: fromTileCoord)]

while !openSteps.isEmpty {
  // 3
  let currentStep = openSteps.removeAtIndex(0)
  closedSteps.insert(currentStep)

  // 4
  if currentStep.position == toTileCoord {
    println("PATH FOUND : ")
    var step: ShortestPathStep? = currentStep
    while step != nil {
      println(step!)
      step = step!.parent
    }
    return []
  }

  // 5
  let adjacentTiles = dataSource.walkableAdjacentTilesCoordsForTileCoord(currentStep.position)
  for tile in adjacentTiles {
    // 6
    let step = ShortestPathStep(position: tile)
    if closedSteps.contains(step) {
      continue
    }
    let moveCost = dataSource.costToMoveFromTileCoord(currentStep.position, toAdjacentTileCoord: step.position)

    if let existingIndex = find(openSteps, step) {
      // 7
      let step = openSteps[existingIndex]

      if currentStep.gScore + moveCost < step.gScore {
        step.setParent(currentStep, withMoveCost: moveCost)

        openSteps.removeAtIndex(existingIndex)
        insertStep(step, inOpenSteps: &openSteps)
      }

    } else {
      // 8
      step.setParent(currentStep, withMoveCost: moveCost)
      step.hScore = hScoreFromCoord(step.position, toCoord: toTileCoord)

      insertStep(step, inOpenSteps: &openSteps)
    }
  }

}

return nil
This is an important method, so let's take it section by section:
- If there's no valid data source then you can exit early. If there is one, you set up a shadowed local variable to unwrap it.
- Set up the data structures to keep track of the steps. The open steps list starts with the initial position.
- Remove the lowest F cost step from the open list and add it to the closed list. Because the list is ordered, the first step is always the one with the lowest F cost.
- If the current step is the destination, you're done! For now, you're just logging the path out to the console.
- Get the adjacent tiles coordinates of the current step and begin looping through them.
- Get the step and check that it isn't already in the closed list. If not, calculate the movement cost.
- If the step is in the open list, then grab that version of the step. If the current step and movement score is better than the old score, then replace the step's existing parent with the current step.
- If the step isn't in the open list then compute the H score and add it.
Build and run to try it out! If you touch the tile shown below:
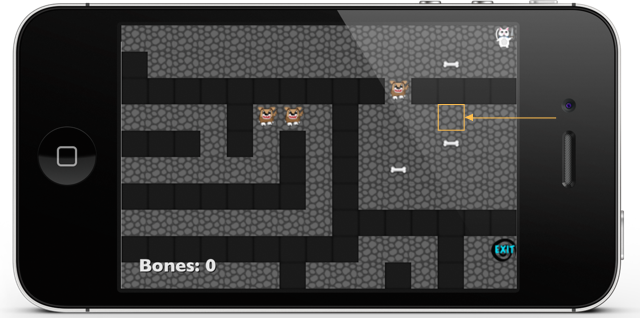
You should see this in the console:
pos=[col=22 row=3] g=9 h=0 f=9
pos=[col=21 row=3] g=8 h=1 f=9
pos=[col=20 row=3] g=7 h=2 f=9
pos=[col=20 row=2] g=6 h=3 f=9
pos=[col=20 row=1] g=5 h=4 f=9
pos=[col=21 row=1] g=4 h=3 f=7
pos=[col=22 row=1] g=3 h=2 f=5
pos=[col=23 row=1] g=2 h=3 f=5
pos=[col=24 row=1] g=1 h=4 f=5
pos=[col=24 row=0] g=0 h=0 f=0
Remember the path is built backwards, so you have to read from bottom to top to see what path the algorithm has chosen. Try to match these up to the tiles in the maze so you can see that it really is the shortest path!
Following the Yellow Brick Path
Now that the path is calculated, you just have to make the cat follow it. The cat will have to remember the whole path, and then follow it step by step.
Open Cat.swift and find moveTo(_:). Add the following code to the end of the method, after the line that sets shortestPath:
if let shortestPath = shortestPath {
  for tileCoord in shortestPath {
    println("Step: \(tileCoord)")
  }
}
The pathfinder isn't actually yet returning the path, so switch to AStarPathfinder.swift. Remember that when the algorithm finishes, it has a path from the final step back to the beginning. This needs to be reversed, and returned to the caller as an array of TileCoords instead of ShortestPathSteps.
Add the following helper method to the AStarPathfinder class:
private func convertStepsToShortestPath(lastStep: ShortestPathStep) -> [TileCoord] {
  var shortestPath = [TileCoord]()
  var currentStep = lastStep
  while let parent = currentStep.parent { // if parent is nil, then it is our starting step, so don't include it
    shortestPath.insert(currentStep.position, atIndex: 0)
    currentStep = parent
  }
  return shortestPath
}
You're reversing the array by inserting each step's parent at the beginning of an array until the beginning step is reached.
Inside shortestPathFromTileCoord(_:toTileCoord:), find the block of code inside the if currentStep.position == toTileCoord { statement that logs out the path. Replace it with the following code:
return convertStepsToShortestPath(currentStep)
This will run your helper method to put the steps in the correct order and return that path.
Build and run. If you try moving the cat, you should see this in the console:
Step: [col=24 row=1]
Step: [col=23 row=1]
Step: [col=22 row=1]
Step: [col=21 row=1]
Step: [col=20 row=1]
Step: [col=20 row=2]
Step: [col=20 row=3]
Step: [col=21 row=3]
Step: [col=22 row=3]
Yes! Now you have tile coordinates ordered from start to finish (instead of reversed), nicely stored in an array for you to use.