Hashing
You did a great job getting authentication set up! However the fun isn’t over yet. Now you’ll address that blank space in front of the names in the friends view.
In FriendsViewController.swift, there is a list of User model objects displayed. You also want to show avatar images for each user in the view. Since there are only two attributes on the User, a name and email, how are you supposed to show an image?
It turns out there is a service that takes an email address and associates it with an avatar image: Gravatar! If you haven’t heard of Gravatar before, it’s commonly used on blogs and forums to globally associate an email address with an avatar. This simplifies things so that users don’t have to upload a new avatar to every forum or site they join.
Each of these users has an avatar associated with their email already. So the only thing you have to do is make a request to Gravatar and get their images. To do so, you’ll create a MD5 hash of their email to build the request URL.
If you look at the docs on Gravatar’s site, you’ll see you need a hashed email address to build a request. This will be a piece of cake since you can leverage CryptoSwift. Add the following, in place of the comment about Gravatar, in tableView(_:cellForRowAt:):
// 1
let emailHash = user.email.trimmingCharacters(in: .whitespacesAndNewlines)
                          .lowercased()
                          .md5()

// 2
if let url = URL(string: "https://www.gravatar.com/avatar/" + emailHash) {
  URLSession.shared.dataTask(with: url) { data, response, error in
    guard let data = data, let image = UIImage(data: data) else {
      return
    }

    // 3
    self.imageCache.setObject(image, forKey: user.email as NSString)

    DispatchQueue.main.async {
      // 4
      self.tableView.reloadRows(at: [indexPath], with: .automatic)
    }
  }.resume()
}
Here’s the breakdown:
- First you normalize the email according to Gravatar’s docs, then you create a MD5 hash.
- You construct the Gravatar URL and URLSession. You load a
UIImage from the returned data.
- You cache the image to avoid repeat fetches for an email address.
- You reload the row in the table view so the avatar image shows up.
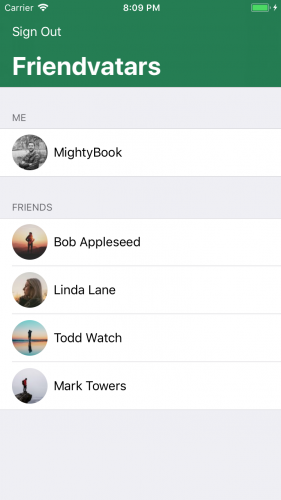
Build and run. Now you can view your friends’ avatar images and names:

Note: If your email returns the default white on blue G, then head over to Gravatar’s site and upload your own avatar and join your friends!
Where to Go From Here?
You now have a complete app the handles basic iOS security and authentication, and you can view avatars powered by Gravatar. You learned about the importance of security, about the iOS keychain and some best practices like storing hashes instead of plain text values. Hopefully, you also had a great time learning about this!
You can download the completed version of the project using the Download Materials button at the top or bottom of this tutorial.
If you’re interested in more ways to secure your applications, learn to use biometric sensors on the latest Apple products in this tutorial.
You can also read more about Apple’s Security framework if you want to really dig into the framework.
Finally, be sure to explore more security algorithms provided by CryptoSwift.
I hope you enjoyed this tutorial! If you have any questions or comments, please join the discussion below!
