iPadOS Multitasking: Using Multiple Windows for Your App
In this iPadOS Multitasking tutorial, you’ll learn how to get the most out of iPad screens and multitasking features for your app. By David Piper.
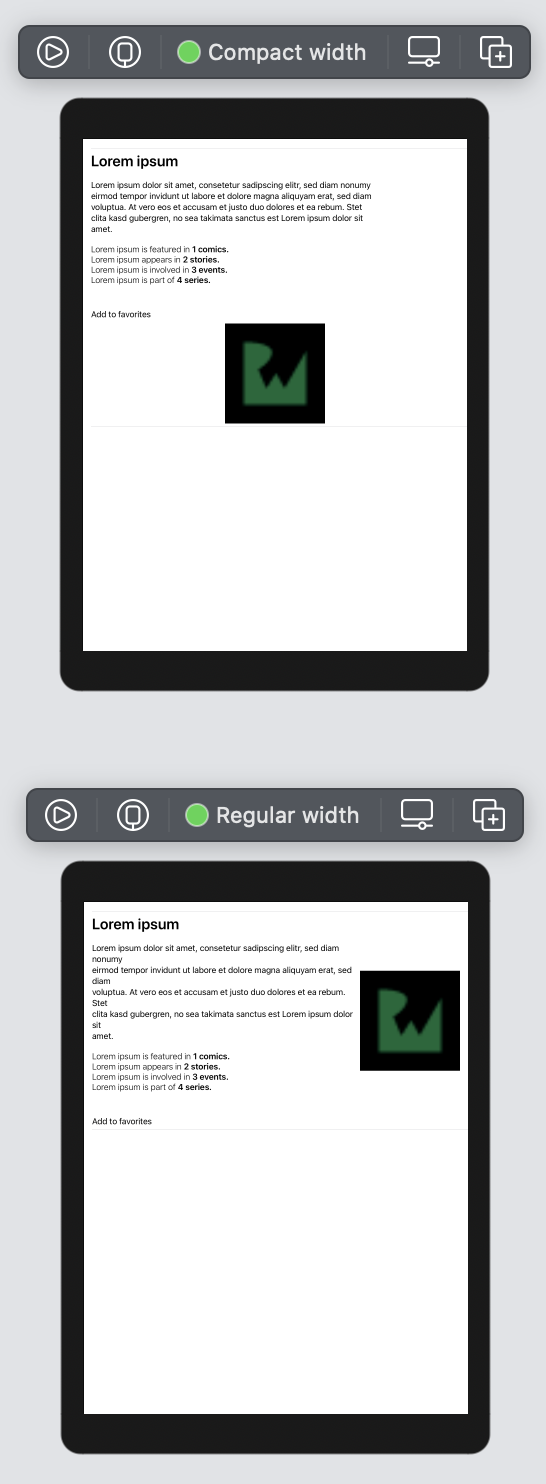
Handling Size Classes in SwiftUI
SwiftUI uses the property wrapper @Environment to access values relevant for all views. These values include the color scheme, layout direction and user’s locale. They also include horizontalSizeClass, which you’ve used to configure the previews above.
Open HeroRow.swift. Replace body with:
// 1
@Environment(\.horizontalSizeClass) var horizontalSizeClass

var body: some View {
  Group {
    // 2
    if horizontalSizeClass == .regular {
      HStack {
        MarvelDescriptionSection(hero: hero, state: state)
        Spacer()
        MarvelImage(hero: hero, state: state)
      }
    // 3
    } else {
      VStack {
        HStack {
          MarvelDescriptionSection(hero: hero, state: state)
          Spacer()
        }
        Spacer()
        HStack {
          Spacer()
          MarvelImage(hero: hero, state: state)
          Spacer()
        }
      }
    }
  }
}
Here’s the code breakdown:
- You get information about the current size class by using
@Environment. Here, you access itshorizontalSizeClassvia the key path. Think of a key path as a function to access a property of a class or struct, but with a special syntax. With(\.horizontalSizeClass)you get the value of the currentEnvironmentandhorizontalSizeClass. - Then, you check whether the current size class is regular or compact in your SwiftUI view’s body property. A row consists of a description block and an image. The Marvel description block contains information about the current hero. Use
HStackwhen the current size class equals.regular. This is because there’s enough space to place these views next to each other. - If the size class is
.compact, the app doesn’t have as much horizontal space as before. So you place the description block above the image. ExtraHStacksandSpacershelp to neatly align the views.
Open HeroList.swift. Look at the preview again. Now, it’ll look like this:
Build and run. When presenting two list of heroes in Split View, your app will look like this:

Now MarvelousHeroes not only supports two windows but also changes the layout when used in different class sizes. :]
But there’s one more thing you can add to get the full potential for multi-window support: drag and drop.
Implementing Drag and Drop
Users can tap the favorite button to add a hero to their favorite heroes. But, what if all the heroes are your favorite heroes? It would be annoying to do this for every hero.
Fortunately, there’s drag and drop. You’ll add the ability to drag a hero from the overview view and drop it in the favorites list view.
You may wonder how it’s possible to send data from one instance of an app to another or even to a different app. In iOS and iPadOS, the source app encodes a dragged item as Data and wraps it inside NSItemProvider. On dropping an element, the destination app unwraps and decodes it.
The source app defines the type of the dragged object by providing a Uniform Type Identifier, or UTI. There are many types you can use to describe the data your app is passing around, such as public.data or public.image. You’ll find a list of all available UTIs in Apple’s documentation about UTType or on Wikipedia.
In the case of your hero, public.data is the correct UTI.
The destination app defines a list of UTIs as well. The destination app must handle the source app’s data type to perform a drag and drop interaction.
You can define these types as raw strings or use Apple’s MobileCoreServices, which defines constants for different UTIs.
You’ll use NSItemProvider to pass around your hero. It contains the data and transports it to the receiving app. Then, the receiving app loads the hero asynchronously. Think of NSItemProvider as a promise between two apps.
To wrap a hero in NSItemProvider, MarvelCharacter needs to implement two protocols: NSItemProviderWriting and NSItemProviderReading. As you can guess, the first protocol adds the ability to create an NSItemProvider from a given hero. The other converts a given NSItemProvider back to an instance of MarvelCharacter.
The image below summarizes the collaboration between the source and destination apps.

Working with NSItemProvider
Inside the Model group, create a new Swift file called MarvelCharacter+NSItemProvider.swift. At the end of the file, add the following code to conform to NSItemProviderWriting:
// 1
import UniformTypeIdentifiers

// 2
extension MarvelCharacter: NSItemProviderWriting {
  // 3
  static var writableTypeIdentifiersForItemProvider: [String] {
    [UTType.data.identifier]
  }
  // 4
  func loadData(
    withTypeIdentifier typeIdentifier: String,
    forItemProviderCompletionHandler completionHandler:
    @escaping (Data?, Error?) -> Void
  ) -> Progress? {
    // 5
    let progress = Progress(totalUnitCount: 100)
    // 6
    do {
      let encoder = JSONEncoder()
      encoder.outputFormatting = .prettyPrinted
      encoder.dateEncodingStrategy = .formatted(.iso8601Full)
      let data = try encoder.encode(self)
      // 7
      progress.completedUnitCount = 100
      completionHandler(data, nil)
    } catch {
      completionHandler(nil, error)
    }
    // 8
    return progress
  }
}
Here the code breakdown:
- Imports
UniformTypeIdentifiersto gain access to the UTI constants. - Creates an extension on
MarvelCharacterto conform toNSItemProviderWriting. -
NSItemProviderWritingrequires an implementation ofwritableTypeIdentifiersForItemProvider. This property describes the types of data you’re wrapping as an array of UTIs. In this case, you’ll only provide one type:public.data. But, instead of using the raw string, use the typeUTType.data, which is part of the newUniformTypeIdentifiersframework. - The protocol requires a method called
loadData(withTypeIdentifier:forItemProviderCompletionHandler:). One of the parameters is a closure calledforItemProviderCompletionHandler. This completion handler expects an optionalDataas an input parameter. So you need to convert a hero to data and pass it to this closure. -
loadData(withTypeIdentifier:forItemProviderCompletionHandler:)returns an optional instance ofProgresswhich tracks the progress of data transportation. The destination app can observe and cancel this progress. This method creates a newProgressthat has a total unit count of 100, representing 100 percentage. Once the progress has reached a completed unit count of 100, the transportation of a hero is finished. - Next, convert an instance of
MarvelCharactertoDataby using aJSONEncoder. You need to setdateEncodingStrategyto match the date format of the received JSON. - Set the property
completedUnitCountofprogressto 100. This indicates you’ve finished the operation and the progress object has reached 100 percent. Call the completion handler with the encoded hero data. - Finally, return
progress.
Good work! Now you can create an NSItemProvider wrapping the data you want to send.
Next, implement NSItemProviderReading to recreate a hero when dropping in the destination app. Add the following code to the end of MarvelCharacter+NSItemProvider.swift:
// 1
extension MarvelCharacter: NSItemProviderReading {
  // 2
  static var readableTypeIdentifiersForItemProvider: [String] {
    [UTType.data.identifier]
  }
  // 3
  static func object(
    withItemProviderData data: Data,
    typeIdentifier: String
  ) throws -> Self {
    let decoder = JSONDecoder()
    decoder.dateDecodingStrategy = .formatted(.iso8601Full)
    do {
      guard let object = try decoder.decode(
        MarvelCharacter.self,
        from: data
        ) as? Self else {
          fatalError("Error on decoding instance of MarvelCharacter")
      }
      return object
    } catch {
      fatalError("Error on decoding instance of MarvelCharacter")
    }
  }
}
Here, you:
- Create a new extension making
MarvelCharacterconform toNSItemProviderReading. - As before, you need to specify a list of supported UTIs. Since the app accepts the same type of item as it provides, return
[UTType.data.identifier]. - Then, implement
object(withItemProviderData:typeIdentifier:). This method converts the givenDataback to a hero. SinceMarvelCharacteralready conforms toCodable, useJSONDecoder.
Perfect! Now that you can create an NSItemProvider given a hero and the other way around, it’s time to add support for drag and drop.