Getting Started With Widgets
In this tutorial, you’ll add a widget to a large SwiftUI app, reusing its views to show entries from the app’s repository. By Audrey Tam.
Providing Timeline Entries
The app displays the array of ContentListDisplayable objects in contents, created in Data/ContentRepositories/ContentRepository.swift. To share this information with your widget, you’ll create an app group. Then, in ContentRepository.swift, you’ll write a file to this app group, which you’ll read from in EmitronWidget.swift.
Creating an App Group
On the project page, select the emitron target. In the Signing & Capabilities tab, click + Capability, then drag App Group into the window. Name it group.your.prefix.emitron.contents; be sure to replace your.prefix appropriately.
Now select the EmitronWidgetExtension target and add the App Group capability. Scroll through the App Groups to find and select group.your.prefix.emitron.contents.
Writing the Contents File
At the top of ContentRepository.swift, just below the import Combine statement, add this code:
import Foundation

extension FileManager {
  static func sharedContainerURL() -> URL {
    return FileManager.default.containerURL(
      forSecurityApplicationGroupIdentifier: "group.your.prefix.emitron.contents"
    )!
  }
}
This is just some standard code for getting the app group container’s URL. Be sure to substitute your app identifier prefix.
Now, just below var contents, add this helper method:
  func writeContents() {
    let widgetContents = contents.map {
      WidgetContent(name: $0.name, cardViewSubtitle: $0.cardViewSubtitle,
      descriptionPlainText: $0.descriptionPlainText,
      releasedAtDateTimeString: $0.releasedAtDateTimeString)
    }
    let archiveURL = FileManager.sharedContainerURL()
      .appendingPathComponent("contents.json")
    print(">>> \(archiveURL)")
    let encoder = JSONEncoder()
    if let dataToSave = try? encoder.encode(widgetContents) {
      do {
        try dataToSave.write(to: archiveURL)
      } catch {
        print("Error: Can't write contents")
        return
      }
    }
  }
Here, you create an array of WidgetContent objects, one for each item in the repository. You convert each to JSON and save it to the app group’s container.
Set a breakpoint at the let archiveURL line.
You’ll call this method when contents is set. Add this didSet closure to contents:
didSet {
  writeContents()
}
If Xcode is on its toes, it’s complaining about WidgetContent. Jump to the definition of WidgetContent and make it conform to Codable:
struct WidgetContent: Codable, TimelineEntry {
Now build and run the app in a simulator. At the breakpoint, widgetContents has 20 values.
Continue program execution and scroll down in the app. At the breakpoint, widgetContents now has 40 values. So you have some control over how many items you share with your widget.
Stop the app, disable the breakpoint, then copy the URL folder path from the debug console and locate in in Finder. Take a look at contents.json.
Next, go and set up the widget to read this file.
Reading the Contents File
In EmitronWidget.swift, add the same FileManager code:
extension FileManager {
  static func sharedContainerURL() -> URL {
    return FileManager.default.containerURL(
      forSecurityApplicationGroupIdentifier: "group.your.prefix.emitron.contents"
    )!
  }
}
Be sure to update your prefix.
Add this helper method to Provider:
func readContents() -> [WidgetContent] {
  var contents: [WidgetContent] = []
  let archiveURL =
    FileManager.sharedContainerURL()
      .appendingPathComponent("contents.json")
  print(">>> \(archiveURL)")

  let decoder = JSONDecoder()
  if let codeData = try? Data(contentsOf: archiveURL) {
    do {
      contents = try decoder.decode([WidgetContent].self, from: codeData)
    } catch {
      print("Error: Can't decode contents")
    }
  }
  return contents
}
This reads the file you saved into the app group’s container.
Uncomment the code in getTimeline(in:completion:), then replace this line:
var entries: [WidgetContent] = []
With
var entries = readContents()
Next, modify the comment and for loop to add dates to your entries:
// Generate a timeline by setting entry dates interval seconds apart,
// starting from the current date.
let currentDate = Date()
let interval = 5
for index in 0 ..< entries.count {
  entries[index].date = Calendar.current.date(byAdding: .second,
    value: index * interval, to: currentDate)!
}
Delete the let entries line below the for loop.
The line after that sets the timeline running and specifies the refresh policy. In this case, the timeline will refresh after using up all the current entries.
Build and run on your device, sign in and let the list load. Then close the app, add your widget and watch it update every 5 seconds.
Widget updating entry every 5 seconds.

Widget updating entry every 5 seconds.
I could watch this all day :].
If you didn't scroll the list, the widget will run out of entries after 20 items. If you wait that long, you'll see it pause while it refreshes.
Enabling User Customization
I picked 5 seconds for the timeline interval, so I wouldn't have to wait long to see the updates. If you want a shorter or longer interval, just change the value in the code. Or ... create an intent that will let you set the interval by editing the widget, right on your home screen!
Adding an Intent
First, add your intent: Create a new file (Command-N), search for "intent", select SiriKit Intent Definition File and name it TimelineInterval. Make sure its target is both emitron and EmitronWidgetExtension.
Intent's target is both emitron and EmitronWidgetExtension
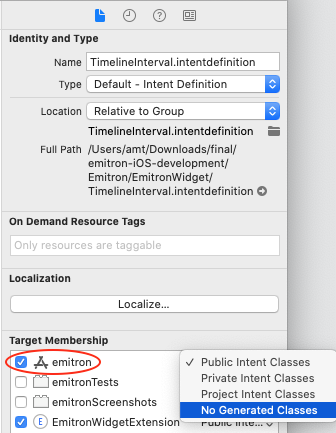
Intent's target is both emitron and EmitronWidgetExtension
In the lower left corner of the intent's sidebar, click + and select New Intent.
Add new intent.
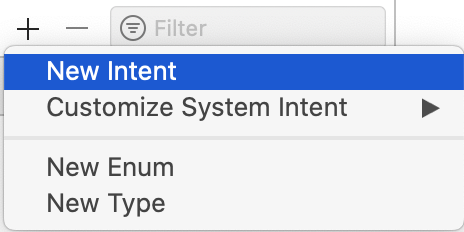
Add new intent.
Name the intent TimelineInterval. Set up the Custom Intent as shown, with Category View:
Custom intent with category view.

Custom intent with category view.
And add a Parameter named interval of type Integer with default, minimum and maximum values as shown, and Type Field. Or set your own values and/or use a stepper.
Add interval parameter.
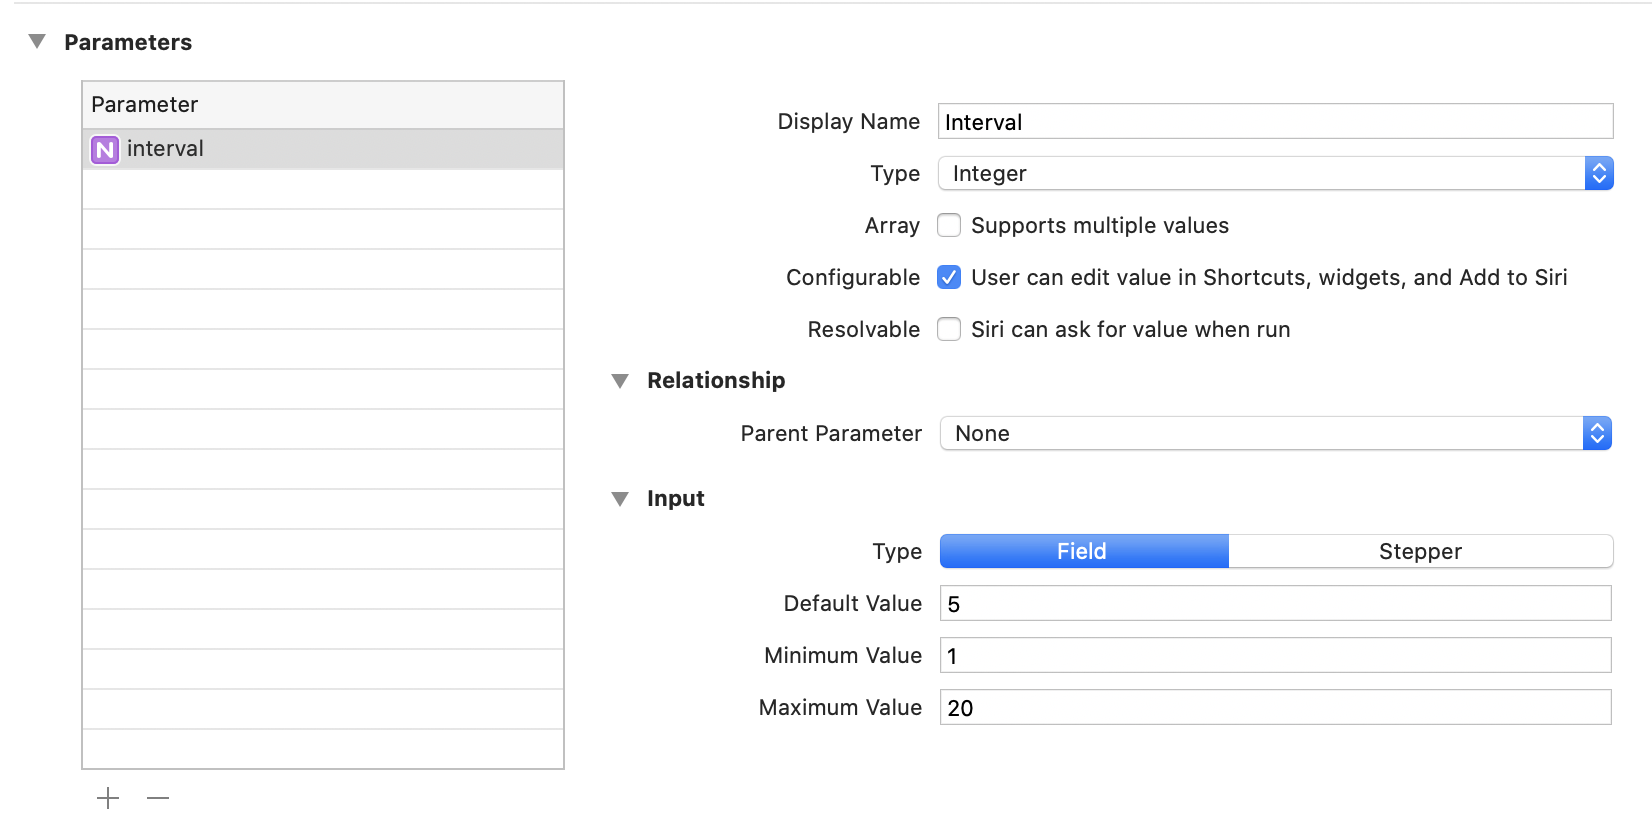
Add interval parameter.