How to Make a Game Like Jetpack Joyride using LevelHelper and SpriteHelper [Cocos2D Edition] – Part 1
This is a post by special contributor Bogdan Vladu, an iOS application developer and aspiring game developer living in Bucharest, Romania. Update 1/9/2013: This tutorial is now deprecated. We now have a newer, updated version of this tutorial, check it out! In this tutorial series, we will create a game similar to Jetpack Joyride using […] By .
Sign up/Sign in
With a free Kodeco account you can download source code, track your progress, bookmark, personalise your learner profile and more!
Create accountAlready a member of Kodeco? Sign in
Sign up/Sign in
With a free Kodeco account you can download source code, track your progress, bookmark, personalise your learner profile and more!
Create accountAlready a member of Kodeco? Sign in
Contents
How to Make a Game Like Jetpack Joyride using LevelHelper and SpriteHelper [Cocos2D Edition] – Part 1
25 mins
- Getting Started
- Installing the LevelHelper Template
- Creating Our Xcode Project
- Cleaning Up What We Don’t Need
- Examining the Cleaned Up Code
- Preparing for LevelHelper
- Creating a LevelHelper Project
- Adding Art to Our LevelHelper Project
- Creating a Basic Level
- Creating the Full Level
- Where to Go From Here?
This is a post by special contributor Bogdan Vladu, an iOS application developer and aspiring game developer living in Bucharest, Romania.
Learn how to create a game like Jetpack Joyride with LevelHelper and SpriteHelper!
Update 1/9/2013: This tutorial is now deprecated. We now have a newer, updated version of this tutorial, check it out!
In this tutorial series, we will create a game similar to Jetpack Joyride using Cocos2D and Box2D. (Prefer Corona? Check out the Corona version of this tutorial!)
If you haven’t played Jetpack Joyride yet, you should check it out – it’s an incredibly polished and fun game, and best of all it’s free! :]
You could make this game with Cocos2D alone, but it would take a lot of time. To make things simpler, we’re going to use two tools written by yours truly – LevelHelper and SpriteHelper.
If you aren’t familiar with these tools, here’s a quick synopsis:
- LevelHelper is a tool that makes creating levels much easier. You literally drag and drop sprites onto the scene!
- SpriteHelper is a tool that creates the sprite sheets and physics shapes for your games quickly and easily.
This is going to be a complex game, and we have a lot to do, so this series will be spread over four parts. In this first part, we’ll first spend some time setting up LevelHelper. Then we’ll create a basic level with a continuous scrolling parallax, and learn how to use SpriteHelper to add and modify our art.
By the end of this series, not only will you have earned valuable experience with these tools – you will have an exciting, sophisticated game to play!
This tutorial assumes you have some basic familiarity with Cocos2D and Box2D. If you are new to either of these game frameworks, you should check out our Cocos2D and Box2D tutorials first.
Getting Started
To get started, you just need to download several things:
- LevelHelper and SpriteHelper, if you don’t have them already.
- Art for the game by Vicki Wenderlich, which you can download here.
- The LevelHelper Xcode 4 template, which you can download here.
Note: LevelHelper supports the latest version of Box2D, but Cocos2D comes shipped with a slightly older version of Box2D. Using the LevelHelper template makes things easier for you because it pre-integrates the latest version of Box2D. If you want to use the normal Cocos2D template and integrate the latest version of Box2D yourself, check out the instructions in the official LevelHelper Cocos2D/Box2D Documentation.
Installing the LevelHelper Template
First, make sure you have the Cocos2D 1.X templates installed (i.e. not Cocos2D 2.X). If you have the Cocos2D 2.X templates installed, just download the 1.X templates from the Cocos2D download page and re-install the templates. You can always re-install the Cocos2D 2.X templates again when you need them later.
Next, unpack Cocos2dBox2dXCode4Template.zip. You will have the following folder structure:
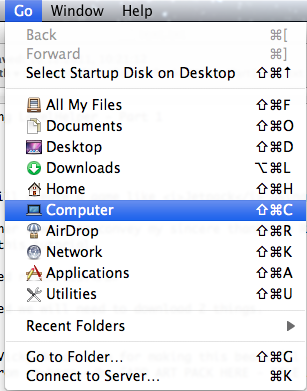
Click once on your desktop in an empty space to make Finder the active application (and hence show its menu bar). From the menu bar, navigate to Go:
While still on the Go menu, press and hold the Option (or Alt) key, and the Library folder will now be visible. Pretty cool trick, eh? Click on it to continue.
You should now be looking at your computer’s Library folder. The full path to Library is /YOUR_HD/Users/YOUR_USER_NAME/Library.
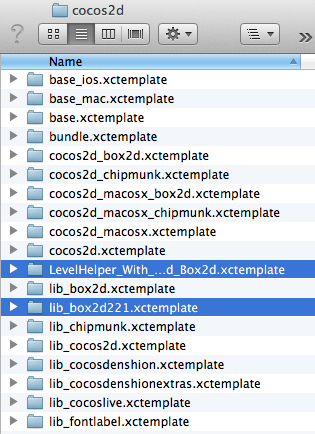
Now navigate to Developer/XCode/Templates/Cocos2D. Copy both of the folders from the unpacked Cocos2dBox2dXcode4Template.zip file into this folder.
The resulting folder structure should look like this:
w00t you’ve installed the template! Now let’s try it out.
Creating Our Xcode Project
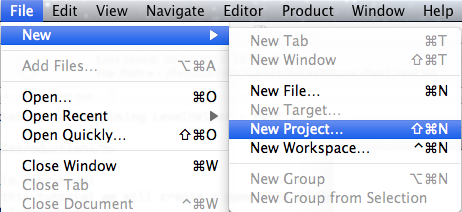
Open Xcode and choose File\New\New Project from the main menu.
Select the iOS\cocos2d\LevelHelper_With_Cocos2d_And_Box2d template, and click Next.
In the next dialog, name your product “RocketMouse” (no spaces), and click Next again.
Compile and run the project, and you’ll see a sample level that was made with LevelHelper:
Nice – soon you will see how easy it is to create these levels yourself! :]
Cleaning Up What We Don’t Need
We could extend the template code from here, but to give you the best understanding of how everything works we’re going to start from scratch.
So let’s clean up everything we don’t need from the template code. There are two steps: cleaning up the resources, and cleaning up the code.
Keep reading to clean this up yourself, but if you’re feeling particularly lazy, you can download the cleaned up project and just skim over these steps :P
1) Cleaning up the resources
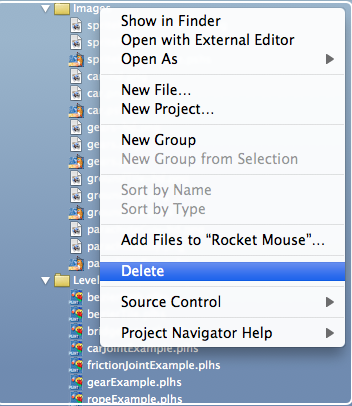
Inside Xcode, navigate to the Resources folder and select all files inside the Images and Levels folders.
Now Control-Click (or right click) and choose Delete.
In the pop-up window, choose Delete.
2) Cleaning up the code
Navigate and click on HelloWorldScene.h and delete the line b2MouseJoint* mouseJoint;
Now navigate and click on HelloWorldScene.mm. In the init method, delete the commented code and the notifications code, none of which we need.
Delete the unneeded methods used for the removed notifications.
Delete the content of all touch methods (DO NOT REMOVE THE METHODS THEMSELVES).
Delete the acceleromenter method:
Finally, delete the mouse joint release code from dealloc method:
Note: The project will compile at this point, but if try to run it it will crash with an assertion failure, as it has no level to load. Don’t worry, we will create one soon! :]
Examining the Cleaned Up Code
If you look through HelloWorldScene.m, you’ll see that there is very little code left. It creates a Box2D world, sets up Box2D debug drawing, and in the update loop runs the Box2D simulation and updates sprites to follow their associated Box2D body.
It also contains some LevelHelper setup code in init:
lh = [[LevelHelperLoader alloc] initWithContentOfFile:@"bezierTile"];

//creating the objects
[lh addObjectsToWorld:world cocos2dLayer:self];

if([lh hasPhysicBoundaries])
    [lh createPhysicBoundaries:world];

if(![lh isGravityZero])
    [lh createGravity:world];
The first line initializes LevelHelper with an initial level. It then has a few lines to allow LevelHelper to add objects to the Box2D world and create physics boundaries and gravity based on the level settings.
Take some time to look through HelloWorldScene.mm and make sure you understand the basic idea of what’s going on so far. We’ll build up from here! :]


