Beginning OpenGL ES 2.0 with GLKit Part 1
A tutorial to get you up-to-speed with the basics of using OpenGL with GLKit, even if you have no experience whatsoever. By Ray Wenderlich.
Sign up/Sign in
With a free Kodeco account you can download source code, track your progress, bookmark, personalise your learner profile and more!
Create accountAlready a member of Kodeco? Sign in
Sign up/Sign in
With a free Kodeco account you can download source code, track your progress, bookmark, personalise your learner profile and more!
Create accountAlready a member of Kodeco? Sign in
Contents
Beginning OpenGL ES 2.0 with GLKit Part 1
35 mins
Update 10/24/12: If you’d like a new version of this tutorial fully updated for iOS 6 and Xcode 4.5, check out iOS 5 by Tutorials Second Edition!
Note from Ray: This is the fourth iOS 5 tutorial in the iOS 5 Feast! This tutorial is a free preview chapter from our new book iOS 5 By Tutorials. Enjoy!
iOS 5 comes with a new set of APIs that makes developing with OpenGL much easier than it used to be.
The new set of APIs is collectively known as GLKit. It contains four main sections:
- GLKView/GLKViewController. These classes abstract out much of the boilerplate code it used to take to set up a basic OpenGL ES project.
- GLKEffects. These classes implement common shading behaviors used in OpenGL ES 1.0, to make transitioning to OpenGL ES 2.0 easier. They’re also a handy way to get some basic lighting and texturing working.
- GLMath. Prior to iOS 5, pretty much every game needed their own math library with common vector and matrix manipulation routines. Now with GLMath, most of the common math routines are there for you!
- GLKTextureLoader. This class makes it much easier to load images as textures to be used in OpenGL. Rather than having to write a complicated method dealing with tons of different image formats, loading a texture is now a single method call!
The goal of this tutorial is to get you quickly up-to-speed with the basics of using OpenGL with GLKit, from the ground up, assuming you have no experience whatsoever. We will build a simple app from scratch that draws a simple cube to the screen and makes it rotate around.
In the process, you’ll learn the basics of using each of these new APIs. It should be a good introduction to GLKit, whether you’ve already used OpenGL in the past, or if you’re a complete beginner!
Note that this tutorial slightly overlaps some of the other OpenGL ES 2.0 tutorials on this site. This tutorial does not assume you have read them first, but if you have you might want to skip over the sections you already know.
OpenGL ES 1.0 vs OpenGL ES 2.0
Before we get started, I wanted to mention that this tutorial will be focusing on OpenGL ES 2.0 (not OpenGL ES 1.0).
If you are new to OpenGL ES programming, here is the difference between OpenGL ES 1.0 and OpenGL ES 2.0:
- OpenGL ES 1.0 uses a fixed pipeline, which is a fancy way of saying you use built-in functions to set lights, vertexes, colors, cameras, and more.
- OpenGL ES 2.0 uses a programmable pipeline, which is a fancy way of saying all those built-in functions go away, and you have to write everything yourself.
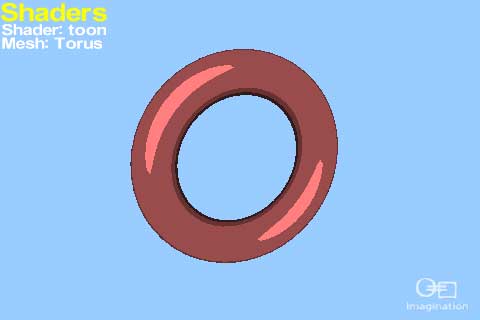
“OMG!” you may think, “well why would I ever want to use OpenGL ES 2.0 then, if it’s just extra work?!” Although it does add some extra work, with OpenGL ES 2.0 you make some really cool effects that wouldn’t be possible in OpenGL ES 1.0, such as this toon shader (via Imagination Technologies):
Or even these amazing lighting and shadow effects (via Fabien Sanglard):
Pretty cool eh?
OpenGL ES 2.0 is only available on the iPhone 3GS+, iPod Touch 3G+, and all iPads. But the percentage of people with these devices is in the majority now, so it’s well worth using!
OpenGL ES 2.0 does have a bit of a higher learning curve than OpenGL ES 1.0, but now with GLKit the learning curve is much easier, because the GLKEffects and GLKMath APIs lets you easily do a lot of the stuff that was built into OpenGL ES 1.0.
I’d say if you’re new to OpenGL programming, it’s probably best to jump straight into OpenGL ES 2.0 rather than trying to learn OpenGL ES 1.0 and then upgrading, especially now that GLKit is available. And this tutorial should help get you started with the basics! :]
Getting Started
OK, let’s get started!
Create a new project in Xcode and select the iOS\Application\Empty Application Template. We’re selecting the Empty Application template (not the OpenGL Game template!) so you can put everything together from scratch and get a better idea how everything fits together.
Set the Product Name to HelloGLKit, make sure the Device Family is set to iPhone, make sure “Use Automatic Reference Counting” is checked but the other options are not, and click Next. Choose a folder to save your project in, and click Create.
If you run your app, you should see a plain blank Window:
The project contains almost no code at this point, but let’s take a quick look to see how it all fits together. If you went through the Storyboard tutorial earlier in this book, this should be a good review.
Open main.m, and you’ll see the first function that is called when the app starts up, unsurprisingly called main:
int main(int argc, char *argv[])
{
    @autoreleasepool {
        return UIApplicationMain(argc, argv, nil, NSStringFromClass([AppDelegate class]));
    }
}
The last parameter to this method tells UIApplication the class to crate an instance of and use as it’s delegate – in this case, a class called AppDelegate.
So switch over to the only class in the template, AppDelegate.m, and take a look at the method that gets called when the app starts up:
- (BOOL)application:(UIApplication *)application didFinishLaunchingWithOptions:(NSDictionary *)launchOptions
{
    self.window = [[UIWindow alloc] initWithFrame:[[UIScreen mainScreen] bounds]];
    // Override point for customization after application launch.
    self.window.backgroundColor = [UIColor whiteColor];
    [self.window makeKeyAndVisible];
    return YES;
}
This programatically creates the main window for the app and makes it visible. And that’s it! About as “from scratch” as you can get.
Introducing GLKView
To get started with OpenGL ES 2.0, the first thing we need to do is add a subview to the window that does its drawing with OpenGL. If you’ve done OpenGL ES 2.0 programming before, you know that there was a ton of boilerplate code to get this working – things like creating a render buffer and frame buffer, etc.
But now it’s nice and easy with a new GLKit class called GLKView! Whenever you want to use OpenGL rendering inside a view, you simply add a GLKView (which is a normal subclass of UIView) and configure a few properties on it.
You can then set a class as the GLKView’s delegate, and it will call a method on that class when it needs to be drawn. In this method you can put in your OpenGL commands!
Let’s see how this works. First things first – you need to add a few frameworks to your project to use GLKit. Select your HelloGLKit project in the Project Navigator, select the HelloGLKit target, select Build Phases, Expand the Link Binary With Libraries section, and click the Plus button. From the drop-down list, select the following frameworks and click Add:
- QuartzCore.framework
- OpenGLES.framework
- GLKit.framework
Switch to AppDelegate.h, and at the top of the file import the header file for GLKit as follows:
#import <GLKit/GLKit.h>
Next switch to AppDelegate.m, and modify the application:didFinishLaunchingWithOptions to add a GLKView as a subview of the main window:
- (BOOL)application:(UIApplication *)application didFinishLaunchingWithOptions:(NSDictionary *)launchOptions
{
    self.window = [[UIWindow alloc] initWithFrame:[[UIScreen mainScreen] bounds]];

    EAGLContext * context = [[EAGLContext alloc] initWithAPI:kEAGLRenderingAPIOpenGLES2]; // 1
    GLKView *view = [[GLKView alloc] initWithFrame:[[UIScreen mainScreen] bounds]]; // 2
    view.context = context; // 3
    view.delegate = self; // 4
    [self.window addSubview:view]; // 5

    self.window.backgroundColor = [UIColor whiteColor];
    [self.window makeKeyAndVisible];
    return YES;
}
The lines marked with comments are the new lines – so let’s go over them one by one.
1. Create a OpenGL context. To do anything with OpenGL, you need to create a EAGLContext.
An EAGLContext manages all of the information iOS needs to draw with OpenGL. It’s similar to how you need a Core Graphics context to do anything with Core Graphics.
When you create a context, you specify what version of the API you want to use. Here, you specify that you want to use OpenGL ES 2.0. If it is not available (such as if the program were run on an iPhone 3G), the app would terminate.
2. Create a GLKView. This creates a new instance of a GLKView, and makes it as large as the entire window.
3. Set the GLKView’s context. When you create a GLKView, you need to tell it the OpenGL context to use, so we specify the one we already created.
4. Set the GLKView’s delegate. This sets the current class (AppDelegate) as the GLKView’s delegate. This means whenever the view needs to be redrawn, it will call a method named glkView:drawInRect on whatever class you specify here. We will implement this inside the App Delegate shortly to contain some basic OpenGL commands to paint the screen red.
5. Add the GLKView as a subview. This line adds the GLKView as a subview of the main window.
Since we marked the App Delegate as GLKView’d delegate, we need to mark it as implementing the GLKViewDelegate protocol. So switch to AppDelegate.h and modify the @interface line as follows:
@interface AppDelegate : UIResponder <UIApplicationDelegate, GLKViewDelegate>
One step left! Switch back to AppDelegate.m, add the following code right before the @end:
#pragma mark - GLKViewDelegate

- (void)glkView:(GLKView *)view drawInRect:(CGRect)rect {

    glClearColor(1.0, 0.0, 0.0, 1.0);
    glClear(GL_COLOR_BUFFER_BIT);

}
The first line calls glClearColor to specify the RGB and alpha (transparency) values to use when clearing the screen. We set it to red here.
The second line calls glClear to actually perform the clearing. Remember that there can be different types of buffers, such as the render/color buffer we’re displaying, and others we’re not using yet such as depth or stencil buffers. Here we use the GL_COLOR_BUFFER_BIT to specify what exactly to clear – in this case, the current render/color buffer.
That’s it! Compile and run, and with just 7 lines of code we have OpenGL rendering to the screen!
Those of you who are completely new to OpenGL might not be very impressed, but those of you who have done this before will be very happy with the convenience here :]


