Learn to Code iOS Apps 1: Welcome to Programming
Learn to code iOS apps using Apple’s development tools. For complete beginners – no prior programming experience needed! By Mike Jaoudi.
Sign up/Sign in
With a free Kodeco account you can download source code, track your progress, bookmark, personalise your learner profile and more!
Create accountAlready a member of Kodeco? Sign in
Sign up/Sign in
With a free Kodeco account you can download source code, track your progress, bookmark, personalise your learner profile and more!
Create accountAlready a member of Kodeco? Sign in
Contents
Learn to Code iOS Apps 1: Welcome to Programming
35 mins
Learn to Code an iPhone App
During your years of iPhone usage have you ever thought “Gee, I wish I could write a mobile app”, or even “Sheesh, I could totally write a better app than that!”?
You’re in luck – developing an iOS app is not hard. In fact, there are numerous tools that make developing your own iOS app easy and fun. Armed with a little knowledge and these tools, you too can learn to code iOS apps!
This tutorial series will teach you how to make an iOS app from scratch. No knowledge of programming is required to follow this tutorial series — the entire process is broken down into a sequence of steps that will take you from programming zero to App Store hero.
This series has four parts:
- In Part 1 (You are Here!), you will learn the basics of Objective-C programming and you will start to create your first simple game. You are here!
- In Part 2, you will learn about objects and classes in Objective-C and you will create a simple app to track people’s names and ages.
- In Part 3, the real fun begins! Now that you know the basics of programming, you will take all that you’ve learned and create a simple iPhone game of your own.
- In Part 4, you will take this app and make it beautiful, learning more about customizing the look and feel of iPhone apps.
The only prerequisite to this series is a Mac running OS X Lion (10.7) or later – and having a willingness to learn! :]
Note: If you’re already familiar with the basics of Objective-C and Foundation, feel free to skip ahead to Part 3 and get started with iOS.
Note: If you’re already familiar with the basics of Objective-C and Foundation, feel free to skip ahead to Part 3 and get started with iOS.
Getting Started
The first thing you need to do is install a free program called Xcode. Xcode is Apple’s Integrated Development Environment, or IDE, which is the main tool you’ll use to create your OS X and iOS apps. Download and install it from the App Store via this link.
Your first project in Xcode will be a small Mac OS X command-line app.
“Wait a minute,” you may think, “Why am I creating a Mac OSX command line app, I wanted to make an iPhone app!”
Well, both Native Mac and iOS apps are both written in the same programming language — Objective-C — and use the same set of tools to create and build applications. So starting with a command line app is the simplest way to start learning the basics. Once you’ve mastered doing some basic things there, making an iPhone app (like you’ll do later in this series) will be that much easier!
So let’s get started. Open up Xcode, and you’ll see a window that looks like this:
Click the button that says Create a new Xcode project, located directly below the Welcome to Xcode title, as shown in the screenshot below:
If you accidentally close the “Welcome to Xcode” window, you can create a new project by going to the File menu and selecting New > Project….
In the column on the left hand side, find the OS X section, click on Application and select Command Line Tool as shown below:
Click Next. On the following screen, fill in the fields as indicated:
- Product Name: My First Project
- Organization Name: This field can be left blank. Or you can enter your company name.
- Company Identifier: Enter com.yourname, such as com.johnsmith
- Type: Foundation
- Use Automatic Reference Counting: Check this box
Your screen should resemble the one below:
Click Next. Choose a location to store the project files (the Desktop is as good a place as any), and click Create. Xcode will set up your new project and open it up in the editor for you.
Running Your First App
Xcode comes with project templates which include some basic starter code; that means that even before you’ve written a line of code, you can run your project and see what it looks like. Granted, your project won’t do much right now, but this is a good opportunity to become familiar with running your project and viewing the output.
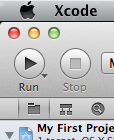
To build and run your project, find the Run button on the upper left corner of the Xcode window, as shown below, and click it:
Look at the bottom of the screen in the All Output pane; you should see Hello, World! displayed there, as shown below:
How about that — you’ve created and run your first OS X program! Before you go adding more functionality to your program, take a few minutes and got through the following sections to learn about the various parts of Xcode and how your program is structured.
Note: If you want to learn more about Xcode and how to use it, you can always refer to the Apple Xcode User Guide.
Note: If you want to learn more about Xcode and how to use it, you can always refer to the Apple Xcode User Guide.
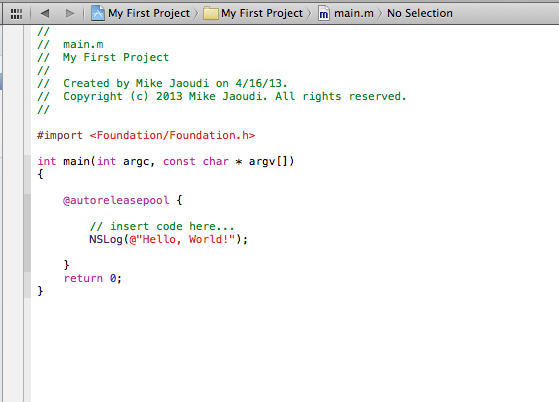
The left pane of Xcode displays a list of files that are part of the project. The files you see were automatically created by the project template you used. Find main.m inside the My First Project folder and click on it to open it up in the editor, as shown below:
The editor window should look very similar to the following screenshot:
Find the following line located around the middle of the file:
NSLog(@"Hello, World!");
Aha — this looks like the line that printed out the text that you saw in the “All Output” pane. To be certain of that, change the text to something else. Modify the line as shown below:
NSLog(@"I can write anything I want!");
Click the Run button; you should see your new text in the “All Output” pane as shown below:
You have now changed your program to output your own custom message. But there’s obviously more to the app than just a single line of output. What makes the app tick?


