Augmented Reality iOS Tutorial: Location Based
In this augmented reality tutorial, you’ll learn how to use your iOS users location to create compelling augmented reality experiences. By Jean-Pierre Distler.
4.5 (4) · 2 Reviews
Implementing the Datasource Method
Xcode complains the line where you assign self as the dataSource, to make it happy ViewController must adopt the ARDataSource protocol. This protocol has only one required method that should return a view for a POI. In most cases and also here you want to provide a custom view. Add a new file by pressing [cmd] + [n]. Choose iOS\Swift File and save it AnnotationView.swift.
Replace the content with the following:
import UIKit

//1
protocol AnnotationViewDelegate {
  func didTouch(annotationView: AnnotationView)
}

//2
class AnnotationView: ARAnnotationView {
  //3
  var titleLabel: UILabel?
  var distanceLabel: UILabel?
  var delegate: AnnotationViewDelegate?

  override func didMoveToSuperview() {
    super.didMoveToSuperview()

    loadUI()
  }

  //4
  func loadUI() {
    titleLabel?.removeFromSuperview()
    distanceLabel?.removeFromSuperview()

    let label = UILabel(frame: CGRect(x: 10, y: 0, width: self.frame.size.width, height: 30))
    label.font = UIFont.systemFont(ofSize: 16)
    label.numberOfLines = 0
    label.backgroundColor = UIColor(white: 0.3, alpha: 0.7)
    label.textColor = UIColor.white
    self.addSubview(label)
    self.titleLabel = label

    distanceLabel = UILabel(frame: CGRect(x: 10, y: 30, width: self.frame.size.width, height: 20))
    distanceLabel?.backgroundColor = UIColor(white: 0.3, alpha: 0.7)
    distanceLabel?.textColor = UIColor.green
    distanceLabel?.font = UIFont.systemFont(ofSize: 12)
    self.addSubview(distanceLabel!)

    if let annotation = annotation as? Place {
      titleLabel?.text = annotation.placeName
      distanceLabel?.text = String(format: "%.2f km", annotation.distanceFromUser / 1000)
    }
  }
}
- First you add a delegate protocol, that you need later.
- This creates a subclass of
ARAnnotationViewwhich is used to show a view for a POI - The view in this app simply shows a label with the name of the POI and a second label with the distance. These lines declare the needed properties and a third one you again need later.
-
loadUI()adds and configures the labels.
To finish the class add two more methods
//1
override func layoutSubviews() {
  super.layoutSubviews()
  titleLabel?.frame = CGRect(x: 10, y: 0, width: self.frame.size.width, height: 30)
  distanceLabel?.frame = CGRect(x: 10, y: 30, width: self.frame.size.width, height: 20)
}

//2
override func touchesEnded(_ touches: Set<UITouch>, with event: UIEvent?) {
  delegate?.didTouch(annotationView: self)
}
- This method is called everytime the view needs to be redrawn and you simply make sure that the frames of the label have the correct values by resetting them.
- Here you tell the delegate that a view was touched, so the delegate can decide if and which action is needed.
Now head back to ViewController.swift and add the following extension:
extension ViewController: ARDataSource {
  func ar(_ arViewController: ARViewController, viewForAnnotation: ARAnnotation) -> ARAnnotationView {
    let annotationView = AnnotationView()
    annotationView.annotation = viewForAnnotation
    annotationView.delegate = self
    annotationView.frame = CGRect(x: 0, y: 0, width: 150, height: 50)

    return annotationView
  }
}
Here you create a new AnnotaionView and set its delegate before you return it.
Before you can test your views in action you need another extension.
extension ViewController: AnnotationViewDelegate {
  func didTouch(annotationView: AnnotationView) {
    print("Tapped view for POI: \(annotationView.titleLabel?.text)")
  }
}
Before you activate the camera, you have to add a key to the Info.plist. Open the file and add the key NSCameraUsageDescription with a value of Needed for AR, just like you did for accessing location information.
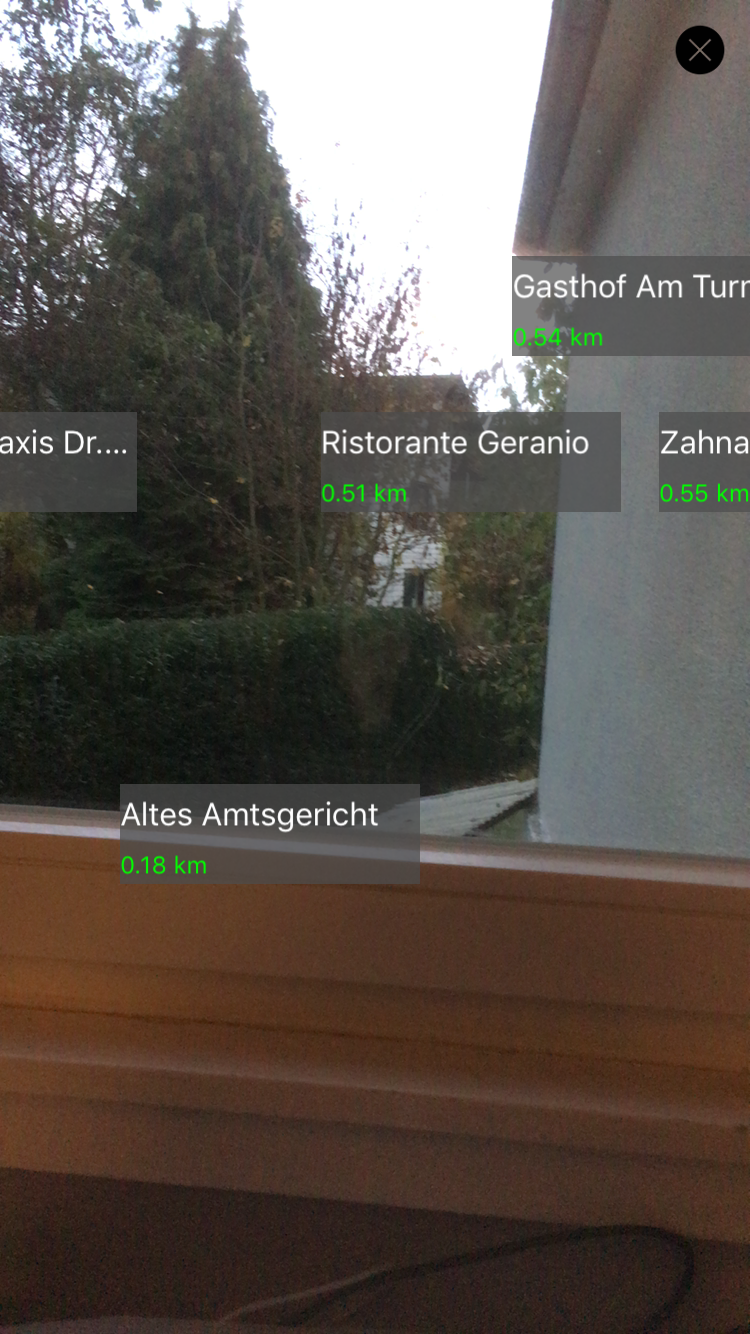
Build and run, and tap the camera button on the map view to go to the ar view. The first time you do so, the system will raise a permission dialog before it gives you access to the camera. Tap a POI and look at the console.
Finishing touches
You have a complete working AR app now, you can show POIs on a camera view and detect taps on this POIs, to make your app complete you'll add some tap handling logic now.
If you closed it open ViewController.swift and replace extension which adopts the AnnotationViewDelegate protocol with the following:
extension ViewController: AnnotationViewDelegate {
  func didTouch(annotationView: AnnotationView) {
  //1
    if let annotation = annotationView.annotation as? Place {
    //2
      let placesLoader = PlacesLoader()
      placesLoader.loadDetailInformation(forPlace: annotation) { resultDict, error in

      //3
      if let infoDict = resultDict?.object(forKey: "result") as? NSDictionary {
          annotation.phoneNumber = infoDict.object(forKey: "formatted_phone_number") as? String
          annotation.website = infoDict.object(forKey: "website") as? String

          //4
          self.showInfoView(forPlace: annotation)
        }
      }
    }
  }
}
- First you cast
annotationViewsannotation to aPlace. - Then you load additional information for this place.
- And assign it to the appropriate properties.
-
showInfoView(forPlace:)is a method you implement right now.
Add this method below showARController(sender:)
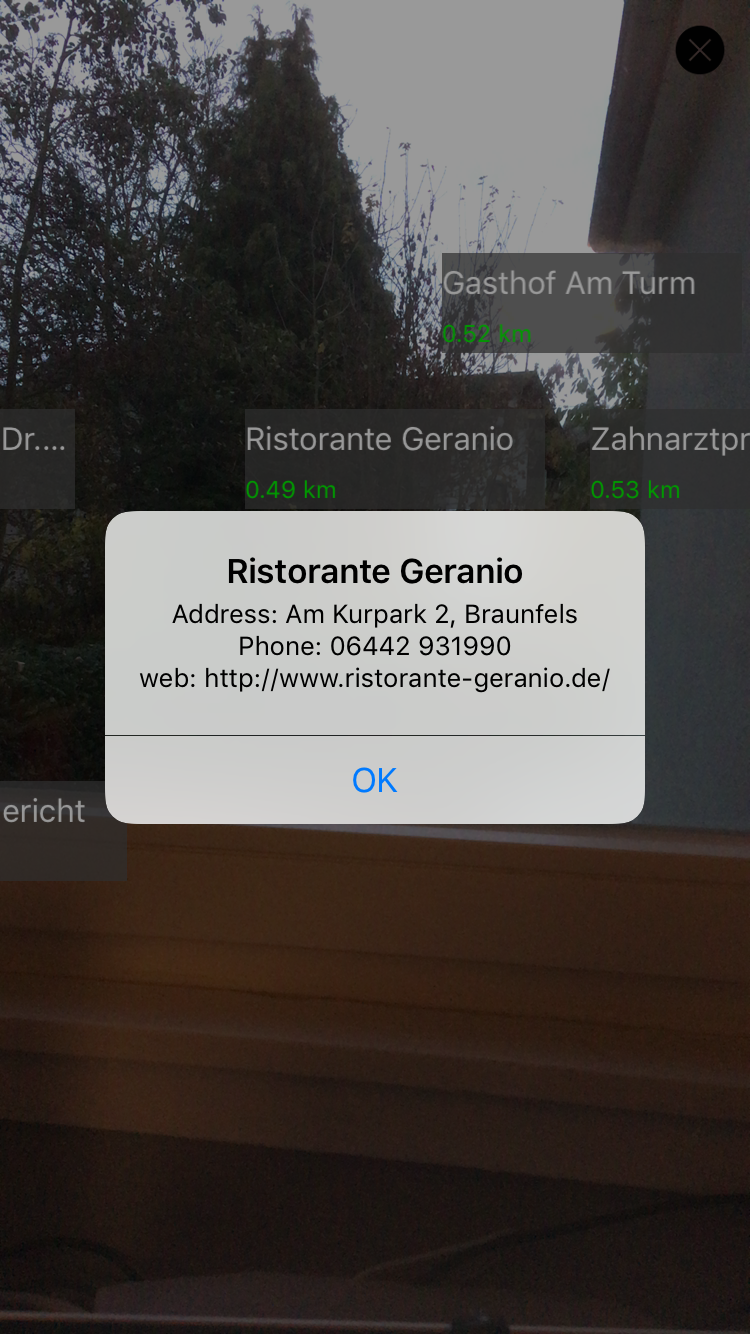
func showInfoView(forPlace place: Place) {
  //1
  let alert = UIAlertController(title: place.placeName , message: place.infoText, preferredStyle: UIAlertControllerStyle.alert)
  alert.addAction(UIAlertAction(title: "OK", style: UIAlertActionStyle.default, handler: nil))
   //2
  arViewController.present(alert, animated: true, completion: nil)
}
- To show the additional info you create an alert view with the POIs name as title and an info text as message.
- Since
ViewControlleris not a part of the view hirarchy right now, you usearViewControllerto show the alert.
Build and run again and see your finished app.
Where to Go from Here?
Here is the final project with all of the code from above.
Congratulations, you now know how to make your own location based augmented reality app! And as a bonus, you’ve also gotten a short introduction to the Google Places API.
In the meantime, if you have any comments or questions, please join the forum discussion below!