My App Crashed, Now What?
In this tutorial, you’ll learn what makes your app crash and how to fix it when it does. By Ehab Amer.
Sign up/Sign in
With a free Kodeco account you can download source code, track your progress, bookmark, personalise your learner profile and more!
Create accountAlready a member of Kodeco? Sign in
Sign up/Sign in
With a free Kodeco account you can download source code, track your progress, bookmark, personalise your learner profile and more!
Create accountAlready a member of Kodeco? Sign in
Sign up/Sign in
With a free Kodeco account you can download source code, track your progress, bookmark, personalise your learner profile and more!
Create accountAlready a member of Kodeco? Sign in
Contents
My App Crashed, Now What?
25 mins
- Getting Started
- Tools to Help You Fix and Resolve Crashes
- Breakpoints
- Console Log
- Variables View
- The Infamous nil
- Exhibit A: Dark Force – Force Unwrapping
- Proving Your Case
- Finding the Right Solution
- Exhibit B: Weak Grip — Weak References
- Understanding the Crash
- Exhibit C: Unexpected Updates — Invalid Table Updates
- A Wider View of the Problem
- Narrowing Down the Problem
- Assertions
- Writing Your Own Reusable Code
- Changing Your Build Configuration
- Where to Go From Here?
A Wider View of the Problem
Before checking the line of the crash itself, you should understand the purpose of addPressed(). The three lines do the following:
- Create an
IndexPathobject after the last row in section0. Index 4 represents the fifth item, since indices start from 0. - Tell the
tableViewto insert a new row atnewIndex. - Add the new row to the
itemsListdata source array.
First, look at the flow: It makes sense and it’s correct. But Xcode just told you that it’s not. So what’s wrong with it?
Narrowing Down the Problem
The exception breakpoint stopped at the second line, so the app didn’t add the new row to itemsList. At this point, it seems like a straightforward fix — add the new item to the itemsList before inserting it in the tableView. It helps to understand more about the line that caused the crash.
Make sure you’ve enabled the exception breakpoint, then build and run and open the same screen again.
Open InvalidTableUpdatesViewController.swift and add breakpoints on line 37, which caused the crash, and on line 44, which is the return of tableView(_:numberOfRowsInSection:). Press the Add button so the app stops on the first breakpoint, then press Continue. Now, look at the call stack on the left:

Notice that insertRows(at:with:) made a call internally to tableView(_:numberOfRowsInSection:) to check the new size of itemsList. Since itemsList hadn’t updated yet, the tableView didn’t find anything added to it which put it in an inconsistent state.
In other words, you told the tableView there’s a new item, but the tableView didn’t find that itemsList grew.
This is a proof of the table view’s behavior. Move the line of code where you add the item to itemsList, between the other two lines. addPressed() should now look like this:
@IBAction func addPressed() {
  let newIndex = IndexPath(row: itemsList.count, section: 0)
  itemsList.append((itemsList.last ?? 0) + 1)
  tableView.insertRows(at: [newIndex], with: .automatic)
}
This updates the data source before updating the view. Build and run, then press the Add button to see if everything works:

Awesome, now you’ve fixed all three screens in the app. But there’s still one more point about app crashes you should know about.
Assertions
Assertions are manually-triggered crashes you can insert into your own code. The obvious question that comes to mind is: Why would you write code to crash your own app?
That’s a very good question. However illogical it may seem, you’ll understand why this is helpful in a moment. :]
Imagine you’re writing a complicated piece of code, and there are some flows in your logic that no one should reach because reaching them means something fatally wrong has happened.
These situations are ideal for assertions. They’ll help you, or anyone else using your code, discover that something’s not working properly during development.
Writing Your Own Reusable Code
Writing a framework is also a good example where assertions can be useful. You can raise an assertion if another developer provides irrational input to your framework that won’t perform as expected.
An example of when this is handy is in ForceUnwrappingViewController.swift. Nothing will happen in showResult(result:) if result doesn’t cast to Int or String, and whoever is using your code won’t know what’s going on right away. Of course they’re doing something wrong, but wouldn’t it be awesome if the code was smart enough to tell them what?
To try it out, add this block of code at the end of showResult(result:):
else {
  assertionFailure("Only Int or Strings are accepted in this function")
}
You raise an assertion if result isn’t an Int or a String. Add this line of code at the end of calculatePressed(_:) to see how it works:
showResult(result: UIView())
Here, you send showResult(result:) a very unexpected value… a UIView!
Build and run, open the Force Unwrapping screen and press the Calculate button.

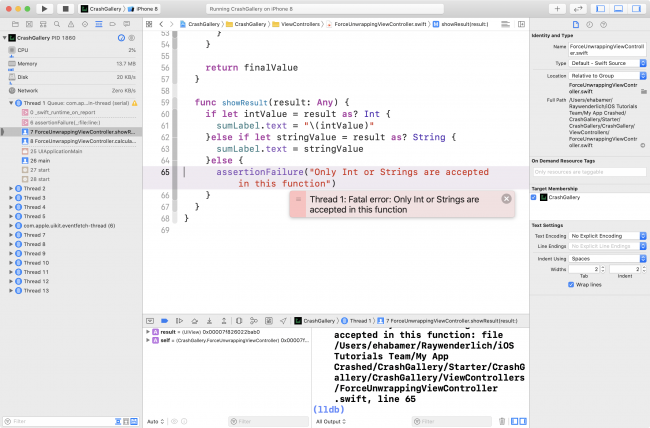
Your app crashed in ForceUnwrappingViewController.swift on line 65.
As expected, the crash line is the assertion call, but you haven’t fully answered the question. Should crashing code be in the final app on the AppStore if the developer doesn’t cover all cases?
The answer to the question is: It doesn’t matter. :]
The assertions do indeed exist in your final product, but it’ll be as if they aren’t there at all.
Assertions only work while your app is building under the debug configuration. Assertions won’t do anything under the release configuration, which is how you’ll build your app when you upload it on the AppStore.
Want to see it for yourself? You’ll try it out in the next step.
Changing Your Build Configuration
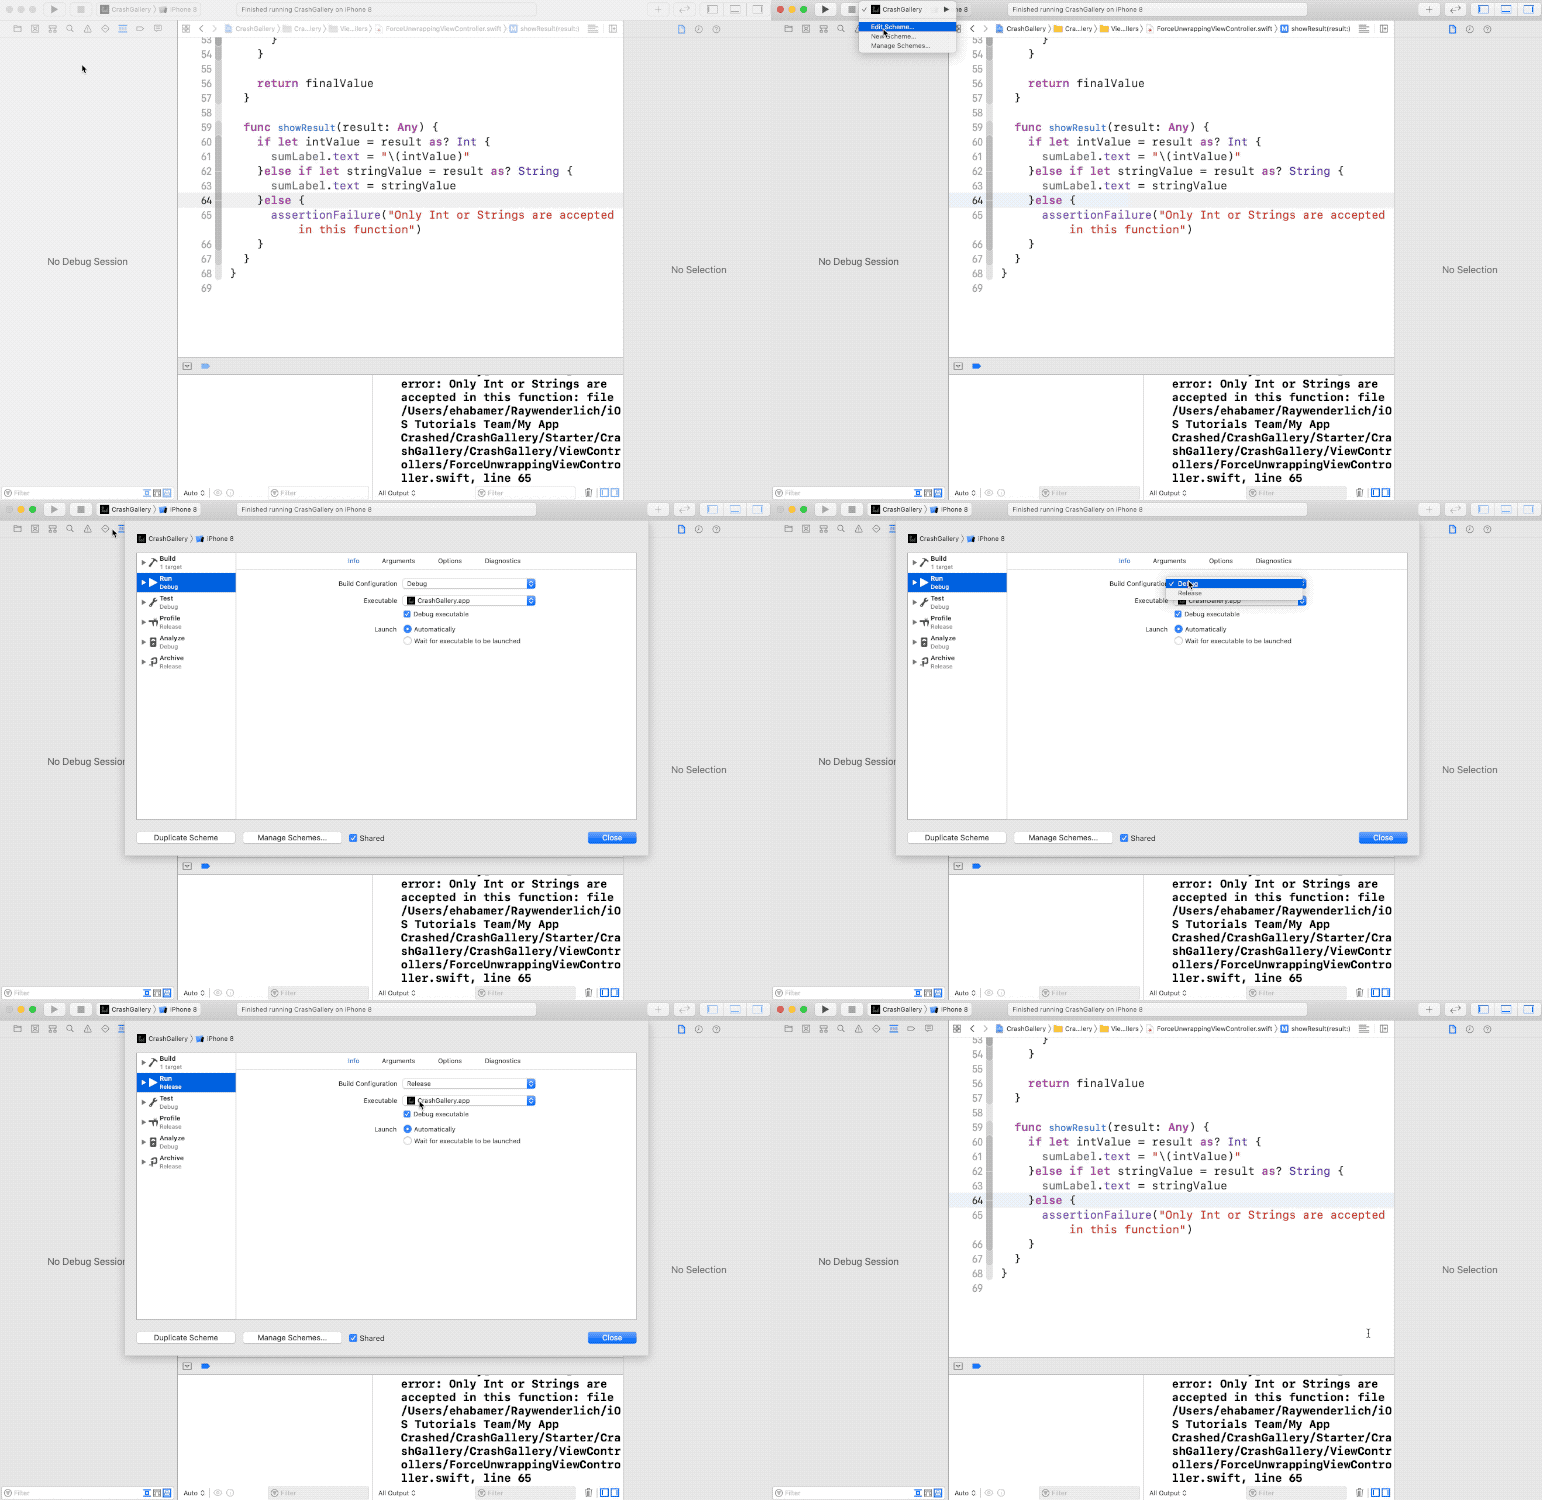
Click the CrashGallery target in the upper-left corner of your Xcode window to try it out. Select Edit Scheme from the drop-down menu, then choose Run from the left-hand side of the new window and select Release from Build Configuration.

Build and run, then press the Calculate button once more.

No crashes, no assertions. It worked normally. Your code didn’t do anything when it got an unexpected value, so this step had no effect.
But also note that the release configuration isn’t for debugging. You’ll find that when you debug with Release selected, Xcode won’t behave as expected. It might show the wrong line executing, the Variables View might not show any values or the Console Log may not evaluate expressions you print.
Use this configuration if you want to measure performance, not for code tracing and debugging.
Assertions are a handy tool to help your fellow developers or yourself fix things before you forget them. But don’t overuse them, as they can become more annoying than helpful.
preconditionFailure(_:file:line:) or fatalError(_:file:line:) instead of assertionFailure(_:file:line:) to make your app crash under the release configuration.Where to Go From Here?
Download the finished project for this tutorial by using the Download Materials button at the top or bottom of this page.
You’ve seen how crashes are a normal part of developing your app. You should even see them as an opportunity to learn more about the framework you’re using.
Do your best to get the most information about why a crash happened. There are multiple ways to fix each crash, and some solutions may be better than others. The more you understand the problem, the better match the solution you choose will be.
You can learn more about debugging from the video course, Beginning iOS Debugging.
I hope you enjoyed this tutorial! If you have any questions or comments, please join the forum discussion below. :]