Room DB: Advanced Data Persistence
This tutorial introduces more advanced concepts for use with the Room persistence library, such as migration and indexing. By Lance Gleason.
Sign up/Sign in
With a free Kodeco account you can download source code, track your progress, bookmark, personalise your learner profile and more!
Create accountAlready a member of Kodeco? Sign in
Sign up/Sign in
With a free Kodeco account you can download source code, track your progress, bookmark, personalise your learner profile and more!
Create accountAlready a member of Kodeco? Sign in
Sign up/Sign in
With a free Kodeco account you can download source code, track your progress, bookmark, personalise your learner profile and more!
Create accountAlready a member of Kodeco? Sign in
Contents
Wiring in the User Interface
Now that you have your ListItem hooked into the database, it’s time to wire it into your interface.
To start, open up the ListCategoryViewHolder class and add the following lines below the existing code inside the setListCategoryItem(listCategory: ListCategory) method:
holderListCategoryBinding.categoryName.rootView.setOnClickListener {
  val intent = Intent(listCategoriesActivity, ListItemsActivity::class.java)
  intent.putExtra(ListItemsActivity.LIST_CATEGORY_ID, listCategory.id)
  intent.putExtra(ListItemsActivity.CATEGORY_NAME, listCategory.categoryName)
  listCategoriesActivity.startActivity(intent)
}
This adds an OnClickListener to each category in the list. The click listener launches a ListItemActivity, passing it the category ID and name.
Now, run the app by clicking on Run ▸ Run ‘app’ (you may need to switch the run configuration from the test class back to app first). Then, click on a category, such as Purr Programming Supplies, and you will see a screen that looks like this:
Your app is set up to use the Android Architecture Components MVVM pattern. When evaluating where to put the database query/insert, if you are not using MVVM, you might be inclined to put those queries in your activity. Part of the power of MVVM is the ability to put that logic into a component that is focused solely on data access.
In your case, you’re going to use two components:
- A repository object that focuses on interacting with your DAO and anything that is database-specific.
- A ViewModel that is lifecycle-aware by extending AndroidViewModel.
Create a ListItemRepository by right-clicking on the listitem package. Next, select New ▸ Kotlin File/Class. Name it ListItemRepository and press OK. Finally, paste in the following:
class ListItemRepository {
  //1
  private val listItemDao = ListMasterApplication.database!!.listItemDao()

  //2
  fun insertAll(vararg listItems: ListItem) {
    AsyncTask.execute {
      listItemDao.insertAll(*listItems)
    }
  }
}
You are doing two things in this class:
- Getting a reference to your DAO.
- Providing a function to insert listItems in a background thread.
Next, you are going to create a lifecycle-managed ViewModel that will abstract the details of working with your repository. To do that, create a new Kotlin class in the listitem package by right-clicking the package name, selecting New and then Kotlin File/Class. Name it ListItemsViewModel and press OK. Finally, paste in the following:
//1
class ListItemsViewModel(application: Application) : AndroidViewModel(application) {

  //2
  private val listItemRepository: ListItemRepository = ListItemRepository()

  //3
  fun insertAll(vararg listItems: ListItem) {
    listItemRepository.insertAll(*listItems)
  }
}
This is doing a few things for you:
- Extends AndroidViewModel and takes a reference to the
applicationin its constructor. - Creates an instance of your repository and keeps a reference to it.
- Exposes an
insertAll()method from your repository.
Note: If you are new to using View Models, check out this tutorial to learn about MVVM and how View Models fit into the pattern, and also our course MVVM on Android.
Note: If you are new to using View Models, check out this tutorial to learn about MVVM and how View Models fit into the pattern, and also our course MVVM on Android.
Now you are going to do some work in ListItemsActivity. To start, open it up and add a property for your ListItemsViewModel above onCreate():
private lateinit var listItemsViewModel: ListItemsViewModel
Inside onCreate(), add the following line right above the call to setupAddButton():
listItemsViewModel =
    ViewModelProviders.of(this).get(ListItemsViewModel::class.java)
This line of code initializes listItemsViewModel by calling ViewModelProviders to get an instance of your ListItemsViewModel.
Next, replace the setupAddButton() method with the following:
private fun setupAddButton() {
  activityListItemsBinding.fab.setOnClickListener {

    // Setup the dialog
    val alertDialogBuilder = AlertDialog.Builder(this).setTitle("Title")
    val dialogAddItemBinding = DialogAddItemBinding.inflate(layoutInflater)
    // 1
    val listItemViewModel = ListItemViewModel(ListItem("", 0, listCategory.id))
    dialogAddItemBinding.listItemViewModel = listItemViewModel

    alertDialogBuilder.setView(dialogAddItemBinding.root)

    /**
     * Setup the positive and negative buttons.
     * When the user clicks ok, a record is added to the db,
     * the db is queried and the RecyclerView is updated.
     */
    alertDialogBuilder.setPositiveButton(android.R.string.ok)
    { _: DialogInterface, _: Int ->
      // 2
      listItemsViewModel.insertAll(listItemViewModel.listItem)
    }
    alertDialogBuilder.setNegativeButton(android.R.string.cancel, null)
    alertDialogBuilder.show()
  }
}
This hooks up the + button by doing the following:
- Creates an instance of your ListItemViewModel and binds it to the dialog. Note that ListItemViewModel is different from ListItemsViewModel.
- Calls
insertAll()on ListItemsViewModel when the user clicks OK.
Run the app by selecting the Run ▸ Run ‘app’ on the menu:
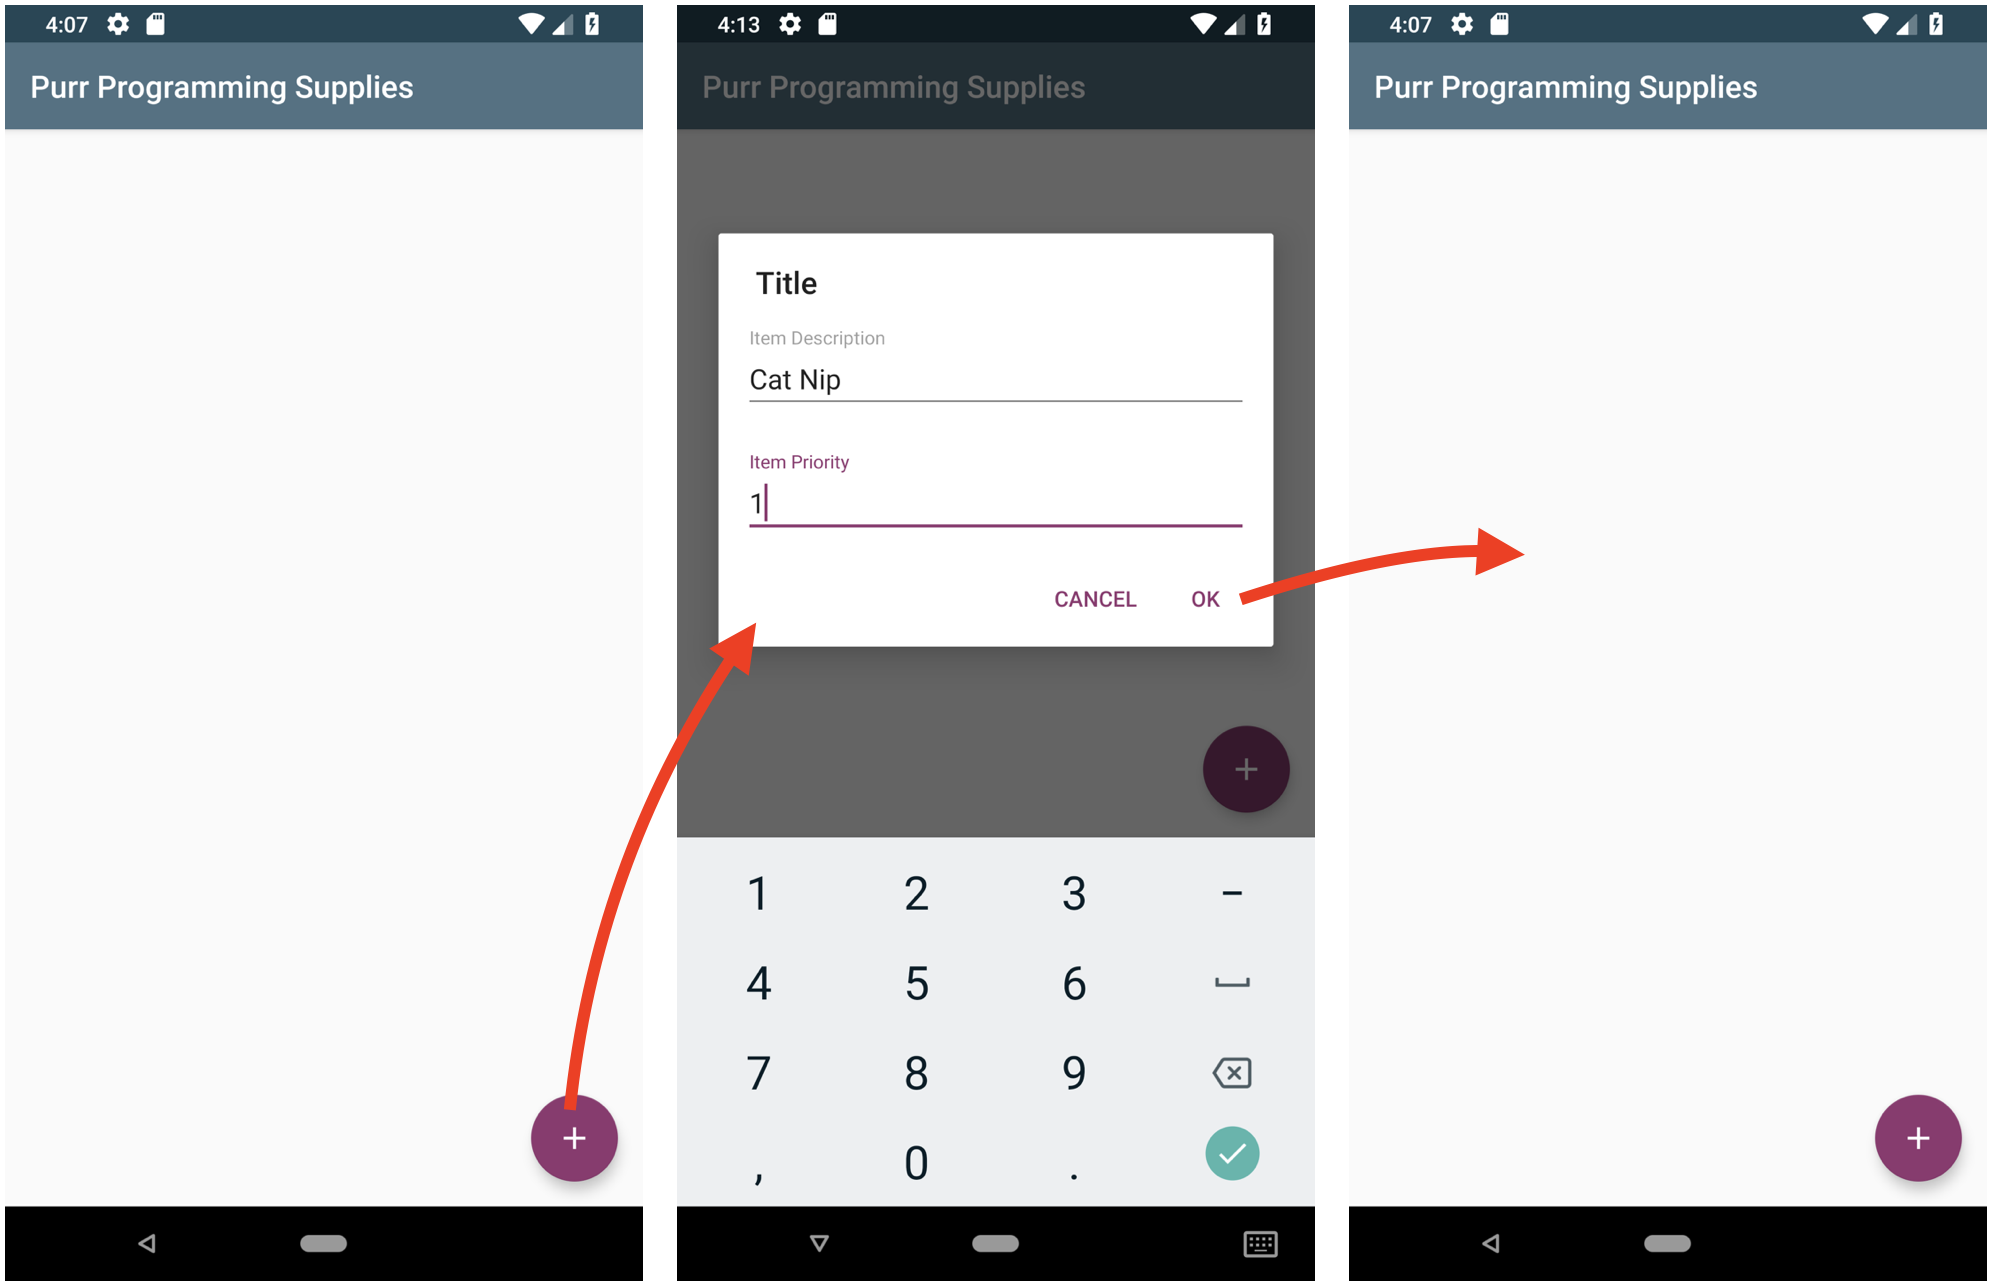
If you click into a category, such as Purr Programming Supplies, you can then click the + button, add an item and priority, click OK, and it will take you back to the list that does not show anything. At this point, your first response might be:
That’s because you have not hooked up your LiveData object to view these items, so time to fix that! Start by opening up ListItemRepository and add a new method named getAllByListCategoryId():
fun getAllByListCategoryId(listCategoryId: Long): LiveData<List<ListItem>> {
  return listItemDao.getAllByListCategoryId(listCategoryId)
}
This method takes a listCategoryId and returns a LiveData object from listItemDao. Next, open ListItemsViewModel and add a method also named getAllByListCategoryId() with different implementation:
fun getAllByListCategoryId(listCategoryId: Long): LiveData<List<ListItem>> {
  return listItemRepository.getAllByListCategoryId(listCategoryId)
}
This method takes same listCategoryId but returns a LiveData object from your listItemRepository.
Now, open up your ListItemsActivity and paste the following method:
private fun setupRecyclerAdapter() {
  val recyclerViewLinearLayoutManager = LinearLayoutManager(this)

  contentListItemsBinding = activityListItemsBinding.listItemsViewInclude!!
  contentListItemsBinding.listItemRecyclerView.layoutManager =
      recyclerViewLinearLayoutManager
  listItemAdapter = ListItemAdapter(listOf(), this)
  listItemsViewModel.getAllByListCategoryId(listCategory.id).observe(
      this, Observer { listItems: List<ListItem>? ->
    listItems?.let {
      listItemAdapter.itemList = it
      listItemAdapter.notifyDataSetChanged()
    }
  })
  contentListItemsBinding.listItemRecyclerView.adapter = listItemAdapter
}
This sets up your RecyclerView by placing an observer in your LiveData object returned by getAllByListCategoryId() to update the RecyclerView when new ListItem objects are added to a category.
Now, it’s time to add a call to your setupRecyclerAdapter() method at the end of onCreate:
override fun onCreate(savedInstanceState: Bundle?) {
  super.onCreate(savedInstanceState)
  ...

  setupRecyclerAdapter()
}
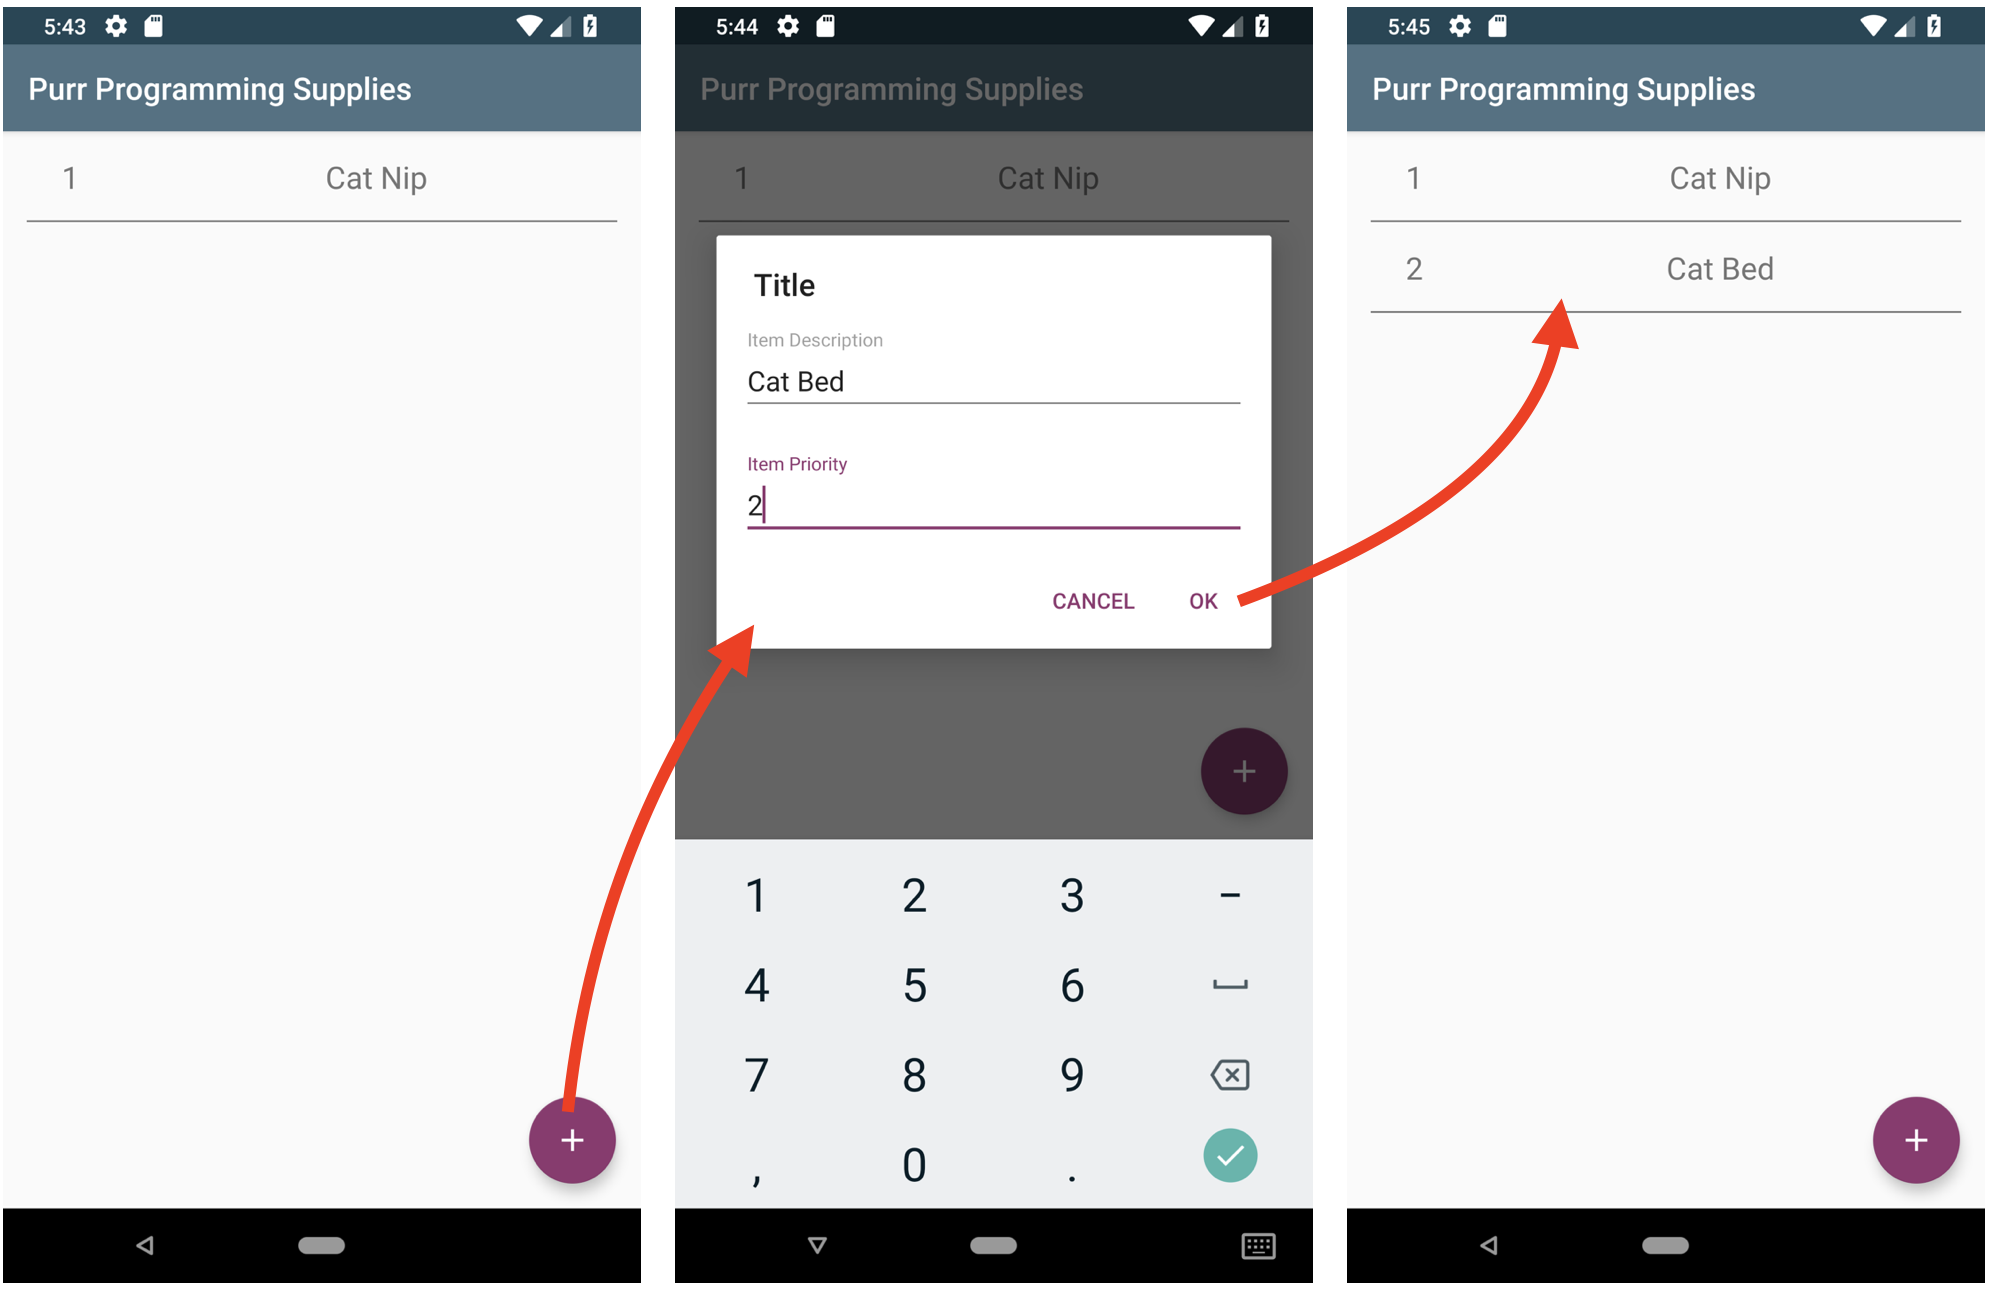
It’s time to run the app again by clicking on the Run option and clicking on Run ‘app’. You should now see the item you added before.
When clicking into Purr Programming Supplies, you will see the Cat Nip you added before. Now, tap the + button, type in Cat Bed with a priority of 2, tap OK and you will see it in your list:
Indexes
When a database table begins to get a lot of records in it, queries can often start to slow down. To mitigate that with SQLite, you can add an index to fields you frequently query to speed up these queries. Under the hood, the database makes a copy of the fields that you are indexing in a data structure that is more efficient to query.
Note: Check out this Wikipedia article to learn more about indexing.
In your app, there can be several list_category records, and each list_category can have multiple list_item records. More importantly, you are regularly performing queries on the list_category_id field to query for them by for selected list_category IDs. Because of that, you are going to add an index to this field.
To add an index, start by replacing the @Entity annotation of the ListItem entity with the following:
@Entity(
    tableName = "list_items",
    foreignKeys = [ForeignKey(
        entity = ListCategory::class,
        parentColumns = ["id"],
        childColumns = ["list_category_id"],
        onDelete = CASCADE)],
    indices = [Index(value = ["list_category_id"],
        name = "index_list_category_id")])
Here, you’ve added an indices property to the entity that is passing in an array of Index objects. In that array, you are then creating the Index with two fields:
- value: Which field(s) you want to index.
- name: A unique name for the index.
Note: The index name is used for things such as migrations. When you perform queries, you still query against the fields as you did before adding the index.
Note: The index name is used for things such as migrations. When you perform queries, you still query against the fields as you did before adding the index.
Now that you have your index, you’re going to need to create a migration for users who have the previous version of the schema. To do that, create a file called Migration2To3 in the migrations package and paste in the following:
@VisibleForTesting
class Migration2To3 : Migration(2, 3) {

  override fun migrate(database: SupportSQLiteDatabase) {
    database.execSQL(
        "CREATE INDEX 'index_list_category_id' ON list_items('list_category_id')")
  }
}
Next, replace your AppDatabase with the following:
//1
@Database(entities = [ListCategory::class, ListItem::class], version = 3)
abstract class AppDatabase : RoomDatabase() {

  abstract fun listCategoryDao(): ListCategoryDao

  abstract fun listItemDao(): ListItemDao

  companion object {

    @VisibleForTesting
    val MIGRATION_1_TO_2 = Migration1To2()
    //2
    @VisibleForTesting
    val MIGRATION_2_TO_3 = Migration2To3()
  }
}
In this, you have done two things:
- Incremented the version of the schema from 2 to 3.
- Added a reference to your new migration.
Now, you need to tell your app database builder to use the new migration by replacing the onCreate() method in ListMasterApplication with:
  override fun onCreate() {
    super.onCreate()
    ListMasterApplication.database = Room.databaseBuilder(
        this,
        AppDatabase::class.java,
        "list-master-db")
        .addMigrations(AppDatabase.MIGRATION_1_TO_2)
        .addMigrations(AppDatabase.MIGRATION_2_TO_3)
        .build()
  }
Run the app to make sure it still runs correctly after indexing.


