Design Patterns on iOS using Swift – Part 1/2
In the first half of this two-part tutorial, you’ll learn about common design patterns when building iOS apps, and how to apply these patterns in your own apps. By Lorenzo Boaro.
Sign up/Sign in
With a free Kodeco account you can download source code, track your progress, bookmark, personalise your learner profile and more!
Create accountAlready a member of Kodeco? Sign in
Sign up/Sign in
With a free Kodeco account you can download source code, track your progress, bookmark, personalise your learner profile and more!
Create accountAlready a member of Kodeco? Sign in
Contents
Design Patterns on iOS using Swift – Part 1/2
30 mins
- Getting Started
- MVC – The King of Design Patterns
- How to Use the MVC Pattern
- The Singleton Pattern
- What Should You Be Careful About?
- How to Use the Singleton Pattern
- The Facade Design Pattern
- How to Use the Facade Pattern
- The Decorator Design Pattern
- Extensions
- How to Use Extensions
- Delegation
- How to Use the Delegate Pattern
- Final Touches
- Where to go from here?
iOS Design Patterns – you’ve probably heard the term, but do you know what it means? While most developers probably agree that design patterns are very important, there aren’t many articles on the subject and we developers sometimes don’t pay too much attention to design patterns while writing code.
Design patterns are reusable solutions to common problems in software design. They’re templates designed to help you write code that’s easy to understand and reuse. They also help you create loosely coupled code so that you can change or replace components in your code without too much hassle.
If you’re new to design patterns, then I have good news for you! First, you’re already using tons of iOS design patterns thanks to the way Cocoa is built and the best practices you’re encouraged to use. Second, this tutorial will bring you up to speed on all the major (and not so major) iOS design patterns that are commonly used in Cocoa.
In this two-part tutorial, you will create a music library app that will display your albums and their relevant information.
In the process of developing this app, you’ll become acquainted with the most common Cocoa design patterns:
- Creational: Singleton.
- Structural: MVC, Decorator, Adapter, Facade.
- Behavioral: Observer, and, Memento
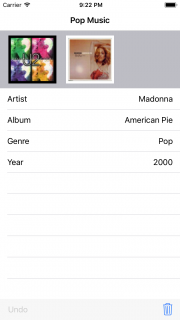
Don’t be misled into thinking that this is an article about theory; you’ll get to use most of these design patterns in your music app. Your app will look like this by the end of the tutorial:

Let’s get started!
Getting Started
Download the Starter project, extract the contents of the ZIP file, and open RWBlueLibrary.xcodeproj in Xcode.
Note the following things in the project:
- The
ViewControllerhas threeIBOutletconnecting the table view, the undo bar button item and the trash in storyboard. - The storyboard has 3 components which are setup with constraints for your convenience. The top component is where the album covers will be displayed. Below the album covers will be a table view which lists information related to an album cover. Lastly the tool bar has two buttons, one to undo an action and another to delete an album that you select. The storyboard is shown below:

- A starter HTTP Client class (
HTTPClient) with an empty implementation for you to fill in later.
Note: Did you know that as soon as you create a new Xcode project your code is already filled with design patterns? Model-View-Controller, Delegate, Protocol, Singleton – You get them all for free! :]
Note: Did you know that as soon as you create a new Xcode project your code is already filled with design patterns? Model-View-Controller, Delegate, Protocol, Singleton – You get them all for free! :]
MVC – The King of Design Patterns
Model-View-Controller (MVC) is one of the building blocks of Cocoa and is undoubtedly the most-used design pattern of all. It classifies objects according to their general role in your application and encourages clean separation of code based on role.
The three roles are:
-
Model: The objects that hold your application data and define how to manipulate it. For example, in your application the Model is the
Albumstruct, which you can find in Album.swift. Most applications will have more than one type as part of their Model :] -
View: The objects that are in charge of the visual representation of the Model and the controls the user can interact with; basically, all the
UIView-derived objects. In your application the View is represented byAlbumView, which you can find in AlbumView.swift. -
Controller: The controller is the mediator that coordinates all the work. It accesses the data from the model and displays it with the views, listens to events and manipulates the data as necessary. Can you guess which class is your controller? That’s right:
ViewController.
A good implementation of this design pattern in your application means that each object falls into one of these groups.
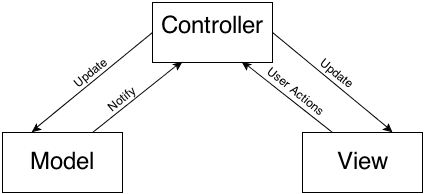
The communication between View to Model through Controller can be best described with the following diagram:
The Model notifies the Controller of any data changes, and in turn, the Controller updates the data in the Views. The View can then notify the Controller of actions the user performed and the Controller will either update the Model if necessary or retrieve any requested data.
You might be wondering why you can’t just ditch the Controller, and implement the View and Model in the same class, as that seems a lot easier.
It all comes down to code separation and reusability. Ideally, the View should be completely separated from the Model. If the View doesn’t rely on a specific implementation of the Model, then it can be reused with a different model to present some other data.
For example, if in the future you’d also like to add movies or books to your library, you could still use the same AlbumView to display your movie and book objects. Furthermore, if you want to create a new project that has something to do with albums, you could simply reuse your Album struct, because it’s not dependent on any view. That’s the strength of MVC!
How to Use the MVC Pattern
First, you need to ensure that each class in your project is either a Controller, a Model or a View; don’t combine the functionality of two roles in one class.
Second, in order to ensure that you conform to this method of work you should create three project groups to hold your code, one for each category.
Navigate to File\New\Group (or press on Command+Option+N) and name the group Model. Repeat the same process to create View and Controller groups.
Now drag Album.swift to the Model group. Drag AlbumView.swift to the View group, and finally drag ViewController.swift to the Controller group.
At this point the project structure should look like this:
Your project already looks a lot better without all those files floating around. Obviously you can have other groups and classes, but the core of the application is contained in these three categories.
Now that your components are organized, you need to get the album data from somewhere. You’ll create an API class to use throughout your code to manage the data — which presents an opportunity to discuss your next design pattern — the Singleton.


