
Exporting Your Godot Project to Windows and Linux
Exporting your Godot project for Windows and Linux is a crucial step in sharing your game with the world. This tutorial walks you through the process, covering essential topics like export templates, preset configuration, and platform-specific settings. Learn how to navigate the export window, understand various options, and create distribution-ready builds for both Windows and Linux platforms. Whether you’re targeting Steam, itch.io, or direct distribution, this guide provides valuable insights to help you reach your audience effectively. By Eric Van de Kerckhove.
Creating a Windows Export
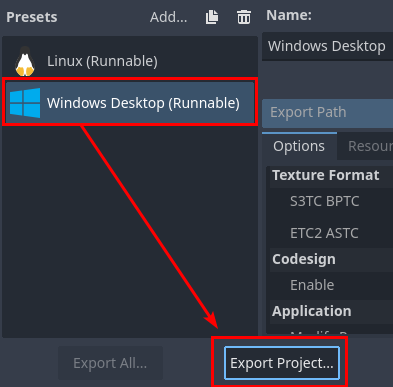
With everything all set-up, the exporting itself is pretty straightforward. Open the Export window again, select the Windows Desktop export preset and click the Export Project… button at the bottom.
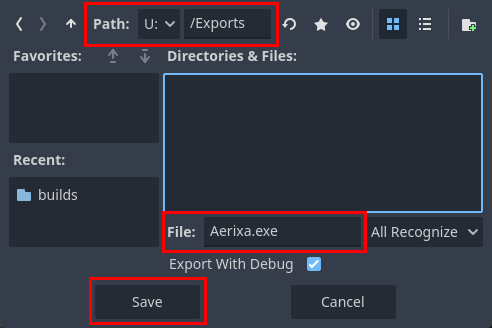
A file dialog will pop up. Select a directory and fill in a file name at the bottom. Now click the Save button to export the project.
Time to take a closer look at the exported project. Navigate to the folder where you stored the project and check out the files that were created.
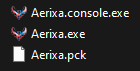
- .console.exe file: This is a console wrapper that runs the main executable in a terminal window.
- .exe file: The main executable.
- .pck file: A PCK file containing the project’s resources.
Try double-clicking the .exe file to run your exported project. If all works well, you should see the project starting up. Make sure to test if everything works as expected. While on the subject of testing, I have some tips on how to test your projects.
Testing Your Exported Project
You now have one or more exported projects. The next step is to test them.
First of all, check if the project works on the hardware you’ve created it on. If your project loads resources on the fly from the file system, make sure that’s working correctly as that’s a common gotcha. Internet access is another one: if your project needs to access the web, make sure your project still works even if you’re not connected to the internet.
Once you verified that your project works, you can test it on your target device.
Ensure that your project runs as expected, checking for any platform-specific issues or performance problems. Pay attention to:
- Graphics rendering
- Input handling (keyboard, mouse, gamepads)
- Audio playback
- File system operations (saving/loading)
- Performance and frame rate
Testing on the actual target platforms is vital because it can reveal issues that weren’t apparent in the Godot editor or on your development machine.
Once you’re satisfied with your export, you can distribute it.
Distributing Your Project
Once you’re ready with your export, there are several ways to distribute it, depending on your needs and audience.
The simplest option for both Windows and Linux is to zip the executable and PCK file together. This zipped file can then be easily shared on platforms like itch.io. It’s a quick and straightforward approach, perfect for smaller projects or early-stage releases.
For broader distribution, you might consider digital marketplaces like Steam or GOG. While these platforms offer greater visibility and tools for updates and community engagement, they also require more setup and adherence to specific submission guidelines.
If you’re looking to release your project on Windows with a more polished touch, creating an installer is a good option. Tools like Inno Setup allow you to create professional installers, and you can use this .iss file as a template. This method provides a smoother user experience and makes it easy to include prerequisites or other files like a soundtrack or modding tools.
Each distribution method has its advantages and trade-offs. When deciding, consider your project’s size, your target audience, and your long-term goals.
Where to Go From Here?
Congratulations on making it to the end of the article! As always, you can download the starter materials zip from the link at the top or bottom of this article.
Exporting your Godot 4 project for Windows and Linux is a crucial step in sharing your project with the world. As you continue to develop and distribute projects, consider exploring these resources for more in-depth information:
- Exporting for Windows (Godot Docs)
- Changing Application Icon for Windows (Godot Docs)
- Exporting for Linux (Godot Docs)
These official documentation pages provide more detailed information on platform-specific export options and advanced techniques.
Remember, the export process is just the beginning. Gathering user feedback, providing updates, and supporting your project post-release are all important aspects of game development. Good luck with your Godot projects! Leave a comment below to join the discussion and share your insights.