HealthKit Tutorial With Swift: Getting Started
Learn how to request permission to access HealthKit data, as well as read and write data to HealthKit’s central repository in this HealthKit tutorial. By Ted Bendixson.
Sign up/Sign in
With a free Kodeco account you can download source code, track your progress, bookmark, personalise your learner profile and more!
Create accountAlready a member of Kodeco? Sign in
Contents
HealthKit Tutorial With Swift: Getting Started
30 mins
- Getting Started
- Assigning a Team
- Entitlements
- Permissions
- Updating the Share Usage Descriptions
- Authorizing HealthKit
- Checking HealthKit Availability
- Preparing Data Types
- Preparing a list of data types to read and write
- Authorizing HealthKit
- Characteristics and Samples
- Reading Characteristics
- Updating The User Interface
- Querying Samples
- Displaying Samples in the User Interface
- Saving Samples
- Where To Go From Here?
Update Note: This tutorial has been updated for Swift 4, Xcode 9 and iOS 11 by Ted Bendixson. The original tutorial was written by Ernesto García.

HealthKit is an API that was introduced in iOS 8. It acts as a central repository for all health-related data, letting users build a biological profile and store workouts.
In this HealthKit tutorial, you will create a simple workout tracking app and learn:
- How to request permission and access HealthKit data
- How to read HealthKit data and display it in a UITableView
- How to write data to HealthKit’s central repository
Ready to start this HealthKit Exercise? Read on!
Note: To work through this HealthKit tutorial, you’ll need an active iOS developer account. Without one, you won’t be able to enable the HealthKit Capability and access the HealthKit Store.
Note: To work through this HealthKit tutorial, you’ll need an active iOS developer account. Without one, you won’t be able to enable the HealthKit Capability and access the HealthKit Store.
Getting Started
The sample app tracks calories burned doing the latest celebrity endorsed workout routine. It should be obvious to Hollywood insiders and well-mannered socialites that I’m talking about Prancercise.
Download the starter project and open it in Xcode.
Build and run the app. You will see a skeleton of the user interface. Throughout the course of these next two articles, you will slowly add in the functionality.

Assigning a Team
HealthKit is a special framework. Your app can’t use it unless you have an active developer account. Once you have a developer account, you can assign your team.
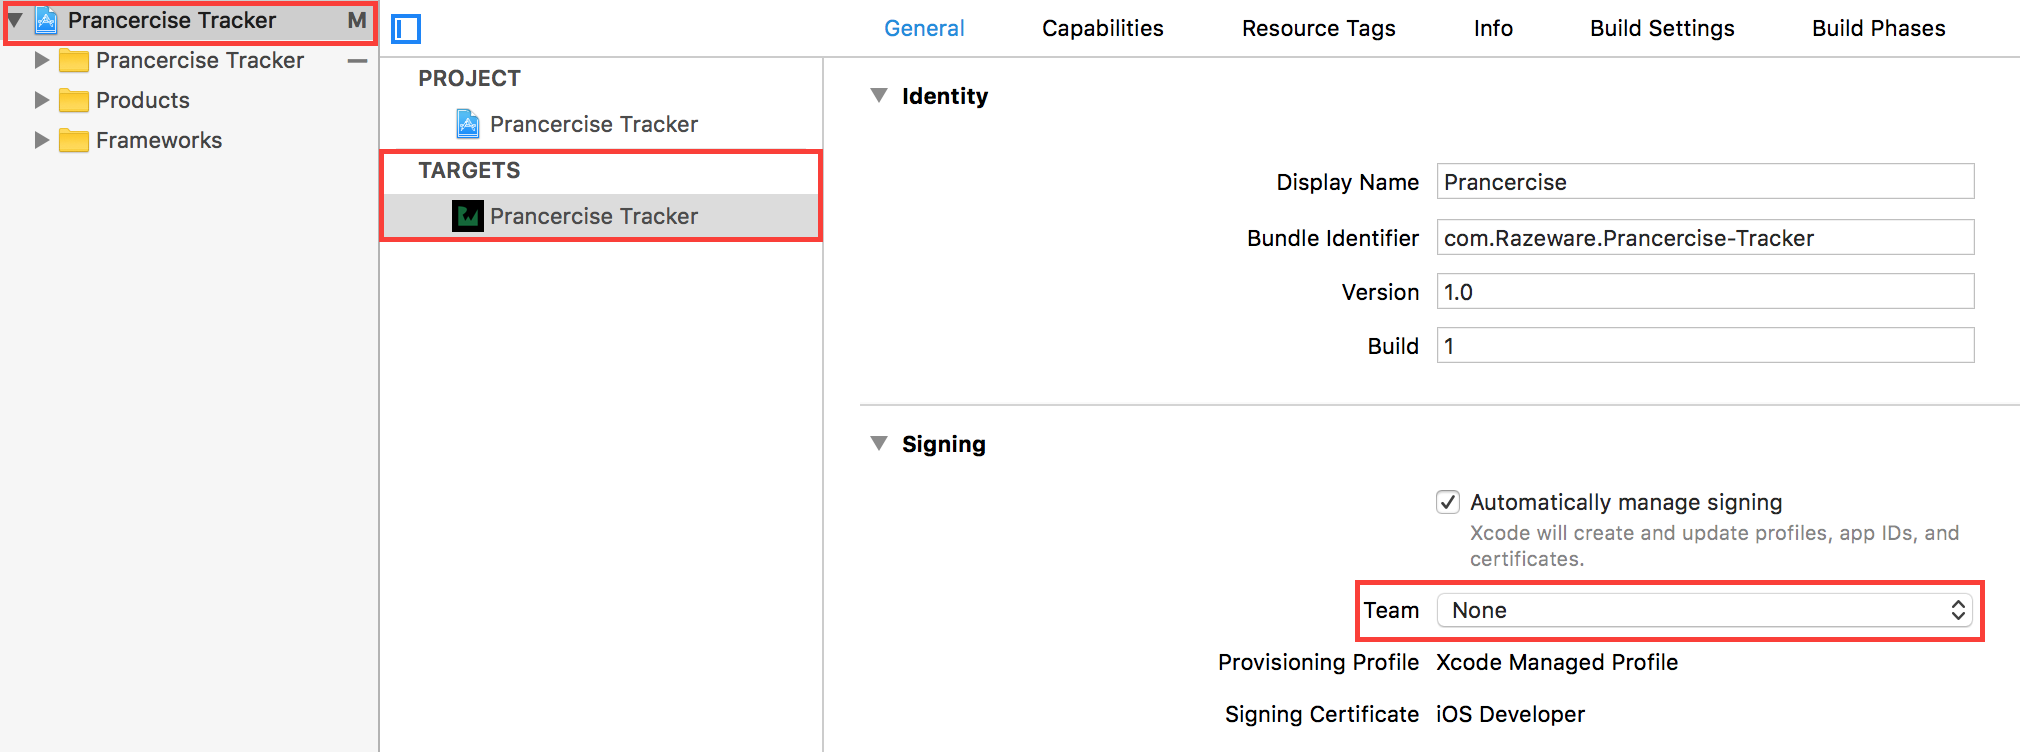
Select PrancerciseTracker in the Project Navigator, and then select the PrancerciseTracker target. Select the General tab and click on the Team combo box.
Select the team associated with your developer account:

That was a piece of cake, right? Oops. I meant to say that was a low-calorie potato and red lentil soup stewed in a vegetable broth :].
Entitlements
HealthKit also has its own set of entitlements, and you will need to enable them in order to build apps that use the framework.
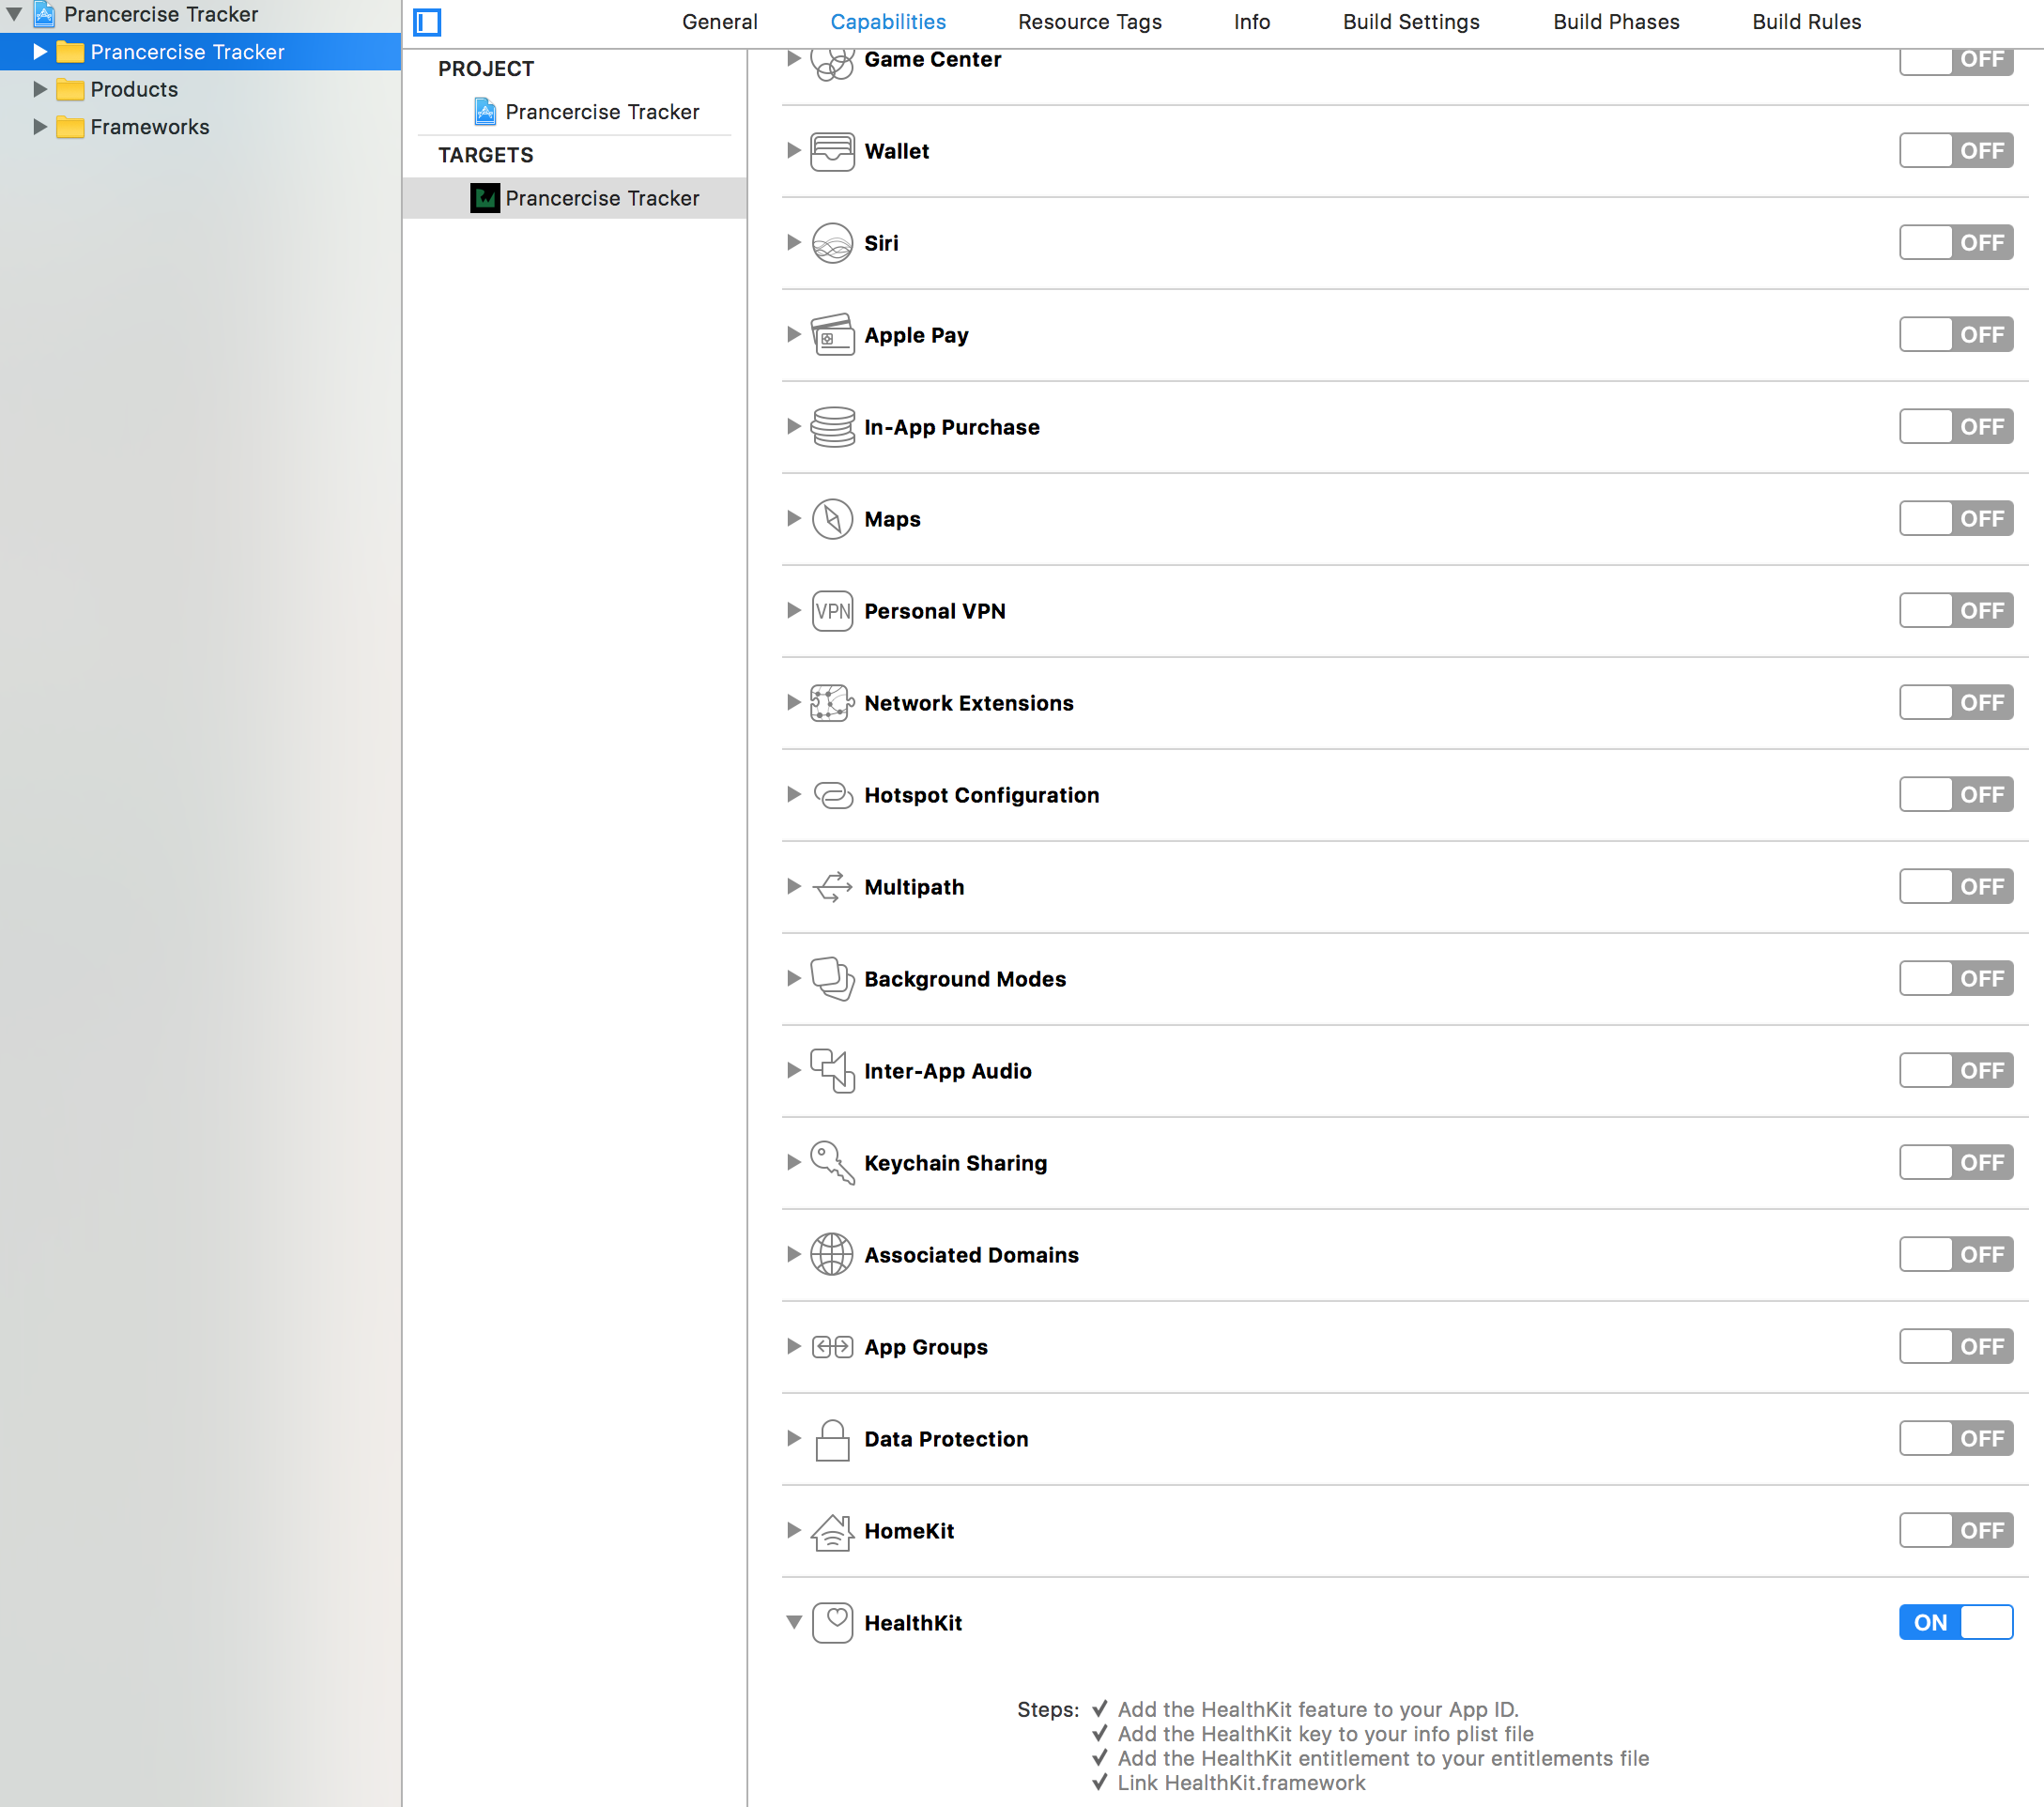
Open the Capabilities tab in the target editor, and turn on the HealthKit switch, as shown in the screenshot below:

Wait for Xcode to configure HealthKit for you. There usually isn’t a problem here, but you might run into some snags if you forgot to setup your Team and Bundle Identifier like you did in the previous section.
Done and done. Now you just need to ask the user for permission to use HealthKit.
Permissions
HealthKit deals with sensitive and private data. Not everyone feels so comfortable letting their apps access this information.
That’s why HealthKit has a robust privacy system. HealthKit only has access to the kinds of data your users agree to share with it. To build up a health profile for your Prancercise Tracker’s users, you need to be nice and ask for permission to access each type of data first.
Updating the Share Usage Descriptions
First, you need to describe why you are asking for health metrics from your users. Xcode gives you a way to specify this in your application’s Info.plist file.
Open Info.plist. Then add the following keys:
Privacy – Health Share Usage Description
Privacy – Health Update Usage Description
Both keys store text that display when the HeathKit authorization screen appears. The Health Share Usage Description goes under the section for data to be read from HealthKit. The Health Update Usage Description corresponds to data that gets written to HealthKit.
You can put anything you want in there. Typically it’s some explanation saying, “We will use your health information to better track Prancercise workouts.”
Do be aware that if those keys aren’t set, your app will crash when attempting to authorize HealthKit.
Authorizing HealthKit
Open HealthKitSetupAssistant.swift and take a peek inside. You will find an empty class with an error type and the body of a method you will use to authorize HealthKit.
class func authorizeHealthKit(completion: @escaping (Bool, Error?) -> Swift.Void) {

}
the authorizeHealthKit(completion:) method accepts no parameters, and it has a completion handler that returns a boolean (success or failure) and an optional error in case something goes wrong. That’s what the two possible errors are for. You will pass them into the completion handler under two special circumstances.
[spoiler title="What might go wrong when trying to authorize HealthKit?"]
1. HealthKit might not be available on the device. This happens with iPads.
2. Some data types might not be available in the current version of HealthKit.
[/spoiler]
Let’s break this process down. To authorize HealthKit, the authorizeHealthKit(completion:) method will need to do these four things:
- Check to see if Healthkit is available on this device. If it isn’t, complete with failure and an error.
- Prepare the types of health data Prancercise Tracker will read and write to HealthKit.
- Organize those data into a list of types to be read and types to be written.
- Request Authorization. If it’s successful, complete with success.
Checking HealthKit Availability
First things first. You are going to check if HealthKit is available on the device.
Paste the following bit of code at the top of the authorizeHealthKit(completion:) method:
//1. Check to see if HealthKit Is Available on this device
guard HKHealthStore.isHealthDataAvailable() else {
  completion(false, HealthkitSetupError.notAvailableOnDevice)
  return
}
You are going to interact with HKHealthStore quite a lot. It represents the central repository that stores a user’s health-related data. HKHealthStore’s isHealthDataAvailable() method helps you figure out if the user’s current device supports HeathKit data.
The guard statement stops the app from executing the rest of the authorizeHealthKit(completion:) method’s logic if HealthKit isn’t available on the device. When this happens, the method completes with the notAvailableOnDevice error. Your view controller can do something with that, or you can just log it to the console.
Preparing Data Types
Once you know HealthKit is available on your user’s device, it is time to prepare the types of data that will get read from and written to HealthKit.
HealthKit works with a type called HKObjectType. Every type that goes into and out HealthKit’s central repository is some kind of HKObjectType. You will also see HKSampleType and HKWorkoutType. Both inherit from HKObjectType, so they’re basically the same thing.
Paste this next piece of code right after the first piece of code:
//2. Prepare the data types that will interact with HealthKit
guard   let dateOfBirth = HKObjectType.characteristicType(forIdentifier: .dateOfBirth),
        let bloodType = HKObjectType.characteristicType(forIdentifier: .bloodType),
        let biologicalSex = HKObjectType.characteristicType(forIdentifier: .biologicalSex),
        let bodyMassIndex = HKObjectType.quantityType(forIdentifier: .bodyMassIndex),
        let height = HKObjectType.quantityType(forIdentifier: .height),
        let bodyMass = HKObjectType.quantityType(forIdentifier: .bodyMass),
        let activeEnergy = HKObjectType.quantityType(forIdentifier: .activeEnergyBurned) else {

        completion(false, HealthkitSetupError.dataTypeNotAvailable)
        return
}
Wow, that’s big guard statement! It’s also an excellent example of using a single guard to unwrap multiple optionals.
In order to create an HKObjectType for a given biological characteristic or quantity, you need to use either HKObjectType.characteristicType(forIdentifier:) or HKObjectType.quantityType(forIdentifier:)
The characteristic types and the quantity types are both enums defined by the framework. HealthKit is loaded with these. There are so many different dimensions of health for your app to track that it makes my head spin whilst prancercising around the possibilities.
You will also notice that if a single characteristic or sample type is not available, the method will complete with an error. That’s intentional. Your app should always know exactly which HealthKit types it can work with, if any at all.