How To Make A Simple Drawing App with UIKit
This is a blog post by iOS Tutorial Team member Abdul Azeem, software architect and co-founder at Datainvent Systems, a software development and IT services company. At some stage in all of our lives, we enjoyed drawing pictures, cartoons, and other stuff. For me it was using a pen and paper when I was growing […] By .
Sign up/Sign in
With a free Kodeco account you can download source code, track your progress, bookmark, personalise your learner profile and more!
Create accountAlready a member of Kodeco? Sign in
Sign up/Sign in
With a free Kodeco account you can download source code, track your progress, bookmark, personalise your learner profile and more!
Create accountAlready a member of Kodeco? Sign in
Contents
How To Make A Simple Drawing App with UIKit
40 mins
- Getting Started
- Starting the First Screen
- In Living Color
- Quick on the Draw
- The App of Many Colors
- Tabula Rasa
- Nobody’s perfect — the Eraser tool
- Finishing Touches — Settings Layout
- Finishing Touches – Settings Implementation
- Finishing Touches – Settings Integration
- Finishing Touches — A Custom Color Selector
- Finishing Touches – Share and Enjoy!
- Finishing Touches – Saving for posterity
- Finishing Touches – Tweet to your friends!
- Where To Go From Here?
How To Make A Simple Drawing App with UIKit
This is a blog post by iOS Tutorial Team member Abdul Azeem, software architect and co-founder at Datainvent Systems, a software development and IT services company.
At some stage in all of our lives, we enjoyed drawing pictures, cartoons, and other stuff.
For me it was using a pen and paper when I was growing up, but these days the old pen and paper has been replaced by the computer and touch devices! Drawing can be especially fun on touch devices, as you can see by the abundance of drawing apps on the App Store.
Want to learn how to make a drawing app of your own? The good news is it’s pretty easy, thanks to some great drawing APIs available in iOS.
In this tutorial, you will create an app very much like Color Pad for iPhone. In the process you’ll learn how to:
- draw lines and strokes using Quartz2D,
- use multiple colors,
- set brush stroke widths and opacity,
- create an eraser,
- create a custom RGB color selector,
- save drawing to the camera roll, and
- share your drawing on Twitter!
Grab your pencils and get started; no need to make this introduction too drawn out! :]
Getting Started
Start by creating a simple app in xCode.
Start Xcode and create a new project with the iOS\Application\Single View Application template. Enter “DrawPad” for the project name, choose “iPhone” for the Device Family, make sure the “Use Storyboard” and “Use Automatic Reference Counting” options are checked, and save the project to a location of your choice.
Next, you’ll add a framework that is required for this project.
Select the root of the project in the “Project Navigator” pane in the left sidebar to bring up the project information in the central pane. If the project target is not selected, select it, then switch to the “Build Phases” tab.
Now click the triangle next to the “Link Binary With Libraries” section to expand it. Here you can add additional libraries/frameworks to your project.
Click the (+) button to add frameworks. Add Twitter.framework; in this project you will only need this one additional framework in order to tweet your images.
All done? Time to sketch out some of the finer details. :]
Starting the First Screen
Your app will have two screens: the first screen (ViewController) will be the drawing area, and the second will be a popup settings screen (SettingsViewController) that allows control over features such as opacity and width of the brush stroke.
ViewController will contain 10 buttons for selecting different colors, an Eraser button, Save and Reset buttons, and a Settings button to open the settings popup screen.
Time to populate the ViewController! Click on the MainStoryboard.storyboard and Xcode will show the visual editor for the storyboard.
First, add two full-screen UIImageViews to the UIViewController’s view. These will serve as your drawing areas on the screen. The top image view will contain each stroke as it is being made, and once the stroke is complete it will be merged into a final image displayed in the bottom image view.
To tell them apart, name the one on the bottom (i.e. the first item underneath the View in the sidebar) mainImage in the identity inspector, and the one on the top (i.e. the second item underneath the View in the sidebar) tempDrawImage in the identity inspector. At this point, your layout should look like this:
ViewController must be able to refer to these UIImageViews, so enable the assistant editor and make sure ViewController.h is displayed. Control-drag from each UIImageView to below the @interface, and connect them to an appropriately named outlet – mainImage and tempDrawImage.
Now you’re at a point where you can add a splash of color to your app!
In Living Color
Next, you’ll need to add some buttons to allow users to select the color they want to draw with. For this, you will use some images of colored pencils to make it look nice.
You can find these images in the resources for this tutorial. Download the resources, unzip the file, and drag the entire folder of graphics into your project. Make sure “Copy items into destination group’s folder” is selected, “Create groups for any added folders” is selected, the DrawPad target is checked, and click Finish.
Now create a button at the bottom of the screen. Set the type to Custom, the image to Black.png, and the size to 28×185. Then align the button at the bottom left of the screen so only the top shows, like this:
Now duplicate the botton 9 more times by option-dragging the button over to the right. For each new button, change the Image to the appropriate colored pencil image name – the order is black, grey, red, blue, dark green, light green, light blue, brown, dark orange, and yellow.
Next, use the tag field to tag the buttons with 0-9. This allows all the buttons to have the same method as their IBAction, and you can distinguish each code by its tag. Note that the code you’ll add later will assume you’ve added the colors in the same order as in the screenshot above.
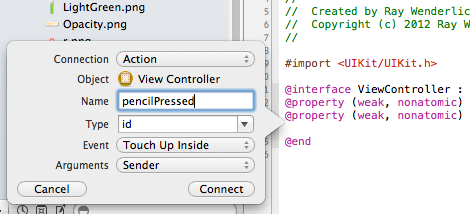
Next, bring up the Assistant Editor and make sure ViewController.h is displayed. Control-drag from the black button to below the properties, set the Connection to Action, name it pencilPressed, and click Connect.
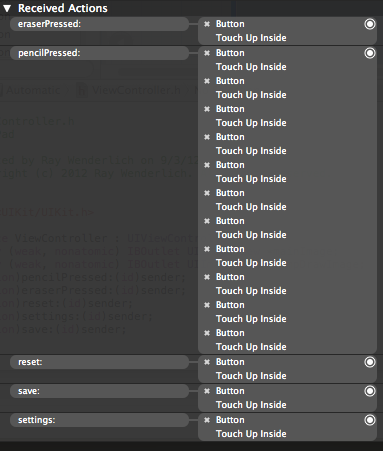
Then connect the rest of the buttons to the same outlet (you can do this by dragging from each button to the new outlet you made in the assistant editor – it should highlight in blue to show it’s been selected).
Next, drag a new button into the canvas. Set it to Custom, set the Image to Eraser.png, and resize it to 28×87. Move it to the end of the row of pencils, so it looks like the following:
Connect the eraser button to a new IBAction method named eraserPressed. If you forgot how to do this, read the instructions from before :]
Finally, add three buttons to the top for “Reset”, “Settings”, and “Save” – there are graphics for each in the resources. Similar to before, set each to Custom, set each to the appropriate image, and resize them so it looks similar to the following:

Then connect these buttons to outlet methods called “reset”, “settings” and “save”.
When all the connections have been made, check the connections by right-clicking “View Controller” in the left pane of the interface editor. You will see that connections are made by the circled tray dots appearing in the bar to the left of the code.
Great! Now save, compile, and run your project! You will see the following screen:
Well, that looks pretty snazzy! However, in order to let your inner artist shine, you’ll need to add some code!


