How To Make an eBook with iBooks Author Tutorial
In this iBooks Author tutorial, you’ll learn how to create a book in iBooks Author from scratch – complete with embedded video, interactive quizzes, and more. You’ll see how easy it is, and will be making your own book in no time! By .
Sign up/Sign in
With a free Kodeco account you can download source code, track your progress, bookmark, personalise your learner profile and more!
Create accountAlready a member of Kodeco? Sign in
Sign up/Sign in
With a free Kodeco account you can download source code, track your progress, bookmark, personalise your learner profile and more!
Create accountAlready a member of Kodeco? Sign in
Contents
How To Make an eBook with iBooks Author Tutorial
30 mins
- Video Demo
- Getting Started
- Once Upon a Time — Choosing an iBooks Author Template
- You Can Judge a Book by its Cover — Creating an iBook Cover
- Going to the Movies — Adding Intro Media to Your iBook
- Lights! Camera! Action! — Viewing your iBook Live
- What’s in Here? — Fleshing out the Table of Contents
- Keeping the Lawyers Happy — Adding a Copyright Notice
- In the Beginning — Adding a Section to Your Chapter
- Don’t Get Bent Out of Shape — Adding Basic Shapes
- Widgets, Widgets Everywhere — Adding Interactive Widgets to your iBook
- There Will be a Quiz at the End — Adding A Review Widget to Your iBook
- Illustrative Images — Adding Interactive Images to your iBook
- Great Galloping Galleries — Adding a Gallery Widget to your iBook
- Adding Some Structure — Organizing Chapters and Sections in your iBook
- Hot off the Presses — Getting Your Book to the Public
- Navigating the iBooks Jungle — iBooks Publishing
- Is is There Yet? — The Approval Process
- Where to Go From Here?
Learn how to make an eBook with iBooks Author!
If you’ve ever had the itch to write your own book, it’s never been easier than now!
There are two recent changes that are to your advantage:
- eBooks: Now that eBooks have become popular (and even preferred by many), you no longer have to worry about physically printing your books in order to sell them.
- Online stores: The other big change is that online stores like iBooks or Amazon.com allow independent authors to submit their books directly, without having to go through the hassle of making a book deal with a major publisher.
So this means to create and sell a book, all you have to do is create a file! And one of the best tools to create eBooks for the Apple iPad is iBooks Author.
In this iBooks Author tutorial, I’ll show you how to create a book in iBooks Author from scratch – complete with embedded video, interactive quizzes, and more. You’ll see how easy it is, and will be making your own book in no time!
Note: that to use iBooks Author, you’ll need a Macintosh computer running OSX 10.11 or later and if you’d like to do previewing, an iPad with iBooks 3.0 installed on it.
Note: that to use iBooks Author, you’ll need a Macintosh computer running OSX 10.11 or later and if you’d like to do previewing, an iPad with iBooks 3.0 installed on it.
Video Demo
If a picture is worth a thousand words, then a video must be worth ten times that! :] The video below shows the eBook that you’ll create in this tutorial:
Believe it or not, you’ll accomplish all that in this tutorial alone! Keep reading to find out how to get started.
Getting Started
iBooks Author is a free download on the Mac App Store. Just search for “iBooks Author” in the App Store, or follow this direct link to the app.
You can download all of the source files needed for this tutorial here. This compressed folder contains all of the media assets that you will need for this project, and it also contains the completed iBook for reference.
Save the folder to your desktop or some other easy-to-find place that you can access from iBook Author.
Minimal setup — things are looking good so far! The next section shows you how to create your iBook from the library of existing templates available.
Once Upon a Time — Choosing an iBooks Author Template
Once iBooks Author is installed, go to your Applications folder and run it. You’ll be greeted by a Template Chooser screen that allows you to pick a template best suited for your book. For this example, choose “Contemporary”, then click “Choose”, as below:
With your new template open, navigate to File\Save, and save your project as iBookTutorial inside the iBooksAuthorTutorial folder that you downloaded in the previous section. As with any project, it’s a good habit to save early and often.
To start, click the “Inspector” button in the upper-right side of iBooks Author. Additionally, click the “Document” button on the far left of the Inspector panel if it is not already highlighted, as shown in the screenshot below:
Fill in some basic information about your book in the Document pane, such as your name, the title of the book, and some basic notes about the book.
Now that you have the basic information entered about your iBook, it’s time to set up the first thing your readers will see — the cover!
You Can Judge a Book by its Cover — Creating an iBook Cover
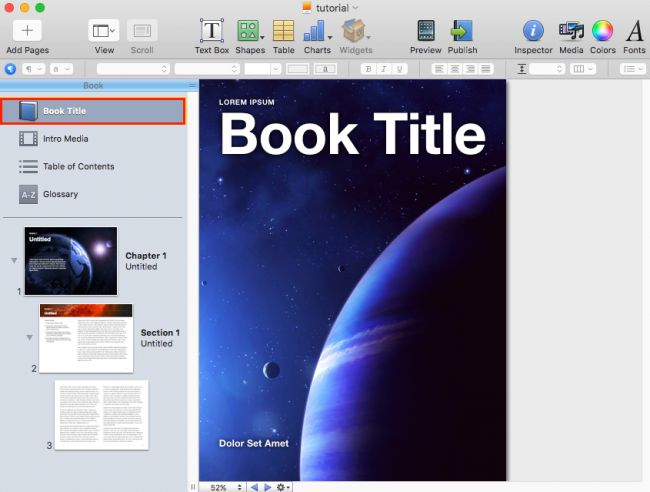
On the left side of iBooks Author, you’ll see the book layout pane. Click Book Title, which will bring up the book cover screen, as such:
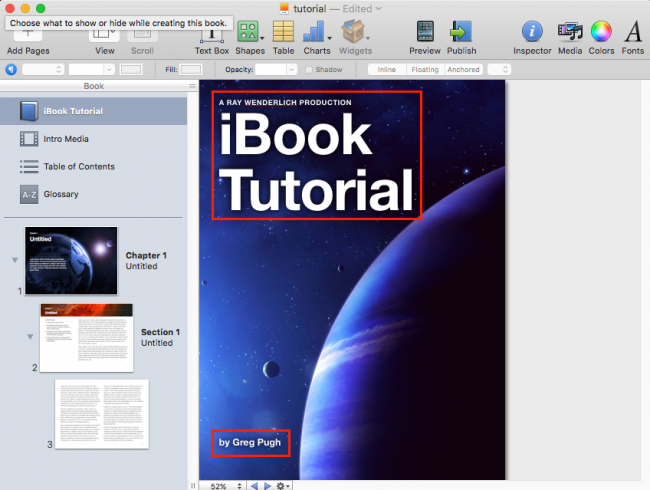
On the book cover, you can double-click any of the text fields directly on the book cover to edit them. Go ahead and edit them now. Note that you can also add, remove, and reposition text boxes to get your titles looking just the way you want, as seen below:
If you’re not happy with the basic cover art that iBooks Author provides, you can also add your own artwork for the cover. In the iBooksAuthorTutorial folder that you downloaded, find the Media folder. In this folder, you will see a file named cover.png, which is the artwork for the cover of your book.
Drag cover.png from the Media folder onto your cover page, which will replace the current blue planet cover with your new shiny artwork. That’s all there is to it!
The new cover should look like this:
This is the cover that readers will briefly see as the book opens on their iPad. It won’t be seen very long at full resolution, but it’s still a good idea to have a nice custom cover image to make your book stand out.
The cover image in this tutorial is 1024×1536, which is half the width of an iPad 3 screen and full height. Images that you would like to fill the entire screen should be 2048×1536 if you’re planning to support iPads with Retina displays.
A nice cover is a good feature, but you’re creating an interactive iBook here, and you can always take it up a notch! iBooks Author allows you to add an introductory video to your iBook which will play when the user opens your book.
Going to the Movies — Adding Intro Media to Your iBook
iBooks have a neat feature where when the book first starts, it can play a movie. This is a great way to introduce the book with something interesting and motivating.
Let’s try it out! In the Book pane of iBooks Author, click Intro Media, like so:
Find intro.mov in the same Media folder where you found the book cover image, and drag it onto the area in iBook Author that says “Drop movie or image here.”, as shown in the screenshot below:
Be patient; iBooks Author might need a few seconds to process the video. Once the processing is complete, hit the play button and watch the exciting intro video! If you choose not to have a video as your Intro Media, you can instead use a still image.
If you opt not to use any intro media, then your iBook will open directly to the table of contents.
Note: Videos will only play when exported in the iBooks format. The Intro Media screen will be skipped for the PDF and Text versions. Keep this in mind if you plan to offer your book as both an iBook and a PDF!
Note: Videos will only play when exported in the iBooks format. The Intro Media screen will be skipped for the PDF and Text versions. Keep this in mind if you plan to offer your book as both an iBook and a PDF!


