Unity 4.3 2D Tutorial: Animation Controllers
Learn how to use animation controllers to move between a state machine of animations in this Unity 4.3 2D tutorial! By Chris LaPollo.
Sign up/Sign in
With a free Kodeco account you can download source code, track your progress, bookmark, personalise your learner profile and more!
Create accountAlready a member of Kodeco? Sign in
Sign up/Sign in
With a free Kodeco account you can download source code, track your progress, bookmark, personalise your learner profile and more!
Create accountAlready a member of Kodeco? Sign in
Contents
Unity 4.3 2D Tutorial: Animation Controllers
40 mins
Welcome back to our Unity 4.3 2D Tutorial series!
In the first part of the series, you started making a fun game called Zombie Conga, learning the basics of Unity 4.3’s built-in 2D support along the way.
In the second part of the series, you learned how to animate the zombie and the cat using Unity’s powerful built-in animation system.
In this third part of the series, you’ll get more practice creating Animation Clips, and you’ll learn how to control the playback of and transition between those clips.
This tutorial picks up where the previous part ended. If you don’t already have the project from that tutorial, download it here.
Just like you did in Part 2, unzip the file and open your scene by double-clicking ZombieConga/Assets/Scenes/CongaScene.unity.
It’s time to make that cat dance!
Getting Started
So far you’ve only been working with Animation Clips, such as ZombieWalk and CatSpawn. You learned in Part 1 that Unity uses an Animator component attached to your GameObjects in order to play these clips, but how does the Animator know which clip to play?
To find out, select cat in the Hierarchy and look at its Animator component in the Inspector. The Controller field is set to an object named cat, as shown below:
This object is an Animator Controller that Unity created for you when you made the cat’s first Animation Clip, and it’s what the Animator uses to decide which animation to play.
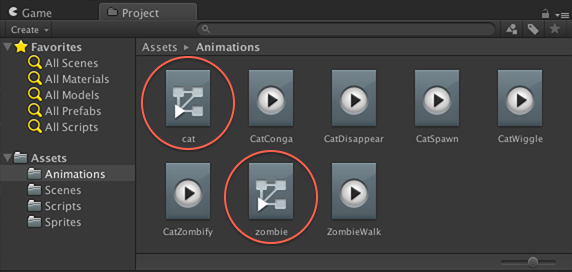
As you can see in the following image, the Animations folder in the Project browser contains the controller named cat, as well as a controller named zombie, which Unity created for the zombie GameObject:
Open the Animator view by choosing Window\Animator. Don’t let the similar names fool you: this view is different from the Animation view you’ve been using.
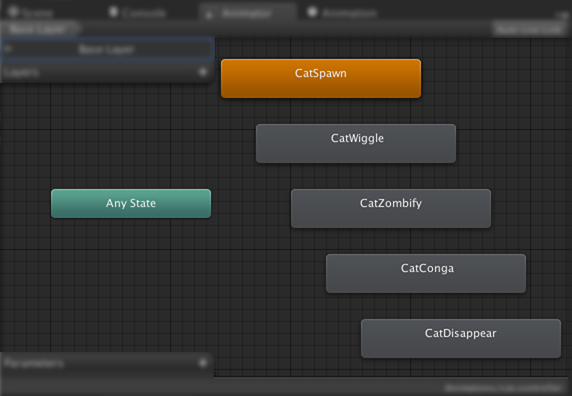
Select cat in the Hierarchy to view its Animator Controller in the Animator view, as shown below:
For now, ignore the areas named Layers and Parameters in the upper and lower left corners, respectively. Instead, take a look at the various rectangles filling most of the view.
What you’re looking at are the states of a state machine that determines which Animation Clip should run on the cat.
If you’ve never heard of a state machine, think of it as a set of possible modes or conditions, called states. At any given time, the machine is in one of these known states, and it includes rules to determine when to transition between its states.
These rectangles each represent an Animation Clip, except for the teal one named Any State, which you’ll read about later.
The orange rectangle represents the default state, i.e. the state that runs when the Animator Controller starts, as shown below:
Unity sets as the default state the first Animation Clip you associate with that Animation Controller. Because you created the cat’s clips in order, Unity correctly set CatSpawn as the default animation. However, if you ever want to assign a different default state, simply right-click the new state in the Animator view and choose Set As Default from the popup menu that appears.
The following image shows how you would manually set CatSpawn as the default state:
With the Animator view still visible, play your scene. Notice that a blue progress bar appears at the bottom of the CatSpawn state. This bar shows you the cat’s exact position within the state machine on any given frame.
As you can see, the cat is continuously running through the CatSpawn animation without ever moving on to the next state.
Note: If you don’t see this blue bar, make sure that you still have the cat selected in the Hierarchy view.
Note: If you don’t see this blue bar, make sure that you still have the cat selected in the Hierarchy view.
You need to provide the Animator Controller with rules for moving between states, so this is the perfect time to segue into a talk about transitions!
Transitions
A state machine isn’t very useful if it can’t ever change states. Here you’ll set up your Animator Controller to smoothly transition your cat from its spawn animation into the animation defined by CatWiggle.
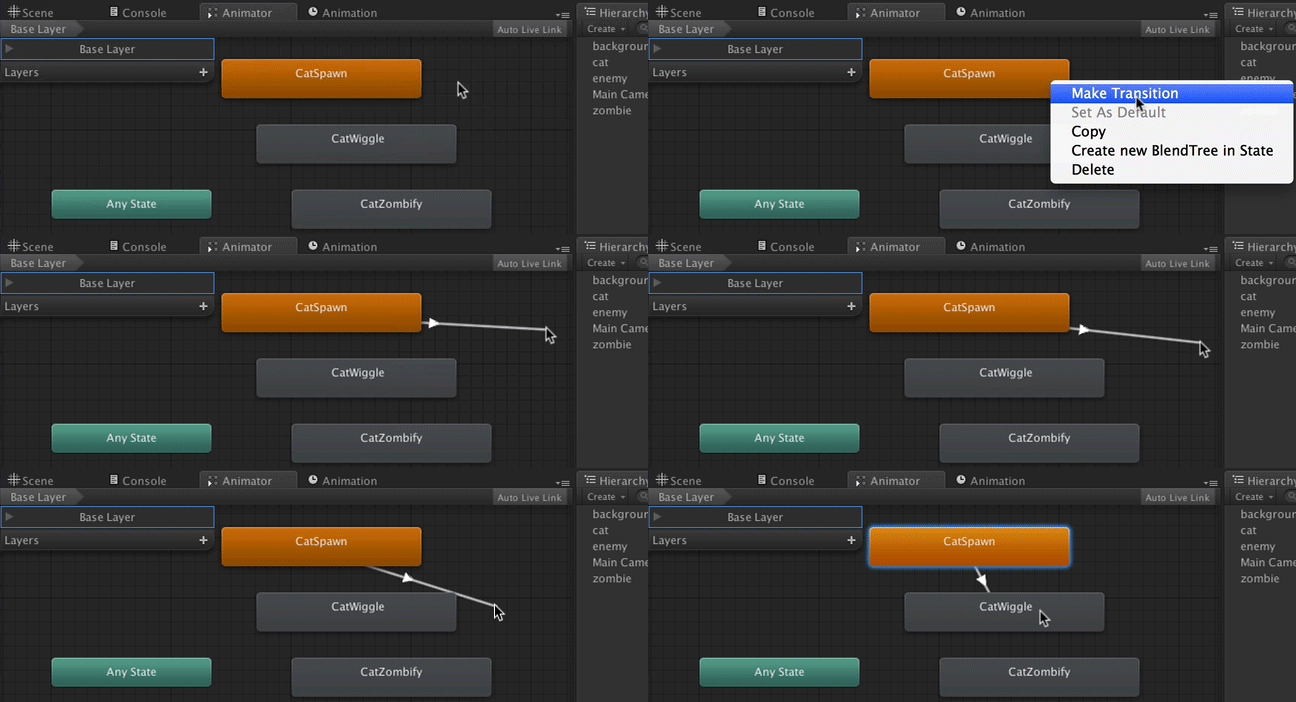
Inside the Animator window, right click on CatSpawn and choose Make Transition. Now as you move your mouse cursor within the Animator view, it remains connected to the CatSpawn state by a line with an arrow in its middle. Click CatWiggle to connect these two states with a transition, as demonstrated below:
Play your scene and you’ll see the cat pop in and start wiggling. How easy was that?
That was certainly quick to set up, and you might be happy with the results. However, sometimes you’ll want to tweak a state transition. For example, in this case, there is actually something a bit strange and unintended happening, so it’s a good time to learn about editing transitions.
Editing Transitions
With only one transition defined, the easiest way to edit it is to click directly on the transition line within the Animator view, shown in the following image:
This displays the transition’s properties in the Inspector, as shown below:
When you have multiple transitions, selecting them in the Animator view isn’t always easy. Instead, you can view a specific transition’s properties by selecting the state in the Animator view that starts the transition – in this case, CatSpawn. In the Inspector, click on the appropriate row in the Transitions list to reveal details about that transition, as shown below:
When you have multiple transitions, selecting them in the Animator view isn’t always easy. Instead, you can view a specific transition’s properties by selecting the state in the Animator view that starts the transition – in this case, CatSpawn. In the Inspector, click on the appropriate row in the Transitions list to reveal details about that transition, as shown below:
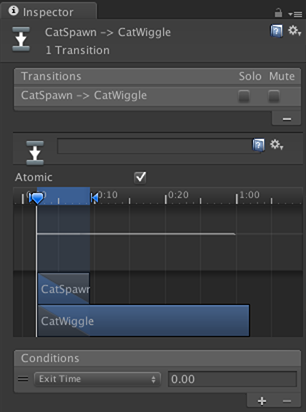
In the Inspector, Unity provides you with a visual representation of how it intends to move between the two animation clips. The following image highlights the most important elements of the transition editor:
- Start and End markers: These icons specify where the transition begins and ends. They look like >| and |<, respectively.
- A blue highlighted area clearly showing the areas of the clips involved during the transition.
- A scrubber that shows your current position when previewing transitions inside the Preview pane at the bottom of the Inspector (not shown).
- Bars showing the clips involved in the transition. If one of the clips loops, it will appear multiple times if necessary to span the transition’s duration. The blue highlighted area of the bars shows what part of and to what extent each of the two clips will affect the final animation at any point in time.
- I’m not clear as to what this actually shows. It appears to be a graph displaying how the clips influence the resulting curve value, but I’m not sure. In any case, I’ve always ignored it without any problems.
As you can see in the previous image, Unity claims it will start the transition between the two clips as soon as CatSpawn starts playing. For the duration of CatSpawn‘s animation, Unity gradually blends the amount by which each clip affects the resulting animation, starting at 100% CatSpawn and 0% CatWiggle, and moving to 100% CatWiggle and 0% CatSpawn.
Unfortunately, it seems that Unity actually triggers this transition after CatSpawn has played through one full time, and then it starts the transition at the beginning of the second run of CatSpawn. You can see it more clearly in this frame-by-frame walk through of the transition:
It seems that starting the transition at the zero percent mark of the first clip causes a problem. I don’t know if this is intended behavior or a bug in Unity, but it’s a good chance to try the transition editor.
With the transition selected, look at the Conditions list in the Inspector, shown below (you might have to scroll down a bit to see it):
This list contains the conditions that trigger this transition. By default, the only condition available is named Exit Time, which is considered true after a specified percentage of the first animation has played.
Exit Time’s value is currently 0.00, meaning it’s set to the start of the clip. You can adjust this value directly in the field next to Exit Time or you can move the Start Marker (>|) described earlier, but it’s easier to be accurate using the field directly.
Change the value for Exit Time to 0.01, as shown in the following image. Exit Time’s value is based on a zero to one scale, so 0.01 means to start the transition after playing just one percent of CatSpawn.
Play your scene again and the cat animates into view, transitioning smoothly into its wiggle animation.
Take a look at the transition in slow motion to see the difference more clearly:
With all this jumping around the cat’s doing, the zombie is sure to notice it! Of course, getting attention from zombies in real life usually leads to zombification, and in this game it’s no different. When the zombie touches them, the cats will turn into demon zombie conga cats. To indicate their undeath, you’ll turn them green.


