Reactive Streams on Kotlin: SharedFlow and StateFlow
In this tutorial, you’ll learn about reactive streams in Kotlin and build an app using two types of streams: SharedFlow and StateFlow. By Ricardo Costeira.
Sign up/Sign in
With a free Kodeco account you can download source code, track your progress, bookmark, personalise your learner profile and more!
Create accountAlready a member of Kodeco? Sign in
Sign up/Sign in
With a free Kodeco account you can download source code, track your progress, bookmark, personalise your learner profile and more!
Create accountAlready a member of Kodeco? Sign in
Contents
Reactive Streams on Kotlin: SharedFlow and StateFlow
30 mins
- Getting Started
- SharedFlow
- Handling Shared Events
- Event Emission With SharedFlow
- Replay and Buffering
- Subscribing to Event Emissions
- Collecting the SharedFlow
- Applying the Stream Data to the View
- SharedFlow and Channels
- StateFlow
- Handling App State
- Event Emission With StateFlow
- Subscribing to State Updates
- StateFlow and Channels
- Hot Flows, RxJava and LiveData
- Challenge: Using SharedFlow To Handle Screen Events
- Where to Go From Here?
Replay and Buffering
MutableSharedFlow() accepts three parameters:
public fun <T> MutableSharedFlow(
  replay: Int = 0, // 1
  extraBufferCapacity: Int = 0, // 2
  onBufferOverflow: BufferOverflow = BufferOverflow.SUSPEND // 3
): MutableSharedFlow<T>
Here’s what they’re used for:
- replay: The number of values replayed to new subscribers. It can’t be negative and it defaults to zero.
-
extraBufferCapacity: The number of values buffered. It can’t be negative and it defaults to zero. The sum of this value plus
replaycomprises the total buffer of the shared flow. -
onBufferOverflow: Action to take when buffer overflow is reached. It can have three values:
BufferOverflow.SUSPEND,BufferOverflow.DROP_OLDESTorBufferOverflow.DROP_LATEST. It defaults toBufferOverflow.SUSPEND.
Default Behavior
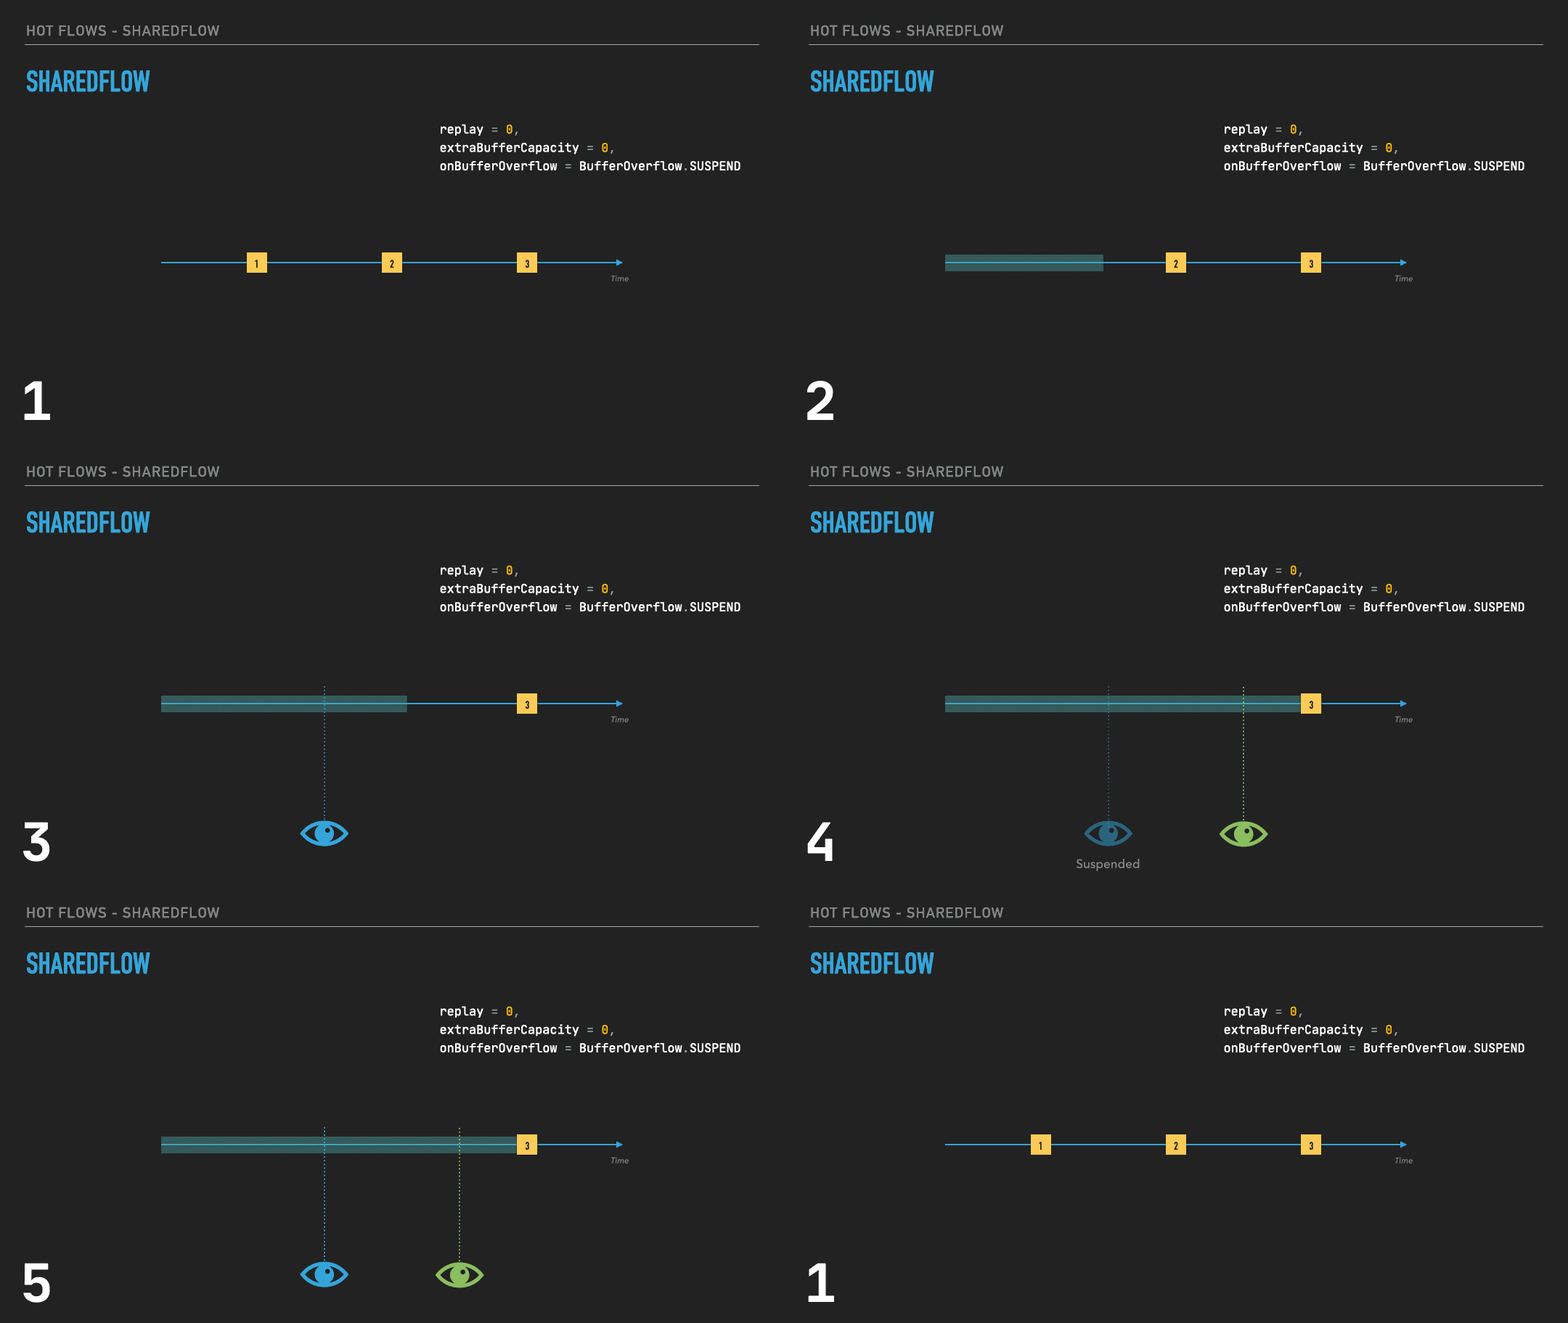
This can get quite tricky to understand, so here’s a short animation of a possible interaction with a shared flow built with the default values. Assume the shared flow uses emit(value: T).
Going step by step:
- This shared flow has three events and two subscribers. The first event is emitted when there are no subscribers yet, so it gets lost forever.
- By the time the shared flow emits the second event, it already has one subscriber, which gets said event.
- Before reaching the third event, another subscriber appears, but the first one gets suspended and remains like that until reaching the event. This means
emit()won’t be able to deliver the third event to that subscriber. When this happens, the shared flow has two options: It either buffers the event and emits it to the suspended subscriber when it resumes or it reaches buffer overflow if there’s not enough buffer left for the event. - In this case, there’s a total buffer of zero —
replay + extraBufferCapacity. In other words, buffer overflow. BecauseonBufferOverflowis set withBufferOverflow.SUSPEND, the flow will suspend until it can deliver the event to all subscribers. - When the subscriber resumes, so does the stream, delivering the event to all subscribers and carrying on its work.
onBufferOverflow = BufferOverflow.SUSPEND when the total buffer value amounts to zero. Because tryEmit(value: T) doesn’t suspend, it won’t work if you use it with the default replay and extraBufferCapacity values. In other words, the only way to emit events with tryEmit(value: T) is by having, at least, a total buffer of one.
With Replay
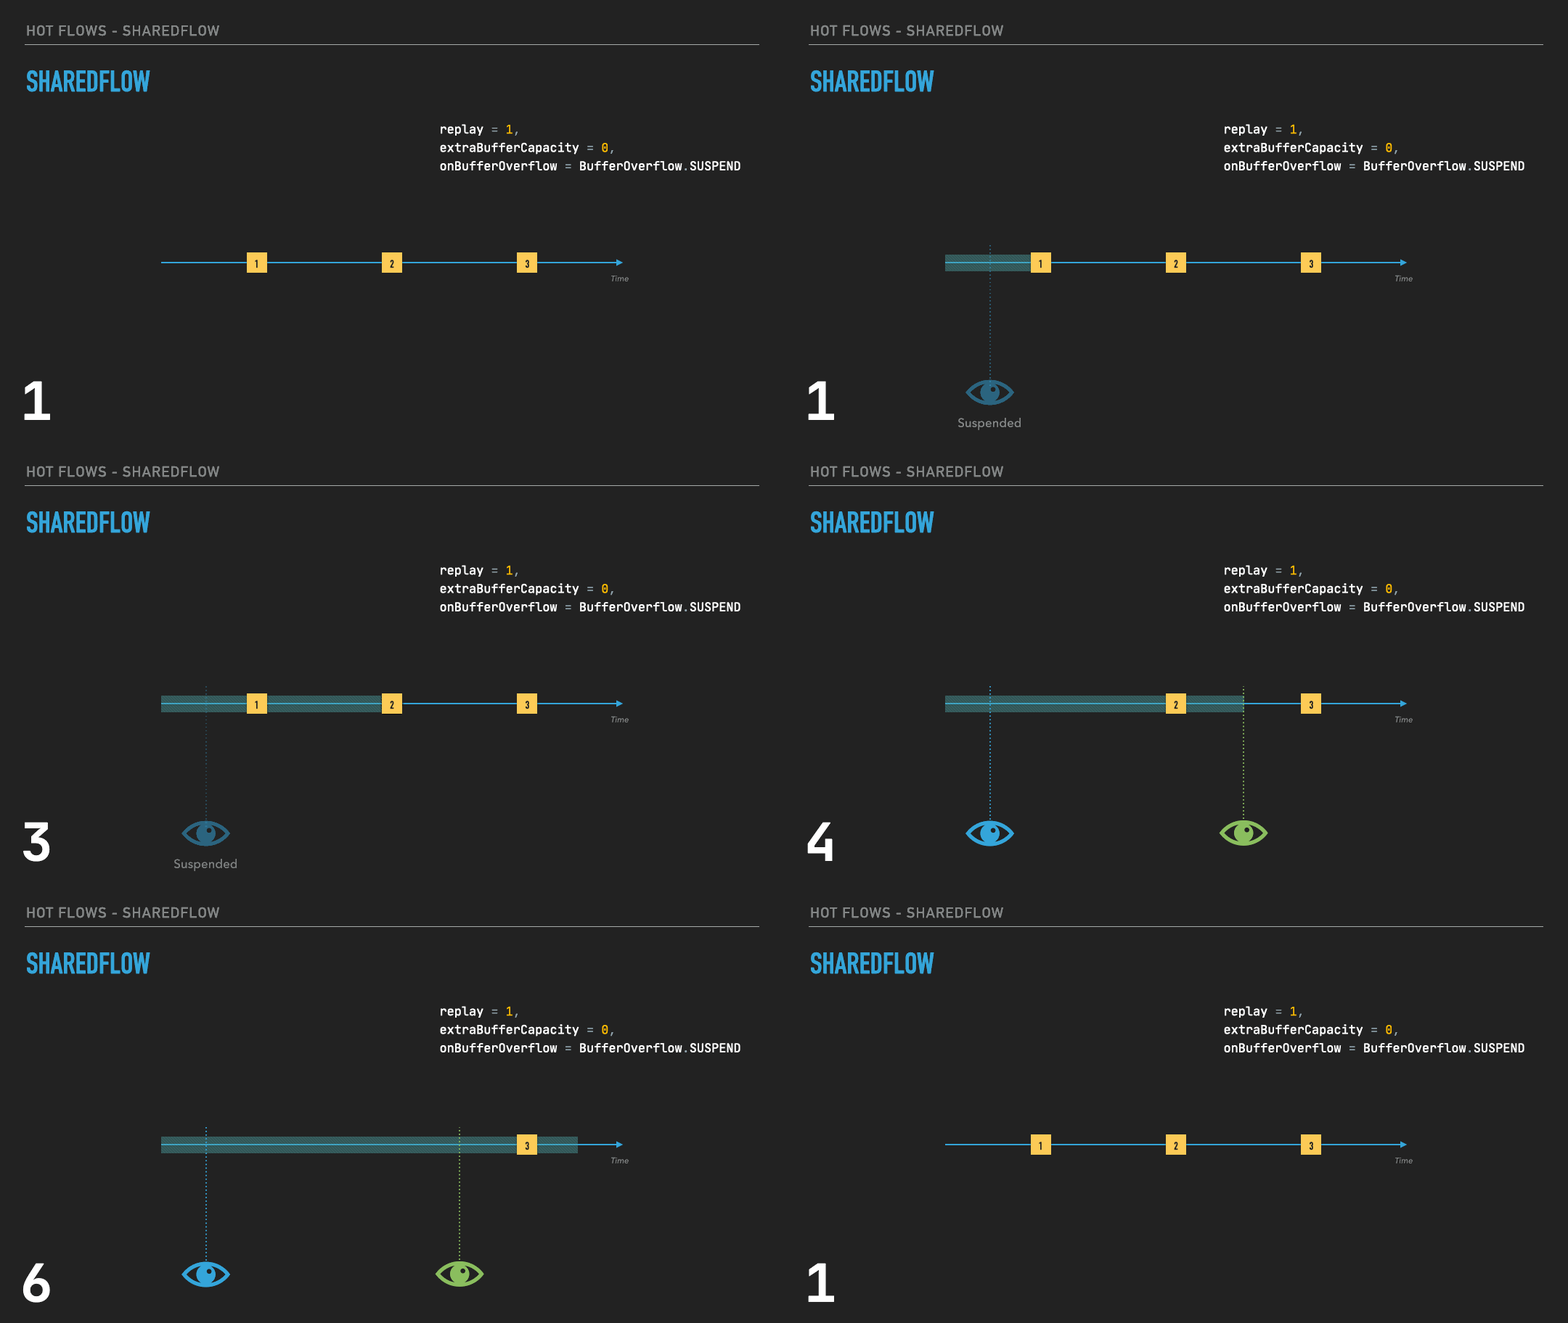
OK, that wasn’t so bad. What happens if there’s a buffer, though? Here’s an example with replay = 1:
Breaking it down:
- When the shared flow reaches the first event without any active subscribers, it doesn’t suspend anymore. With
replay = 1, there’s now a total buffer size of one. As such, the flow buffers the first event and keeps going. - When it reaches the second event, there’s no more room in the buffer, so it suspends.
- The flow remains suspended until the subscriber resumes. As soon as it does, it gets the buffered first event, along with the latest second event. The shared flow resumes, and the first event disappears forever because the second one now takes its place in the replay cache.
- Before reaching the third event, a new subscriber appears. Due to
replay, it also gets a copy of the latest event. - When the flow finally reaches the third event, both subscribers get a copy of it.
- The shared flow buffers this third event while discarding the previous one. Later, when a third subscriber shows up, it also gets a copy of the third event.
With extraBufferCapacity and onBufferOverflow
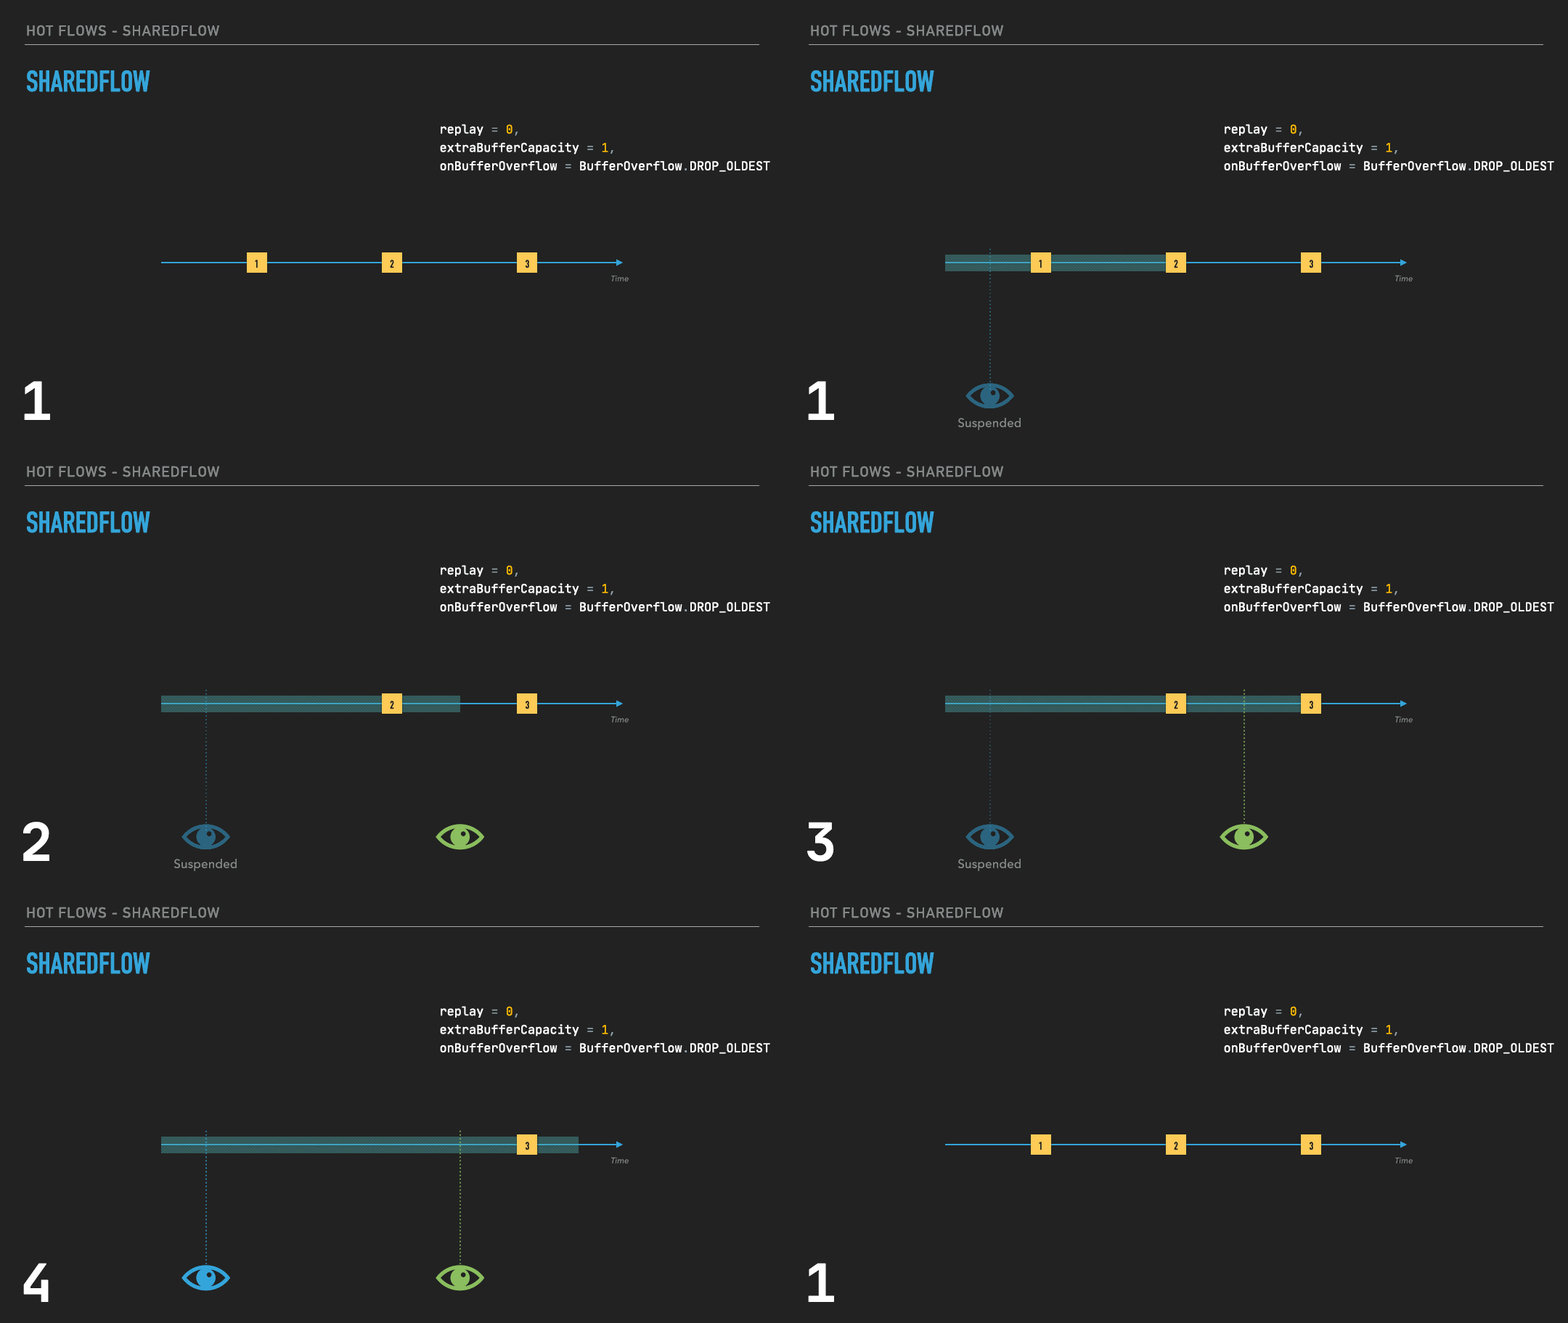
The process is similar with extraBufferCapacity, but without the replay-like behavior. This third example shows a shared flow with both extraBufferCapacity = 1 and onBufferOverflow = BufferOverflow.DROP_OLDEST:
In this example:
- The behavior is the same at first: With a suspended subscriber and a total buffer size of one, the shared flow buffers the first event.
- The different behavior starts on the second event emission. With
onBufferOverflow = BufferOverflow.DROP_OLDEST, the shared flow drops the first event, buffers the second one and carries on. Also, notice how the second subscriber does not get a copy of the buffered event: Remember, this shared flow hasextraBufferCapacity = 1, butreplay = 0. - The flow eventually reaches the third event, which the active subscriber receives. The flow then buffers this event, dropping the previous one.
- Shortly after, the suspended subscriber resumes, triggering the shared flow to emit the buffered event to it and cleaning up the buffer.
Subscribing to Event Emissions
OK, good job getting this far! You now know how to create a shared flow and customize its behavior. There’s only one thing left to do, which is to subscribe to a shared flow.
In the code, go to the coinhistory package inside presentation and open CoinHistoryFragment.kt. At the top of the class, declare and initialize the shared ViewModel:
private val sharedViewModel: CoinsSharedViewModel by activityViewModels { CoinsSharedViewModelFactory }
You want the shared flow to emit no matter which screen you’re in, so you can’t bind this ViewModel to this specific Fragment. Instead, you want it bound to the Activity so it survives when you go from one Fragment to another. That’s why the code uses the by activityViewModels delegate. As for CoinsSharedViewModelFactory, don’t worry about it: Every ViewModel factory in the app is already prepared to properly inject any dependencies.
Collecting the SharedFlow
Now that you have the shared ViewModel, you can use it. Locate subscribeToSharedViewEffects(). Subscribe to the shared flow here by adding the following code:
viewLifecycleOwner.lifecycleScope.launchWhenStarted { // 1
  sharedViewModel.sharedViewEffects.collect { // 2
    when (it) {
      // 3
      is SharedViewEffects.PriceVariation -> notifyOfPriceVariation(it.variation)
    }
  }
}
This code has a few important details:
- The coroutine is scoped to the
Viewinstead of theFragment. This ensures the coroutine is alive only while theViewis alive, even if theFragmentoutlives it. The code creates the coroutine withlaunchWhenStarted, instead of the most commonlaunch. This way, the coroutine launches only when the lifecycle is at least in theSTARTEDstate, suspends when it’s at least in theSTOPPEDstate and gets canceled when the scope is destroyed. Usinglaunchhere can lead to potential crashes, as the coroutine will keep processing events even in the background. - As you can see, subscribing to a shared flow is the same as subscribing to a regular flow. The code calls
collect()on theSharedFlowto subscribe to new events. - The subscriber reacts to the shared flow event.
Keep in mind at all times that even using launchWhenStarted, the shared flow will keep emitting events without subscribers. As such, you always need to consider the wasted resources. In this case, the event emission code is fairly harmless. But things can get heavy, especially if you turn cold flows into hot ones using something like shareIn.


