Custom Thumbnails and Previews with Quick Look on iOS
Learn how to build your own Quick Look preview and thumbnail extensions to display custom file types in iOS. By Chuck Krutsinger .
Sign up/Sign in
With a free Kodeco account you can download source code, track your progress, bookmark, personalise your learner profile and more!
Create accountAlready a member of Kodeco? Sign in
Sign up/Sign in
With a free Kodeco account you can download source code, track your progress, bookmark, personalise your learner profile and more!
Create accountAlready a member of Kodeco? Sign in
Contents
Custom Thumbnails and Previews with Quick Look on iOS
25 mins
- Getting Started
- Adding Quick Look Thumbnails
- Generating a Quick Look thumbnail
- Searching messages printed in the Console
- Defining and Exporting a Document Type
- Defining a Document Type
- Exporting a Document Type
- Quick Look Extensions
- Adding a Quick Look preview extension
- Invoking a Quick Look Preview Extension
- Adding a Thumbnail Extension
- Invoking a Thumbnail extension
- Trying Out Your Extensions Using the Files App
- Attaching the Debugger to Your Extension
- Where to Go From Here?
Adding a Thumbnail Extension
Now that RazeThumb can render a thumb file, it’s time to produce a thumbnail image from that rendering. You’ll do this by adding a thumbnail extension to your project in a way similar to how you added the last extension.
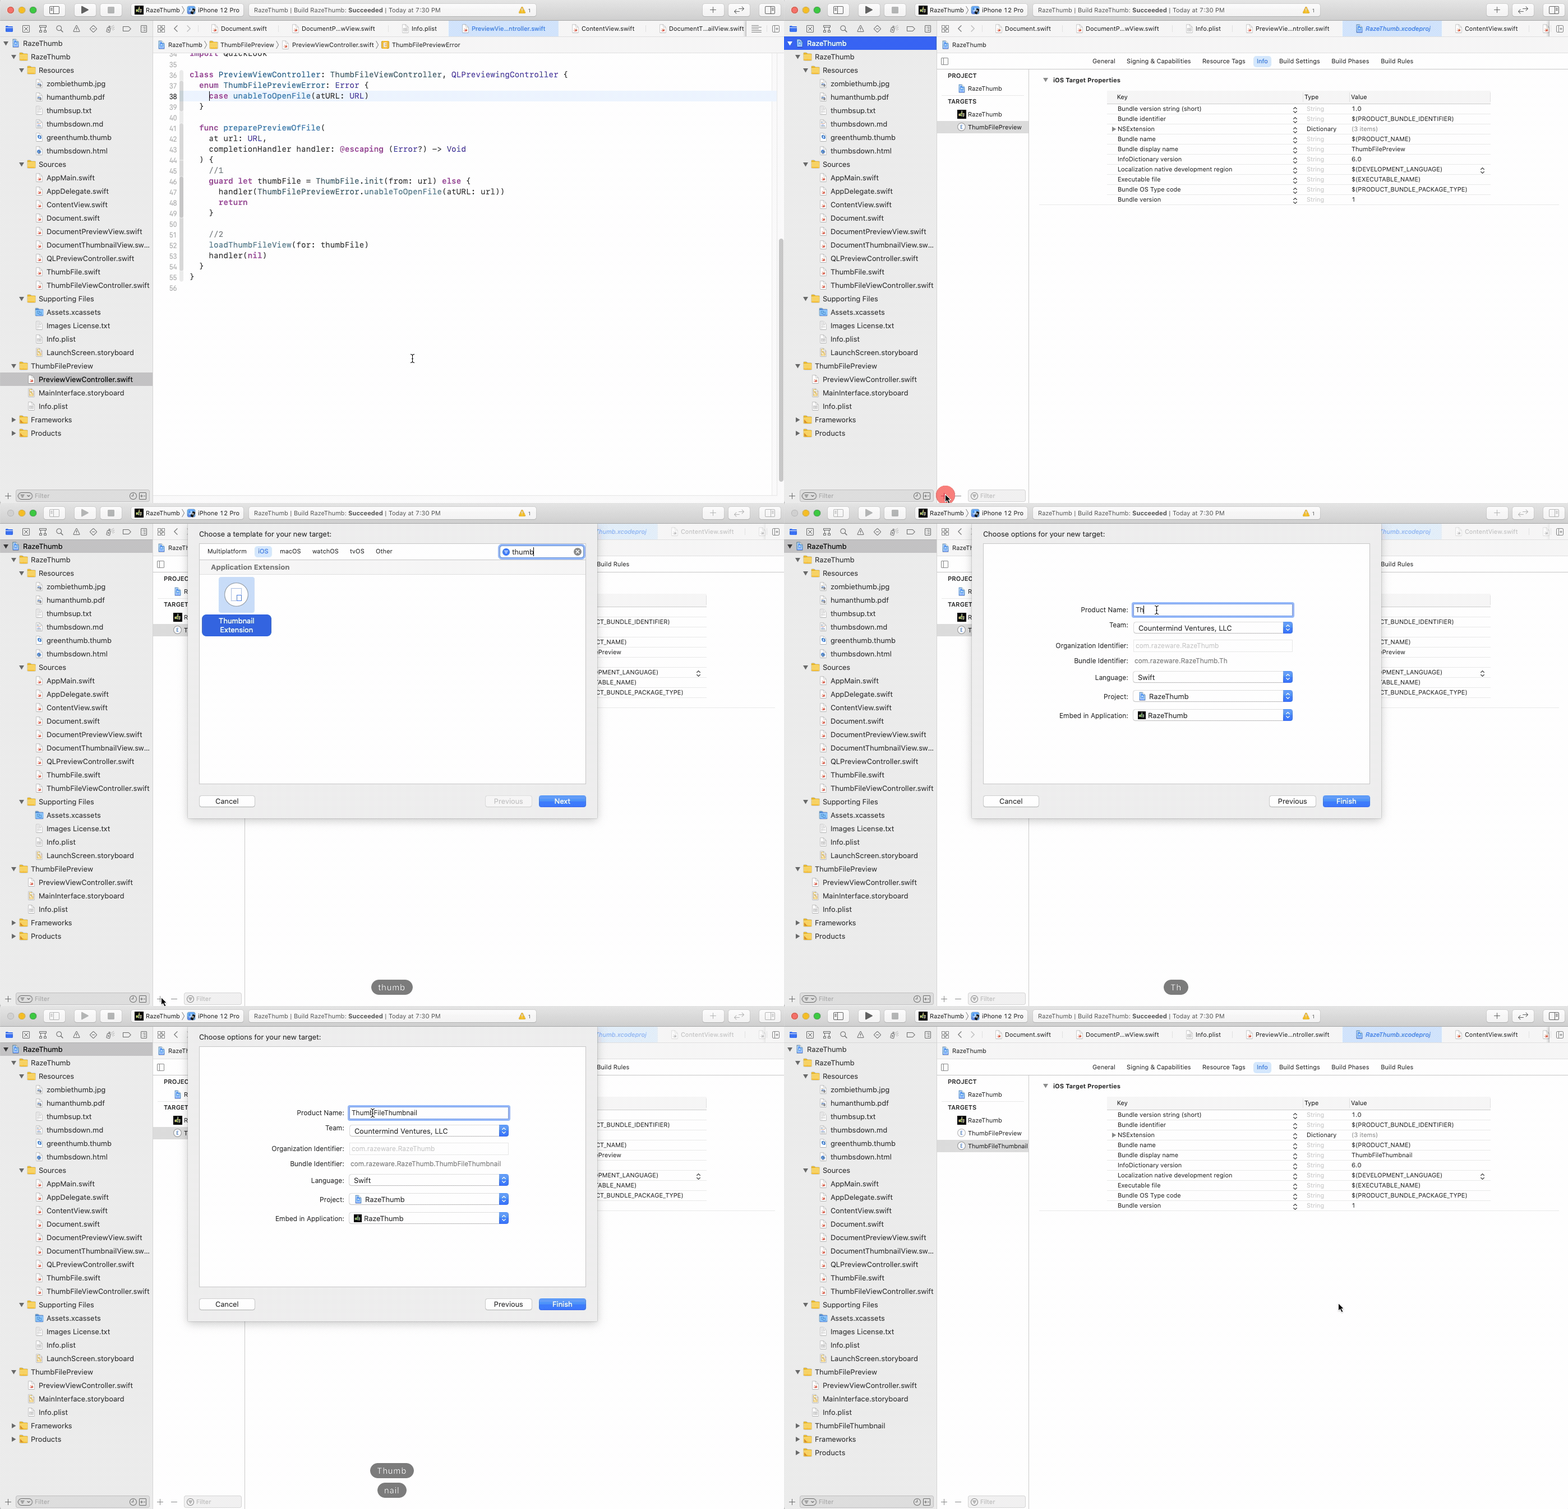
A thumbnail extension is used by the QuickLook framework to create thumbnails for custom file types and to then return them to RazeThumb, as well as any other app on the device, via QLThumbnailGenerator. To get started, follow the steps below to add the next extension:
- Select the RazeThumb project in the Project navigator.
- At the bottom of the window listing Targets, click the + icon and type Thumbnail in the Filter.
- Double-click Thumbnail Extension and give it the name ThumbFileThumbnail.
- Click Finish.
- If prompted, do not activate the new ThumbFileThumbnail scheme just yet.
Expand the new ThumbFileThumbnail group in the Project navigator. Xcode has added ThumbnailProvider.swift and Info.plist. These are the files that make up the extension.
Invoking a Thumbnail extension
In order to invoke the Thumbnail extension, you’ll need to associate this thumbnail extension with the .thumb file type like you did with the preview extension.
- Open the Info.plist file in the ThumbFileThumbnail extension folder.
- Expand the NSExtension entry and all its sub-entries by Option-clicking the disclosure triangle next to it.
- Hover the mouse over QLSupportedContentTypes and click the + that appears to add an item below it.
- Make Item 0 a String and give it a value of com.raywenderlich.rwthumbfile, which matches the document type identifier you added earlier.
- Optionally, you can also specify a minimum size in points for the thumbnail using
QLThumbnailMinimumDimension. If the thumbnail is displayed very small like a favicon in an internet browser tab, you might want to use the cached thumbnail (like the default app icon) instead of the generated thumbnail (like the markdown text) that might be too complex to discern at a small size. In this app, you won’t use the minimum dimension feature.
As with the ThumbFilePreview target, the ThumbFileThumbnail target will also make use of ThumbFile.swift and ThumbFileViewController.swift. Following the same steps from earlier, select the two swift files in the Project navigator and update their target memberships to include ThumbFileThumbnail by checking the appropriate checkbox in the File inspector.
Next, open ThumbnailProvider.swift and replace the contents of the file with the following:
import UIKit
import QuickLookThumbnailing

class ThumbnailProvider: QLThumbnailProvider {
  // 1
  enum ThumbFileThumbnailError: Error {
    case unableToOpenFile(atURL: URL)
  }

  // 2
  override func provideThumbnail(
    for request: QLFileThumbnailRequest,
    _ handler: @escaping (QLThumbnailReply?, Error?) -> Void
  ) {
    // 3
    guard let thumbFile = ThumbFile(from: request.fileURL) else {
      handler(
        nil,
        ThumbFileThumbnailError.unableToOpenFile(atURL: request.fileURL))
      return
    }

    // 4
    DispatchQueue.main.async {
      // 5
      let image = ThumbFileViewController.generateThumbnail(
        for: thumbFile,
        size: request.maximumSize)

      // 6
      let reply = QLThumbnailReply(contextSize: request.maximumSize) {
        image.draw(in: CGRect(origin: .zero, size: request.maximumSize))
        return true
      }

      // 7
      handler(reply, nil)
    }
  }
}
There are a few steps involved here:
- Define a simple error type that can describe any failures back to
QLThumbnailProvider, should it be required. - Override
provideThumbnail(for:_)so you can load theThumbFileand render its thumbnail for theQuickLookThumbnailingframework. - Attempt to load the
ThumbFileand invoke the handler with an error in the event of a failure. - The
QuickLookThumbnailingframework invokes this method on a background thread. But in order to draw user interface on the screen, you have to be in the main thread. - Using some existing code from
ThumbFileViewController, construct aUIImagerepresentation of the preview with the correct dimensions. - Using the generated thumbnail, create a
QLThumbnailReplyobject that draws the image thumbnail into the context provided. - Invoke the handler with the reply object and a
nilerror to indicate success.
ThumbFileViewController.generateThumbnail(for:size:) uses UIGraphicsImageRenderer — which requires use of the main thread — internally. In other scenarios where you might use other drawing APIs such as CoreGraphics directly, you might not need to do this.Build and run. You should now see a thumbnail for greenthumb.thumb that looks like a miniature version of the preview.
Congratulate yourself with two big thumbs up! The RazeThumb app is finished.
Trying Out Your Extensions Using the Files App
Now that you’ve created a preview extension and a thumbnail extension for .thumb files, other apps will be able to use that file type. In this section, you can show that the extension supports other apps by adding a .thumb file to the simulator and browsing to that file using the Files app.
Here are the steps to add a thumb file to the simulator:
- Delete RazeThumb from the simulator. This is because the simulator will launch RazeThumb upon receiving a thumb file, but RazeThumb doesn’t save files. You’ll reinstall the app after you copy the file onto the simulator.
- Drag greenthumb.thumb from Xcode or Finder into the simulator app. This will open the Files app to import the file. Choose to save the file On My iPhone.
- Tap Save to return to browsing.
- If the Recents tab is selected, tap Browse, followed by On My iPhone to see the file you just added.
Since you deleted RazeThumb, you won’t see a thumbnail, and if you open the file, you won’t see a preview.
In Xcode, build and run RazeThumb to reinstall it onto the simulator. Installing RazeThumb reestablishes the association between thumb files and RazeThumb. This is because RazeThumb includes the preview and thumbnail extensions for thumb files.
Open the Files app in the simulator:
Tap On My iPhone and you’ll see the rendered thumbnail for the thumb file. Tap greenthumb.thumb and the file will render its preview, just as it does when in the RazeThumb app. How cool is that?
Attaching the Debugger to Your Extension
The Quick Look preview extension and thumbnail extension processes run separately from your main app. While they install together, they’re completely isolated, which is what allows the system to efficiently use them within the Quick Look framework to produce previews and thumbnails in other apps installed on the device.
While you’re developing your extension, you may want to set a breakpoint and see what’s going on as it executes, but since the Xcode debugger can only attach to a process once, you’ll have to decide whether to attach the debugger to your app or your extension.
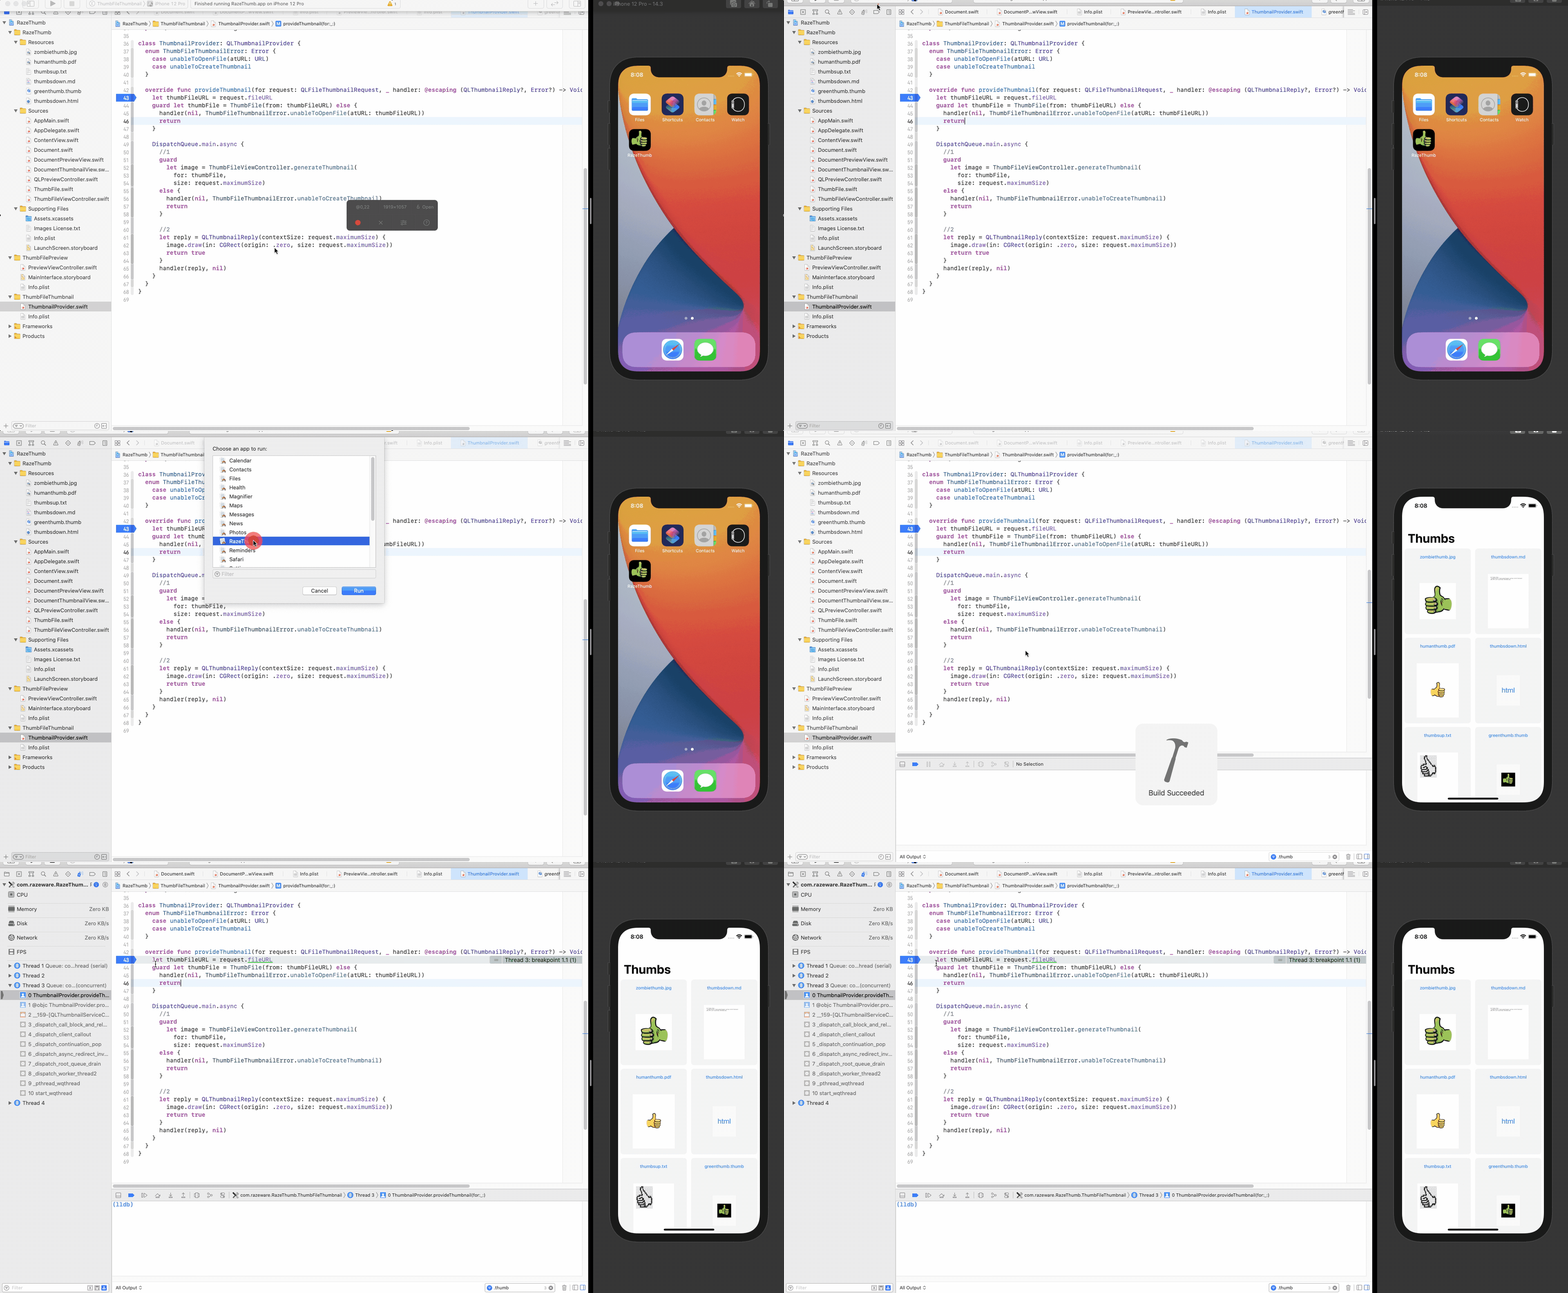
Start by setting a breakpoint in ThumbnailProvider.swift on the guard let thumbFile = ThumbFile(from: request.fileURL) statement at the beginning of provideThumbnail(for:_:).
If you build and run RazeThumb and scroll until greenthumb.thumb is visible, you’ll notice the debugger won’t stop at the breakpoint. Don’t panic. You can fix that.
Click RazeThumb in the scheme selector to see a drop-down with a list of available schemes. Choose ThumbFileThumbnail as the scheme and click Run. When prompted to choose an app to launch, select RazeThumb and scroll until greenthumb.thumb is visible. This time, the debugger should stop at the breakpoint.
For even more fun, re-run the ThumbFileThumbnail scheme instead selecting the Files app to see your code running inside other apps!


