Android RecyclerView Tutorial with Kotlin
In this Android RecyclerView tutorial, learn how to use Kotlin to display datasets of a large or unknown size! By Kevin D Moore.
Sign up/Sign in
With a free Kodeco account you can download source code, track your progress, bookmark, personalise your learner profile and more!
Create accountAlready a member of Kodeco? Sign in
Sign up/Sign in
With a free Kodeco account you can download source code, track your progress, bookmark, personalise your learner profile and more!
Create accountAlready a member of Kodeco? Sign in
Contents
Android RecyclerView Tutorial with Kotlin
30 mins
- Getting Started
- Obtaining The API Keys
- RecyclerView 101
- Why Use a RecyclerView?
- RecyclerView and Layouts
- Creating the RecyclerView
- Laying Out RecyclerView Items
- Adapters for RecyclerView
- Keeping Hold of Your Views
- Assembling The Pieces
- Hooking up the Adapter and RecyclerView
- Adding Scrolling Support
- Layout Changes
- Using ItemTouchHelper
- Where to Go From Here?
Update note: Kevin Moore updated this tutorial for Kotlin, Android 28 (Pie) and Android Studio 3.3. Darryl Bayliss wrote the original and Rod Biresch provided the original update.
Update note: Kevin Moore updated this tutorial for Kotlin, Android 28 (Pie) and Android Studio 3.3. Darryl Bayliss wrote the original and Rod Biresch provided the original update.
Recycling is good for the planet. It’s a way to make sure we’re not buried in our own rubbish or lacking resources in the future. Applying this concept to development, Android engineers realized recycling can also make an OS run efficiently. The result? Recycling enthusiasts and developers alike rejoiced at the release of the RecyclerView widget for Android Lollipop. :]
Google announced a support library to make this clean, green recycling machine backwards compatible all the way to Android Eclair (2.2), released in 2010. More celebration!
In this tutorial, you’ll experience the power of RecyclerView in action and learn:
- The purpose and components of RecyclerView
- How to change the layout of RecyclerView
- How to add animations to RecyclerView
For this tutorial, you’ll use the sample app Galacticon to build out a feed of astronomy photos from a public NASA API. Ready to blast off?
Prerequisite note: You’ll need Android Studio 3.0 or greater and a working knowledge of developing for Android with Kotlin before starting this tutorial. Review our introductory tutorials for a refresher!
Prerequisite note: You’ll need Android Studio 3.0 or greater and a working knowledge of developing for Android with Kotlin before starting this tutorial. Review our introductory tutorials for a refresher!
Getting Started
Get the starter project using the Download Materials at the top or bottom of this tutorial and open it in Android Studio. Click the Run app button at the top and you’ll see this:

It’s empty! Before adding NASA’s amazing astrophotography, you need to do some set up.
Obtaining The API Keys
To use the Astronomy Picture of the Day API, one of NASA’s most popular web services, you need an API key.
To get a key, put your name and email address into api.nasa.gov and copy the API key that appears on the screen or in your email.
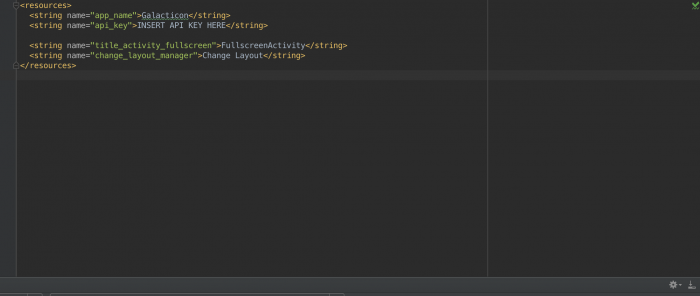
Next, copy the API key and open the strings.xml file in your project. Paste the API key into the api_key string resource, replacing INSERT API KEY HERE:

RecyclerView 101
You’re about to explore the vastness of RecyclerViews, and no competent commander heads into the unknown without preparation. Consider the next section your mission brief.
Android used to use ListView or GridView classes for displaying lists. A RecyclerView can be thought of as a combination of a ListView and a GridView. However, in a RecyclerView, there are features that separate your code into maintainable components even as they enforce memory-efficient design patterns.
How could it be better than the tried and tested ListView and GridView? The answers are in the details.
Why Use a RecyclerView?
Imagine you’re creating a ListView with complicated custom items.
You create a row layout for the items and use that layout inside your adapter. You inflate your item layout in getView(), referencing each view with the unique ID you provided in XML to customize and add view logic. You pass that to the ListView, and it’s ready to be drawn on the screen. Or is it?
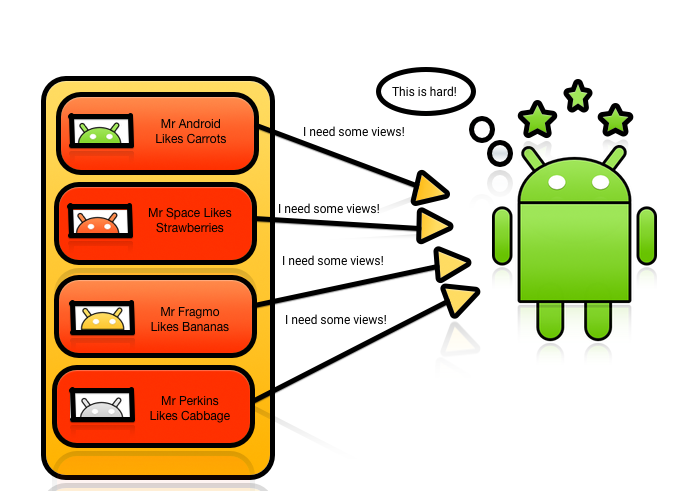
ListViews and GridViews only do half the job of achieving true memory efficiency. They recycle the item layout, but don’t keep references to the layout children, forcing you to call findViewById() for every child of your item layout every time you call getView().
All this calling around can become processor-intensive, especially for complicated layouts. Furthermore, the situation can cause your ListView scrolling to become jerky or nonresponsive as it tries to grab view references.

Android initially provided a solution to this problem on the Android Developers site with smooth scrolling via the power of the View Holder pattern.
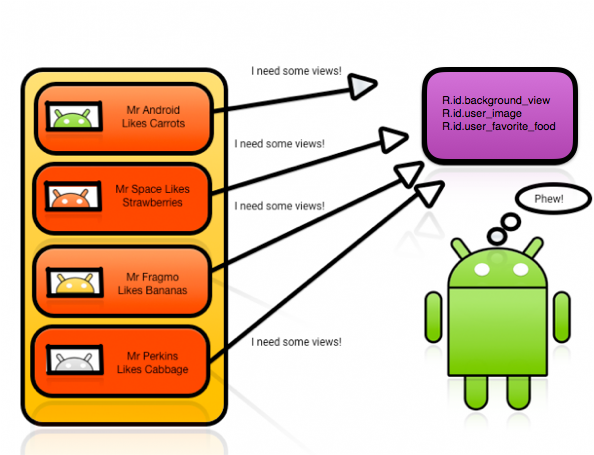
With this pattern, a class becomes an in-memory reference to all the views needed to fill your layout. You set the references once and reuse them, working around the performance hit that comes with repeatedly calling findViewById().

Take note: This is an optional pattern for a ListView or GridView. If you’re unaware of this detail, then you may wonder why your ListViews and GridViews are so slow.
RecyclerView and Layouts
The arrival of the RecyclerView changed everything. It still uses an Adapter to act as a data source; however, you have to create ViewHolders to keep references in memory.
To provide a new view, RecyclerView either creates a new ViewHolder object to inflate the layout and hold those references, or it recycles one from the existing stack.
Now you know why it’s called a RecyclerView!
Another perk of using RecyclerViews is that they come with default animations that you don’t have to create or add yourself.
Because it requires a ViewHolder, the RecyclerView knows which animation to apply to which item and adds them as required. You can also create your own animations and apply them as needed.
The last and most interesting component of a RecyclerView is its LayoutManager. This object positions the RecyclerView’s items and tells it when to recycle items that have transitioned off-screen. The ListView used to do this work alone. The RecyclerView has broken out this functionality to allow for different kinds of layouts: Vertical, horizontal, grid, staggered or your own!
Layout Managers offer three choices by default:
- LinearLayoutManager positions items to look like a standard ListView
- GridLayoutManager positions items in a grid format similar to a GridView
- StaggeredGridLayoutManager positions tems in a staggered grid format.
Create your own LayoutManagers to use with a RecyclerView if you want extra customization.
Those are the basics of RecyclerView. Now, on to the mission!
Creating the RecyclerView
To create the RecyclerView, break the work into four parts:
- Declare the RecyclerView in an activity layout and reference it in the activity Kotlin file.
- Create a custom item XML layout for RecyclerView for its items.
- Create the view holder for view items, connect the data source of the RecyclerView and handle the view logic by creating a RecyclerView Adapter.
- Attach the adapter to the RecyclerView.
Step one should be familiar. Open up the activity_main.xml layout file and add the following as a child of the LinearLayout:
<android.support.v7.widget.RecyclerView
  android:id="@+id/recyclerView"
  android:layout_width="match_parent"
  android:layout_height="match_parent"
  android:scrollbars="vertical"/>
Here, you’re setting up the layout and telling the RecyclerView to match its parent.
Note: You’re using the v7 support library for backwards compatibility with older devices. The starter project already adds the RecyclerView Support Library as a dependency in your app’s build.gradle file. If you want more information on how to do it yourself, check out the Android developer website.
Note: You’re using the v7 support library for backwards compatibility with older devices. The starter project already adds the RecyclerView Support Library as a dependency in your app’s build.gradle file. If you want more information on how to do it yourself, check out the Android developer website.
Open MainActivity.kt and declare the following property at the top of the class:
private lateinit var linearLayoutManager: LinearLayoutManager
In onCreate(), add the following lines after setContentView:
linearLayoutManager = LinearLayoutManager(this)
recyclerView.layoutManager = linearLayoutManager
Android Studio should prompt you to import kotlinx.android.synthetic.main.activity_main.* for recyclerView.
recyclerView without first finding findViewById(). As configured, the project uses the Kotlin Android Extensions plugin. This plugin allows for importing views in a layout as synthetic properties.
The recyclerView is now an extension property for Activity, and it has the same type as declared in activity_main.xml. The plugin removes a lot of boilerplate code and reduces the risk of potential bugs.
Phase one is complete! You’ve declared and allocated memory for two parts of the puzzle that RecyclerViews need to work: The RecyclerView and its Layout Manager.