SMS User Authentication With Vapor and AWS
In this SMS user authentication tutorial, you’ll learn how to use Vapor and AWS SNS to authenticate your users with their phone numbers. By Natan Rolnik.
Sign up/Sign in
With a free Kodeco account you can download source code, track your progress, bookmark, personalise your learner profile and more!
Create accountAlready a member of Kodeco? Sign in
Sign up/Sign in
With a free Kodeco account you can download source code, track your progress, bookmark, personalise your learner profile and more!
Create accountAlready a member of Kodeco? Sign in
Sign up/Sign in
With a free Kodeco account you can download source code, track your progress, bookmark, personalise your learner profile and more!
Create accountAlready a member of Kodeco? Sign in
Contents
SMS User Authentication With Vapor and AWS
25 mins
- Getting Started
- How SMS Auth Works Behind the Curtain
- Interacting With AWS SNS
- Your First API: Sending the SMS
- Your Second API: Authenticating the Received Code
- Validating the Code
- Returning the User and the Session Token
- Testing the APIs With cURL
- Registering the Routes
- Calling the First API
- Calling the Second API
- Where to Go From Here?
There are many reasons why you’d want to verify your app’s users and identify them by phone number. SMS-based authentication is one of the options for a quick login experience that doesn’t require remembering passwords.
Nowadays, there are many services that provide SMS — aka short message service — authentication on your behalf. Using one might save you some time writing backend code, but it adds another dependency to your server and all your clients.
Writing your own solution is simpler than you think. If you already have a Vapor server for your app, or if you want to build a microservice for it, then you’ve come to the right place!
In this tutorial, you’ll learn how to build your own SMS authentication with Vapor and Amazon Web Services’ SNS. SNS, or Simple Notification Service, is the AWS service for sending messages of various types: push, email and of course, SMS. It requires an AWS account and basic knowledge of Vapor and Swift.
By the end of this tutorial, you’ll have two HTTP APIs that will allow you to create a user for your app.
Getting Started
Download the materials for this tutorial using the Download Materials button at the top or bottom of this page. Navigate to the materials’ Starter directory in your favorite terminal application and run the following command:
open Package.swift
Once your project is open in Xcode, it’ll fetch all the dependencies defined in the manifest. This may take a few minutes to complete. Once that’s finished, build and run the Run scheme to make sure the starter project compiles. As a last step before you start coding, it’s always a great idea to browse through the starter project’s source code to get a sense of the layout and various pieces.
How SMS Auth Works Behind the Curtain
You’ve most likely used an app with SMS authentication before. Insert your phone number, move to another screen, enter the code received in the SMS and you’re in. Have you ever thought about how it works behind the scenes?
If you haven’t, fear not: I’ve got you covered!
- The client asks the server to send a code to a phone number.
- The server creates a four- or six-digit code and asks an SMS provider to deliver it to the phone number in question.
- The server adds an entry in the database associating the sent code with the phone number.
- The user receives the SMS and inputs it in the client.
- The client sends the code back to the server.
- The server queries the database for the phone number and tries to match the code it saved before to the code it received.
- If they match, the server looks in the database to see if a user is associated with the phone number. If it doesn’t find an existing user, it creates a new one.
- The server returns the user object, along with some sort of authentication token, to the client.
You can see the steps detailed above in this diagram:

Interacting With AWS SNS
To execute step two in the diagram above, you’ll need to create a class that asks SNS to send the text message. In the Sources ► App folder, create a new Swift file named SMSSender.swift. Make sure you’re creating this file in the App target. Next, add the following:
import Vapor
// 1
protocol SMSSender {
  // 2
  func sendSMS(
    to phoneNumber: String,
    message: String,
    on eventLoop: EventLoop) throws -> EventLoopFuture<Bool>
}
There are a few things to notice here:
- You define a protocol called
SMSSender, which creates an abstraction around sending an SMS. This means it can potentially be used to create many classes, each with its own mechanism for SMS delivery. -
sendSMS(to:message:on:)receives a destination phone number, a text message and the currentEventLoop, and it returns anEventLoopFuture<Bool>. This is a future value that indicates if sending the message succeeded or failed. You can learn more aboutEventLoopFutureand asynchronous programming in this article or Vapor’s documentation.
Next, you’ll create the class that implements this protocol. Under the Sources ► App folder, create a file named AWSSNSSender.swift and add the following code to it:
import Vapor
import SNS

class AWSSNSSender {
  // 1
  private let sns: SNS
  // 2
  private let messageAttributes: [String: SNS.MessageAttributeValue]?

  init(accessKeyID: String, secretAccessKey: String, senderId: String?) {
    // 3
    sns = SNS(accessKeyId: accessKeyID, secretAccessKey: secretAccessKey)

    // 4
    messageAttributes = senderId.map { sender in
      let senderAttribute = SNS.MessageAttributeValue(
        binaryValue: nil,
        dataType: "String",
        stringValue: sender)
      return ["AWS.SNS.SMS.SenderID": senderAttribute]
    }
  }
}
This is the class definition and initialization. Here’s an overview of what the code above does.
- This keeps a private property of the
SNSclass. This class comes from the AWSSDKSwift dependency declared in Package.swift. Notice that in the second line, you need to import theSNSmodule. - SNS allows setting specific message attributes. You’re interested in
SenderIDso that the SMS messages arrive with the sender name of your app. The class will usemessageAttributeswhenever a message is sent as part of the payload. - The initializer receives your AWS access key and the matching secret. You pass these on to the
SNSclass initializer. - The initializer may also receive an optional
senderId. Use themapmethod on the
Optionalargument to map it to themessageAttributesdictionary. IfsenderIdisnil,messageAttributeswill also benil. If it has a value,mapwill transform the string into the needed dictionary.
For security, and to allow for easier configuration, don’t hardcode your AWS keys into your app. Instead, a best practice is to use environment variables. These variables are set in the environment in which the server process runs, and they can be accessed by the app at runtime.
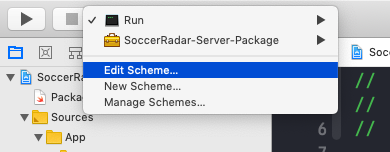
To add environment variables in Xcode, edit the Run scheme:
You can also edit the current scheme by typing Command + Shift + ,

You can also edit the current scheme by typing Command + Shift + ,
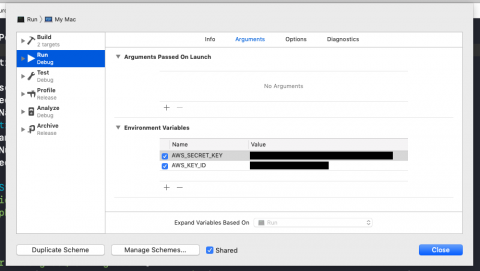
Then, select the Arguments tab. Under Environment Variables, click the + button to add a new variable.
You’ll need two variables: AWS_KEY_ID and AWS_SECRET_KEY. Add the corresponding value for each one:
Add the values of the variables in Xcode.

Add the values of the variables in Xcode.
Next, add an extension below the code you just wrote to make AWSSNSSender conform to the SMSSender protocol:
extension AWSSNSSender: SMSSender {
  func sendSMS(
    to phoneNumber: String,
    message: String,
    on eventLoop: EventLoop) throws -> EventLoopFuture<Bool> {
    // 1
    let input = SNS.PublishInput(
      message: message,
      messageAttributes: messageAttributes,
      phoneNumber: phoneNumber)

    // 2
    return sns.publish(input).hop(to: eventLoop).map { $0.messageId != nil }
  }
}
This protocol conformance is straightforward. It delegates the request to publish a message to the AWS SNS service like so:
- First, you create a
PublishInputstruct with the message, the attributes created in the initialization and the recipient’s phone number. - Next, you ask the
SNSinstance to publish the input. Because it returns anEventLoopFuture<PublishResponse>in anotherEventLoop, usehop(to:)to get back to the request’s event loop. Then map the response to a Boolean by making sure itsmessageIdexists. The existence of themessageIdmeans that the message has been saved and Amazon SNS will try to deliver it.
Finally, you still need to initialize an instance of AWSSNSSender and register it in the configuration. In Vapor 4, services can be registered to the Application instance using storage. Open SMSSender.swift and add the following code:
// 1
private struct SMSSenderKey: StorageKey {
  typealias Value = SMSSender
}

extension Application {
  // 2
  var smsSender: SMSSender? {
    get {
      storage[SMSSenderKey.self]
    }

    set {
      storage[SMSSenderKey.self] = newValue
    }
  }
}
To allow registering a service, you need to:
- Declare a type that conforms to
StorageKey. The only requirement is having atypealiasfor the type of the value you’ll store — in this case, aSMSSender. - Extending
Application, add a property forSMSSenderand implement the getter and the setter, which each use the application’sstorage.
Now it’s time to initialize and register the service. Open configure.swift and add this block of code after try app.autoMigrate().wait():
// 1
guard let accessKeyId = Environment.get("AWS_KEY_ID"),
      let secretKey = Environment.get("AWS_SECRET_KEY") else {
  throw ConfigError.missingAWSKeys
}

// 2
let snsSender = AWSSNSSender(
  accessKeyID: accessKeyId,
  secretAccessKey: secretKey,
  senderId: "SoccerRadar")
// 3
app.smsSender = snsSender
Here’s what you’re doing in the code above:
- You retrieve the AWS keys from your environment variables, throwing an error if your app can’t find them.
- You initialize
AWSSNSSenderwith those keys and the app’s name. In this case, the name is SoccerRadar. - You register the
snsSenderas the application’sSMSSender. This uses the setter you defined in theApplicationextension in the previous code block.
Once you have the sender configured, initialized and registered, it’s time to move on to actually using it.