TestFlight Essentials: Quickstart Guide for iOS Beta Testing
TestFlight Beta Testing is an Apple product that makes it easy to invite users to test your iOS, iPadOS, watchOS, and tvOS apps before you release them to the App Store. By Michael Katz.
Sign up/Sign in
With a free Kodeco account you can download source code, track your progress, bookmark, personalise your learner profile and more!
Create accountAlready a member of Kodeco? Sign in
Sign up/Sign in
With a free Kodeco account you can download source code, track your progress, bookmark, personalise your learner profile and more!
Create accountAlready a member of Kodeco? Sign in
Sign up/Sign in
With a free Kodeco account you can download source code, track your progress, bookmark, personalise your learner profile and more!
Create accountAlready a member of Kodeco? Sign in
Contents
TestFlight Essentials: Quickstart Guide for iOS Beta Testing
25 mins
- Getting Started
- Submitting Your Build to App Store Connect
- Archiving Your App
- Uploading the Archive to the App Store
- Types of Testers
- Adding Internal Testers
- Starting Beta Testing
- Adding External Testers
- Selecting a Build
- Inviting by Link
- Testers’ Point of View
- Accepting the Invitation
- Installing TestFlight
- Redeeming Your App
- Running the App
- Giving and Receiving Feedback
- Getting the Feedback
- Crash Reports
- Where to Go From Here?
This tutorial demonstrates how to seamlessly integrate TestFlight into your app release workflow. With TestFlight, you can effortlessly distribute your production-ready app to up to 10,000 testers via link sharing or email invitations, without having to collect device information. Moreover, these testers do not contribute to your development device limit.
In this tutorial, you’ll learn how to:
- Submit your build to App Store Connect.
- Add internal and external testers.
- Start beta testing.
- Receive feedback and crash reports.
You’ll also see how the process works from the testers’ point of view.
This is one of those rare tutorials where you don’t code. Follow the steps and you’ll be up and running with TestFlight in no time! :]
Getting Started
This tutorial uses an updated version of DropCharge, from 2D Apple Games by Tutorials, as the example. Because you’ll submit test builds to Apple for Beta App Review, follow along with a project of your own.
This tutorial assumes your app is set up for provisioning and has an app ID created in both the Developer Portal and on App Store Connect.
This setup is outside the scope of this tutorial, but you can get all the information you need on submitting an app and getting it published on the App Store in our two-part tutorial How to Submit An App to Apple: From No Account to App Store.
Submitting Your Build to App Store Connect
Once you get the hang of it, the TestFlight process is simple. You need to perform the following steps:
- Archive your app.
- Upload the archive to the App Store.
You’ll walk through each of these steps next.
Archiving Your App
Open your project in Xcode. In the target editor, under Signing & Capabilities, make sure you have a Bundle Identifier and that your Team and Signing Certificate are set. If you’re not using an app of your own, you will have to change the bundle ID to something unique.
Now, build and archive the app. This is a way of compiling the app and exporting it in a package that gets uploaded to the App Store.
First, choose Generic iOS Device in the Scheme chooser:
Then, create an archive using the Product ▸ Archive menu:
If everything is OK with the build, Xcode will open the Organizer with your app in the Archives tab.
Now, click Distribute App.
Next, you’ll choose your distribution method. Select App Store Connect; this is how you distribute your app both when using TestFlight and when publishing on the app store. Click Next.
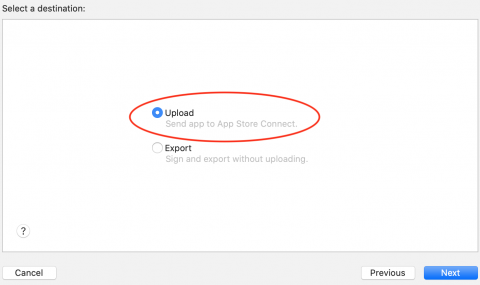
Now, select the destination. Leave Upload selected and click Next. The Export option is for saving the signed archive and uploading it later using a different tool.
Xcode will prepare to submit your app; this includes checking your App Store credentials. App Store will show a prompt with distribution options; Xcode will select all the checkboxes by default. Leave them like this and click Next.
The two options shown above are:
- Include bitcode for iOS content: This allows the App Store to recompile and optimize your code for new devices later. It’s rare you’ll need to disable this.
- Upload your app’s symbols to receive symbolicated reports from Apple: This uploads debug symbols along with the app so that you get symbolicated crash reports. This is helpful when doing TestFlight testing.
The next screen asks for distribution signing options. You have the option to either use automatic signing or manually choose your distribution certificate and provisioning profile. Letting Xcode manage your signing makes life easier most of the time. But if you’re managing the signing yourself, select the second option along with the relevant certificates. When you’re ready, click Next.
If prompted, export the signing certificate and store it in a safe place.
If prompted, export the signing certificate and store it in a safe place.
Uploading the Archive to the App Store
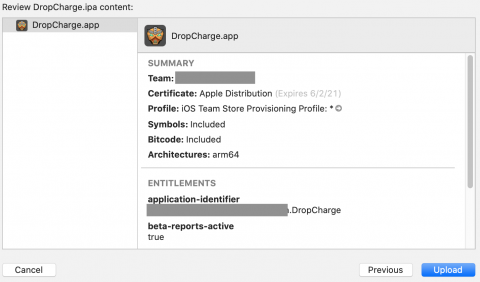
Once Xcode finishes doing some of its magic, it presents a summary page for the app you’re about to submit. Click Upload.
Your app will start uploading to App Store Connect. You’ll see various messages from Xcode as it compiles, verifies, and signs your app.
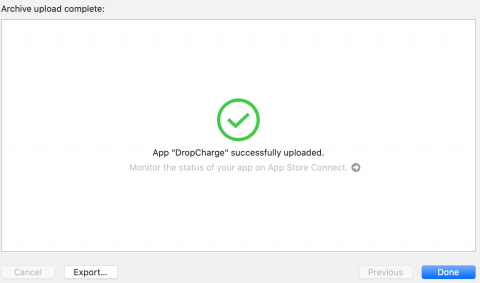
When the upload finishes, you’ll see the following message:
You can now smile and click Done. :]
That’s all the work required from Xcode. Your beta build is now available on App Store Connect, which is where you’ll do the rest of the work to set up TestFlight.
Types of Testers
Your build is now ready for testing, but who’s going to test it?
Apple defines two types of testers for TestFlight:
- Internal Tester: This is an App Store Connect user who has an Admin, App Manager, Legal, Developer or Marketer role with access to your app. This is usually a team member or a client for whom you’re developing an app. You can add up to 100 internal testers, and each member can test on up to 30 devices.
- External Tester: This is any user outside of your team who wants to test your app. External testers have no access to your App Store Connect account, and they can only download and install the app. You can add up to 10,000 external testers.
Before your external testers can test your app, you must submit your app to Apple for review, just like you would with a regular App Store submission. These reviews tend to be quicker than normal app reviews, but there’s no guarantee. Once approved, you can send your app to external testers.
As soon as App Store Connect finishes processing a build, it notifies all internal testers. External testers get a notification after Apple finishes performing a beta app review to make sure the app follows the App Store Review Guidelines. To control who gets specific builds, use different external test groups. You’ll learn more about external testers and how to submit for beta app review later; for now, you’ll focus on internal testers.


